

磁盘管理
本文将按顺序以实例演示磁盘管理的所有操作,让我们开始吧!
一,磁盘的添加
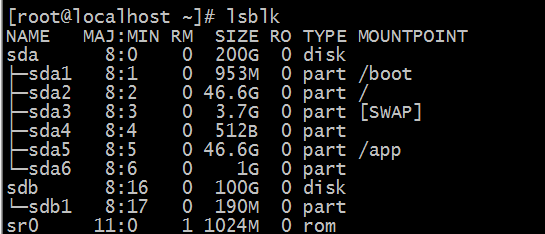
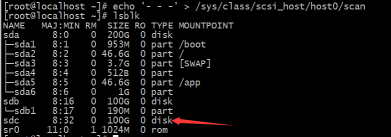
① 先来查看linux系统总共有几个磁盘,由图可知是两个,分别是sda,sdb。我们再加一个,按照磁盘命名顺序,应是sdc,他们都在/dev目录下。

补充:
1,磁盘命名规则:
不同磁盘,按照a-z依次标识,如sda,sdb,sdc
同一磁盘的不同分区,按照1,2,…的规则标识。如sda1,sda2,…
2,lsblk 列出所有可用块设备的信息(磁盘的存取单位为块,block)
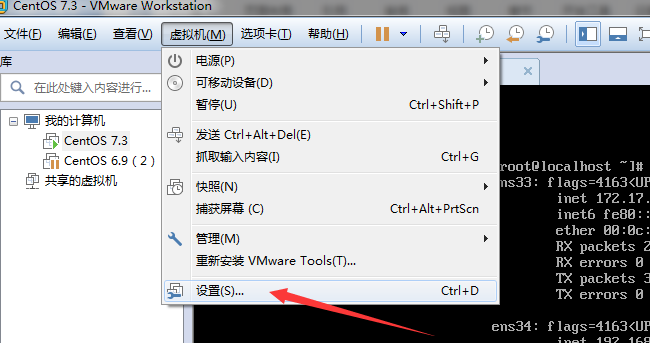
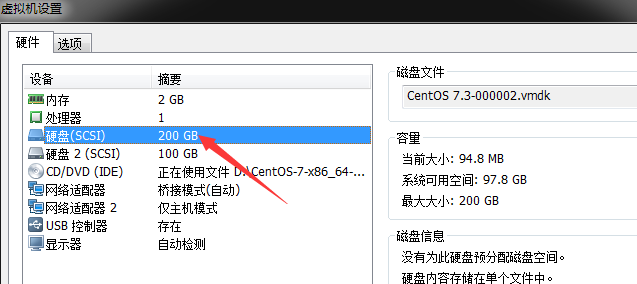
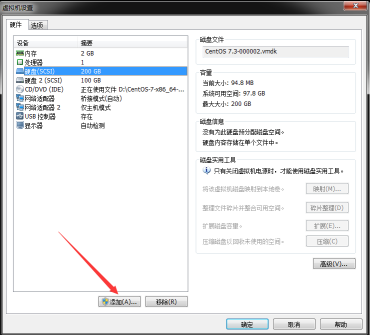
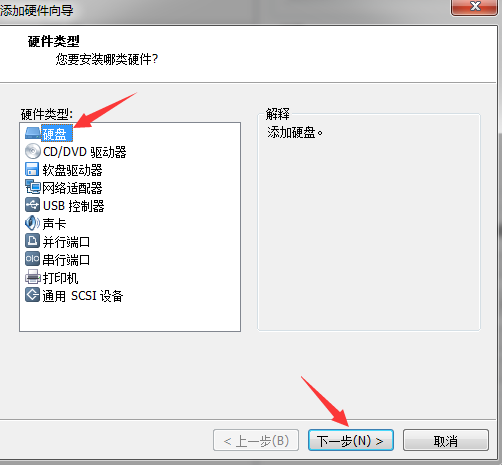
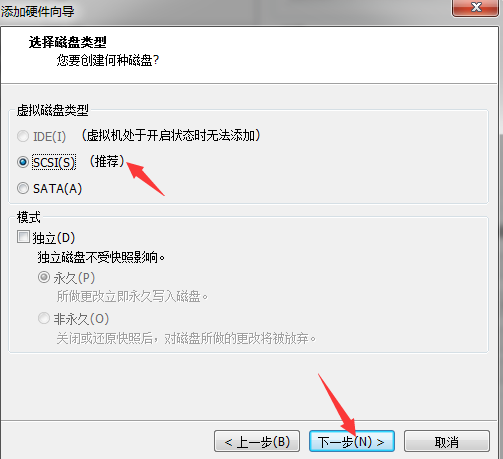
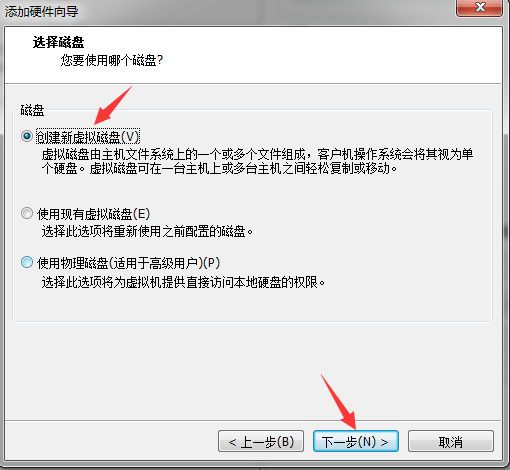
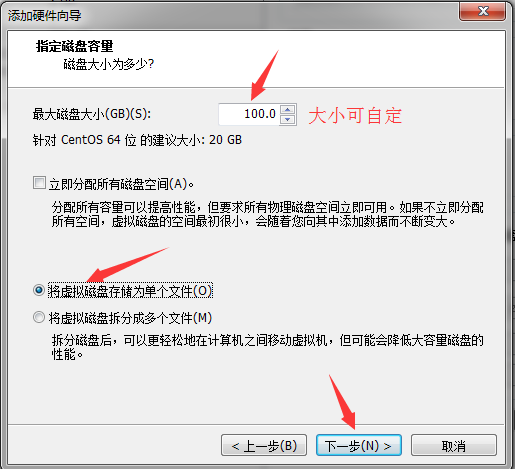
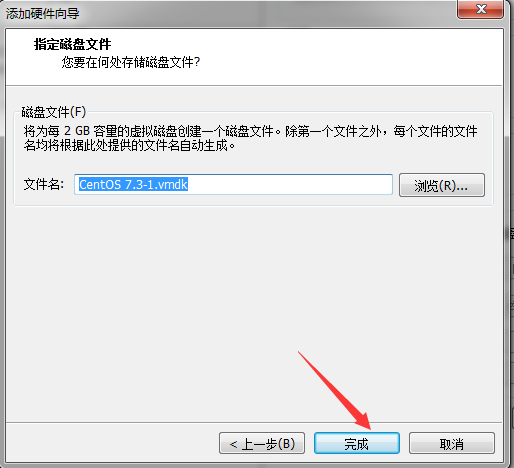
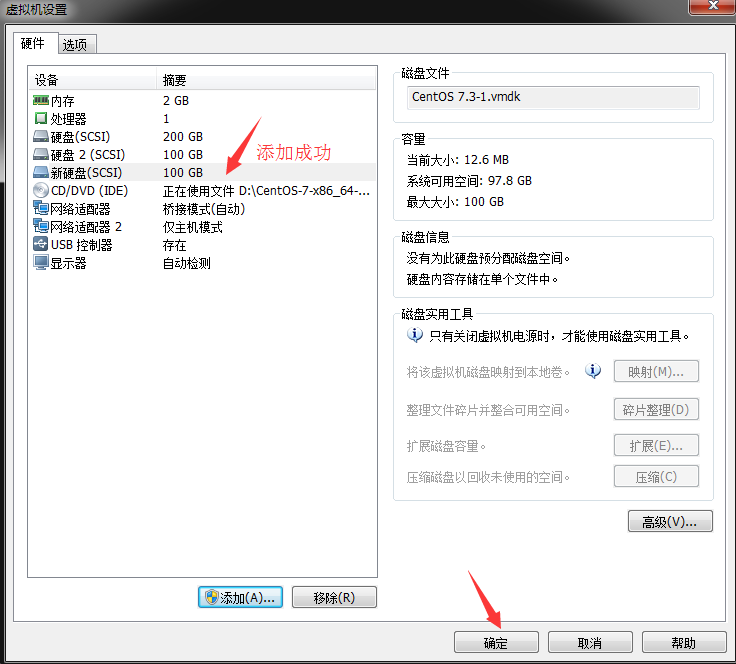
② 下面是磁盘的添加步骤
③ 此时用lsblk查看,会发现并没有发现有sdc磁盘,需要执行下面一条语句。
好了,磁盘添加成功!
二,磁盘的分区
1) 在分区之前,先了解一下MBR和GPT
MBR
主引导记录,又叫做主引导扇区,是计算机开机后访问硬盘时所必须要读取的首个扇区,它在硬盘上 的三维地址为(柱面,磁头,扇区)=(0,0,1)。它由4个部分组成:
主引导程序(偏移地址0000H–0088H),负责从活动分区中装载
出错信息数据区,偏移地址0089H–00E1H为出错信息,00E2H–01BDH全为0字节
分区表含4个分区项,偏移地址为01BEH–01FDH,每个分区表项长16个字节,共64字节分别为分区项1,分区项2,分区项3,分区4.
结束标志字,偏移地址01FEH–01FFH的两个字节值为结束标志
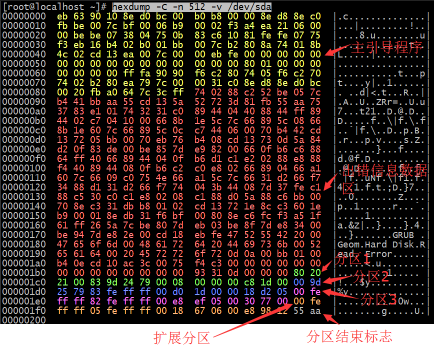
上面列出的偏移地址数是16进制,详细请看下图
GPT分区:
支持128个分区,使用64位,支持8Z(512byte/Block)和64Z(4096byte/Block), 使用128位UUID表示磁盘和分区
向后兼容MBR
底层硬件必须使用UEFI
必须使用64位操作系统
2) 创建分区使用命令:
fdisk 使用MBR分区
gdisk 使用GPT分区
parted 高级分区操作
以fdisk演示
[root@localhost ~]# fdisk /dev/sdc
Welcome to fdisk (util-linux 2.23.2).
Changes will remain in memory only, until you decide to write them.
Be careful before using the write command.
Device does not contain a recognized partition table
Building a new DOS disklabel with disk identifier 0x7d4c5be8.
Command (m for help): m #输入m获取帮助
Command action
a toggle a bootable flag
b edit bsd disklabel
c toggle the dos compatibility flag
d delete a partition
g create a new empty GPT partition table
G create an IRIX (SGI) partition table
l list known partition types
m print this menu
n add a new partition
o create a new empty DOS partition table
p print the partition table
q quit without saving changes
s create a new empty Sun disklabel
t change a partition’s system id
u change display/entry units
v verify the partition table
w write table to disk and exit
x extra functionality (experts only)
Command (m for help): n #由上面的帮助信息可知n是创建分区
Partition type:
p primary (0 primary, 0 extended, 4 free)
e extended
Select (default p): p #要先分主分区,所以输入p
Partition number (1-4, default 1): 1
First sector (2048-209715199, default 2048): #可以默认
Using default value 2048
Last sector, +sectors or +size{K,M,G} (2048-209715199, default 209715199): +1G
Partition 1 of type Linux and of size 1 GiB is set
#以下便可如以上重复,直到建到第三个分区
Command (m for help): n
Partition type:
p primary (1 primary, 0 extended, 3 free)
e extended
Select (default p): p
Partition number (2-4, default 2): 2
First sector (2099200-209715199, default 2099200):
Using default value 2099200
Last sector, +sectors or +size{K,M,G} (2099200-209715199, default 209715199): +20G
Partition 2 of type Linux and of size 20 GiB is set
Command (m for help): n
Partition type:
p primary (2 primary, 0 extended, 2 free)
e extended
Select (default p): p
Partition number (3,4, default 3):
First sector (44042240-209715199, default 44042240):
Using default value 44042240
Last sector, +sectors or +size{K,M,G} (44042240-209715199, default 209715199): +10G
Partition 3 of type Linux and of size 10 GiB is set
#4一般选择为扩展分区
Command (m for help): n
Partition type:
p primary (3 primary, 0 extended, 1 free)
e extended
Select (default e): e
Selected partition 4
First sector (65013760-209715199, default 65013760):
Using default value 65013760
Last sector, +sectors or +size{K,M,G} (65013760-209715199, default 209715199):
Using default value 209715199
Partition 4 of type Extended and of size 69 GiB is set
#下面是创建逻辑分区,
Command (m for help): n
All primary partitions are in use
Adding logical partition 5
First sector (65015808-209715199, default 65015808):
Using default value 65015808
Last sector, +sectors or +size{K,M,G} (65015808-209715199, default 209715199): +1G
Partition 5 of type Linux and of size 1 GiB is set
Command (m for help): n
All primary partitions are in use
Adding logical partition 6
First sector (67115008-209715199, default 67115008):
Using default value 67115008
Last sector, +sectors or +size{K,M,G} (67115008-209715199, default 209715199):
Using default value 209715199
Partition 6 of type Linux and of size 68 GiB is set
Command (m for help): w
The partition table has been altered!
Calling ioctl() to re-read partition table.
Syncing disks.
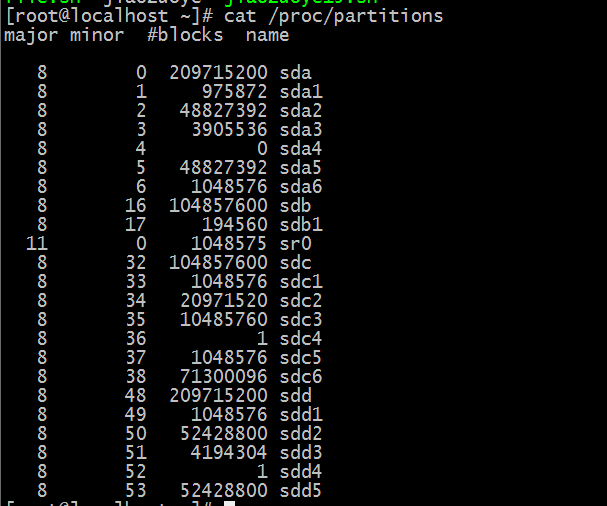
[root@localhost ~]# lsblk
NAME MAJ:MIN RM SIZE RO TYPE MOUNTPOINT
sda 8:0 0 200G 0 disk
├─sda1 8:1 0 953M 0 part /boot
├─sda2 8:2 0 46.6G 0 part /
├─sda3 8:3 0 3.7G 0 part [SWAP]
├─sda4 8:4 0 512B 0 part
├─sda5 8:5 0 46.6G 0 part /app
└─sda6 8:6 0 1G 0 part
sdb 8:16 0 100G 0 disk
└─sdb1 8:17 0 190M 0 part
sdc 8:32 0 100G 0 disk
├─sdc1 8:33 0 1G 0 part
├─sdc2 8:34 0 20G 0 part
├─sdc3 8:35 0 10G 0 part
├─sdc4 8:36 0 1K 0 part
├─sdc5 8:37 0 1G 0 part
└─sdc6 8:38 0 68G 0 part
sr0 11:0 1 1024M 0 rom
除了lsblk,可以用如下命令查看内核是否已经识别到新的分区
三,为分区写入文件系统
文件系统是操作系统用于明确存储设备或分区上的文件的方法和数据结构,即上存储设备上组织文件 的方法。操作系统中负责管理和存储文件信息的软件结构称为文件管理系统,简称文件系统。
Linux文件系统包括:ext2 , ext3 , ext4 , xfs , btrfs , reiserfs , jfs , swap …
文件系统类型:
查看系统支持的文件系统使用:ls /lib/modules/`uname -r`/kernel/fs
为分区装入文件系统:
mkfs.ext3 /dev/sdc1
mkfs.ext4 /dev/sdc2
mkfs.ext2 /dev/sdc3
mkfs.ext4 /dev/sdc5
mkfs.xfs /dev/sdc6
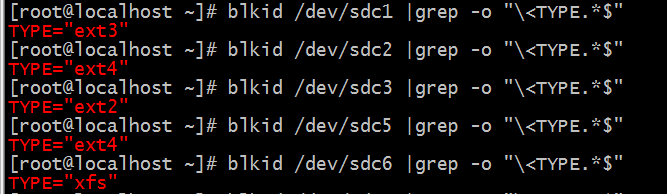
查看分区所装的文件系统:
[root@localhost ~]# blkid /dev/sdc1
/dev/sdc1: UUID=”7f0334db-9fe2-4449-a364-dbae7f092ba1″ SEC_TYPE=”ext2″ TYPE=”ext3″
我们过滤一下,只显示TYPE
为分区写入文件系统成功!
补充:
blkid 显示有关你系统里所有可用块设备的信息。
四,分区的挂载
挂载:将额外文件系统与根文件系统某现存的目录建立起关联关系,进而使得此目录 做为其它文件访问入口的行为。
卸载:为解除此关联关系的行为
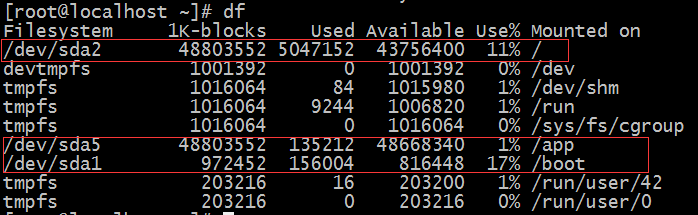
下图使用df看到挂载项一列
挂载使用mount
-a 安装在/etc/fstab文件中列出的所有文件系统
-f 伙装mount,作出检查设备和目录的样子,但并不真正挂载文件系统
-n 不把安装记录在/etc/mtab文件中。
-r 讲文件系统安装只为读
-v 详细显示安装信息
-w 将文件系统安装为可写,为命令默认情况
-t 指定设备的文件系统类型
-o 指定挂载文件系统时的选项,有些也可写在/etc/fstab中,常用的有:
defaults 使用所有选项的默认值(auto, nouser, rw, suid)
auto/noauto 允许/不允许以-a选项进行安装
dev/nodev 对/不对文件系统上的特殊设备进行解释
exec/noexec 允许/不允许执行二进制代码
suid/nosuid 确认/不确认suid和sgid位
user/nouser 允许/不允许一般用户挂载
ro 以只读方式挂载
rw 以读写方式挂载
remount 重新安装已经安装了的文件系统
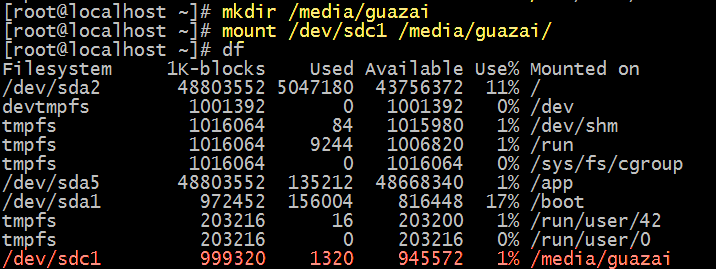
说明:df只显示挂载的分区,如sda1,sda2,若没有挂载就不会出现,如图可知,/dev/sdc1, 挂载到了/media/guazai。
原创文章,作者:xxcj,如若转载,请注明出处:http://www.178linux.com/85030
