

一、PXE介绍
PXE: Preboot Excution Environment,由Intel公司研发,可以使没有任何操作系统的主机能够基于网络完成系统的安装工作,实现服务器的自动化安装系统
二、PXE工作原理
- Client向PXE Server上的DHCP发送IP地址请求消息,DHCP检测Client是否合法(主要是检测Client的网卡MAC地址),如果合法则返回Client的IP地址,同时将启动文件pxelinux.0的位置信息一并传送给Client
- Client向PXE Server上的TFTP发送获取pxelinux.0请求消息, TFTP接收到消息之后再向Client发送pxelinux.0大小信息,试探Client是否满意,当TFTP收到Client发回的同意大小信息之后,正式向Client发送pxelinux.0
- Client执行接收到的pxelinux.0文件
- Client向TFTP Server发送针对本机的配置信息文件(在TFTP 服务的pxelinux.cfg目录下), TFTP将配置文件发回Client,继而Client根据配置文件执行后续操作
- Client向TFTP发送Linux内核请求信息, TFTP接收到消息之后将内核文件发送给Client
- Client向TFTP发送根文件请求信息, TFTP接收到消息之后返回Linux根文件系统
- Client启动Linux内核
- Client下载安装源文件,读取自动化安装脚本
三、PXE Server 的配置
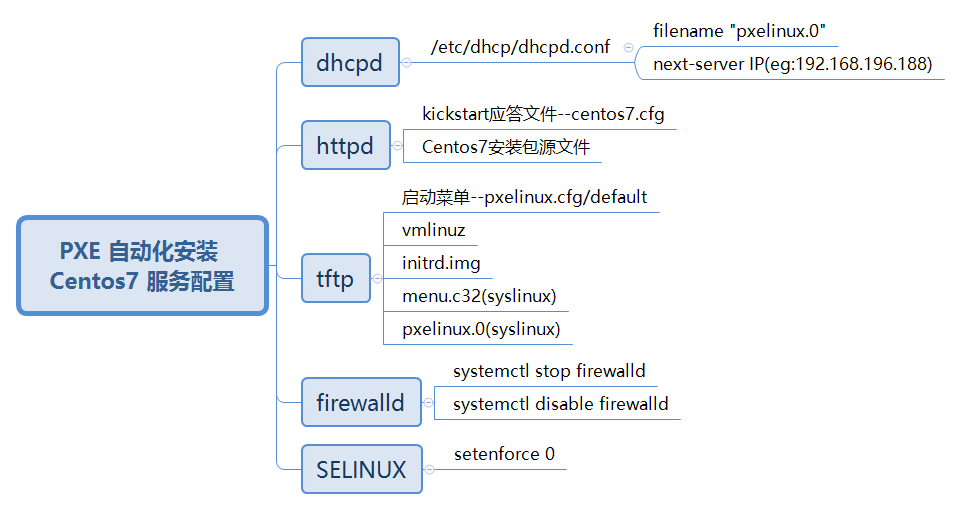

图1 PXE Server 的依赖服务
1. DHCP服务的配置
安装包:dhcp-4.2.5-47.el7.centos.x86_64
[root@centos7 ~]#cp /usr/share/doc/dhcp*/dhcpd.conf.example /etc/dhcp/dhcpd.conf  --> 使用模本配置文件
[root@centos7 ~]#vi /etc/dhcp/dhcpd.conf

subnet 192.168.196.0 netmask 255.255.255.0 {                --> 定义网段
  range 192.168.196.10 192.168.196.40;                      --> 定义分配IP范围
  option routers 192.168.196.1;                             --> 配置路由
  filename "pxelinux.0";                                    --> 启动文件名称
  next-server 192.168.196.188;                              --> dhcp服务器地址
}
[root@centos7 ~]#systemctl start dhcpd
[root@centos7 ~]#systemctl enable dhcpd
配置完成,并设置DHCP静态IP192.168.196.188。目标主机开机获取IP后,可以访问PXE Sever
2. tftp、httpd服务的配置
安装包:tftp-5.2-13.el7.x86_64 httpd-2.4.6-45.el7.centos.x86_64
[root@Centos7 ~]#yum -q -y tftp
[root@Centos7 ~]#yum -q -y httpd
[root@Centos7 ~]#systemctl start tftpd.socket httpd
[root@Centos7 ~]#systemctl enable tftp.socket
[root@Centos7 ~]#systemctl enable httpd
注意:centos6里tftp是由xinetd服务代理的,需要先安装xinetd服务,再chkconfig tftp on 命令开启tftp服务
3.关闭SElinux、防火墙
[root@Centos7 ~]#setenforce 0
[root@Centos7 ~]#vi /etc/selinux/config                      --> 修改配置文件
    SELINUX=permissive
[root@Centos7 ~]#systemctl stop firewalld
[root@Centos7 ~]#systemctl disable firewalld
4.kickstart应答文件准备
[root@centos7 ~]#mkdir /var/www/html/{centos7,ks}                       --> PXE Sever http服务会提供网络源于ks文件
[root@centos7 ~]#cp ~/anaconda-ks.cfg /var/www/html/ks/centos7-m.cfg    --> 以系统安装ks文件为范本
[root@centos7 ks]#vi centos7-m.cfg
#version=DEVEL
# System authorization information
auth --enableshadow --passalgo=sha512
url --url=http://192.168.196.188/centos7/                                --> 网络源由PXE Sever http服务提供
text                                                                     --> 文本界面安装
# Run the Setup Agent on first boot
firstboot --disable
reboot                                                                    --> 安装完成后重启
ignoredisk --only-use=sda
# Keyboard layouts
keyboard --vckeymap=us --xlayouts='us'
# System language
lang en_US.UTF-8
# Network information
network  --bootproto=dhcp --device=ens33 --onboot=on --ipv6=auto --activate  -->网卡配置
network  --hostname=centos7.ffu.com
# Root password
rootpw --iscrypted $6$8sIxlzOyC1RQ4g.X$UXgct3LHH67rVNH5StXAall/82K/5OkK6.QijHagr.DB4zw8IbnI0CYIUUAhTSDa.dfVfnZabRVZ8nFq5Cc1c1
# System services
services --disabled="chronyd"
# System timezone
timezone Asia/Shanghai --isUtc --nontp
# System bootloader configuration
bootloader --append=" crashkernel=auto" --location=mbr --boot-drive=sda
# Partition clearing information
clearpart --none --initlabel
# Disk partitioning information
part swap --fstype="swap" --ondisk=sda --size=2048
part /app --fstype="ext4" --ondisk=sda --size=50000
part / --fstype="ext4" --ondisk=sda --size=100000
part /boot --fstype="ext4" --ondisk=sda --size=1000

%packages                                                                   --> 安装包选择
@^minimal
@core
kexec-tools
%end                                                                        -->各个模块要以%end结束

%addon com_redhat_kdump --enable --reserve-mb='auto'
%end

%post                                                                       -->安装完成后运行自定义脚本
useradd ffu
echo 123456|passwd --stdin ffu rm -rf /etc/yum.repos.d/*
cat > /etc/yum.repos.d/base.repo << EOF
[base]
name=base
baseurl=https://mirrors.aliyun.com/centos/7/os/x86_64/
gpgcheck=0
EOF
%end

%anaconda
pwpolicy root --minlen=6 --minquality=50 --notstrict --nochanges --notempty
pwpolicy user --minlen=6 --minquality=50 --notstrict --nochanges --notempty
pwpolicy luks --minlen=6 --minquality=50 --notstrict --nochanges --notempty
%end

[root@centos7 ks]#chmod a+r centos7-m.cfg                                      --> 为other加读权限,以便能通过http访问
[root@centos7 ks]#ll
-rw-r--r--. 1 root root 2042 Jul 24 15:00 centos7-m.cfg
5. 安装源准备
[root@centos7 ks]# mount /dev/sr0 /var/www/html/centos7/
6. 启动菜单、内核等相关文件准备
a.相关文件准备
[root@centos7 tftpboot]#mkdir /var/lib/tftpboot/pxelinux.cfg
[root@centos7 tftpboot]#cp /var/www/html/centos7/isolinux/isolinux.cfg  pxelinux.cfg/default    -->复制安装光盘启动菜单并重命名
[root@centos7 tftpboot]#cp /usr/share/syslinux/menu.c32 /usr/share/syslinux/pxelinux.0  ./      -->复制syslinux的菜单及启动文件
[root@centos7 tftpboot]#cp /var/www/html/centos7/isolinux/vmlinuz /var/www/html/centos7/isolinux/initrd.img ./
[root@centos7 tftpboot]#tree                                                                    -->目录结构
.
├── initrd.img
├── menu.c32
├── pxelinux.0
├── pxelinux.cfg
│   └── default
└── vmlinuz
b.启动菜单定制
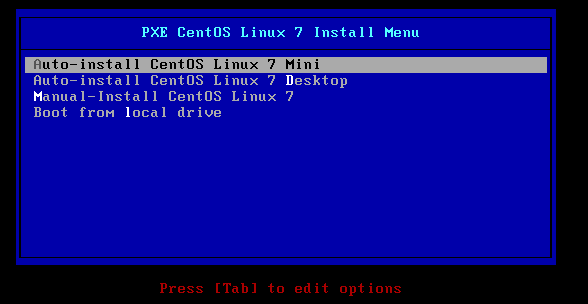
[root@centos7 tftpboot]#vi pxelinux.cfg/default
default menu.c32                                                            -->所用菜单文件
timeout 600
menu title PXE CentOS Linux 7 Install Menu

label linux-mini
  menu label ^Auto-install CentOS Linux 7 Mini
  kernel vmlinuz
  append initrd=initrd.img ks=http://192.168.196.188/ks/centos7-m.cfg      -->ks文件由PXE Sever http服务提供

label linux-desktop
  menu label Test Auto-install CentOS Linux 7 ^Desktop
  kernel vmlinuz
  append initrd=initrd.img ks=http://192.168.196.188/ks/centos7.cfg        -->可根据不同目的定制不同应答文件
label linux-manual
  menu label Test ^Manual-Install CentOS Linux 7
  kernel vmlinuz
  append initrd=initrd.img

label local
  menu label Boot from ^local drive
  menu default
  localboot 0xffff
四、主机自动化安装系统实现
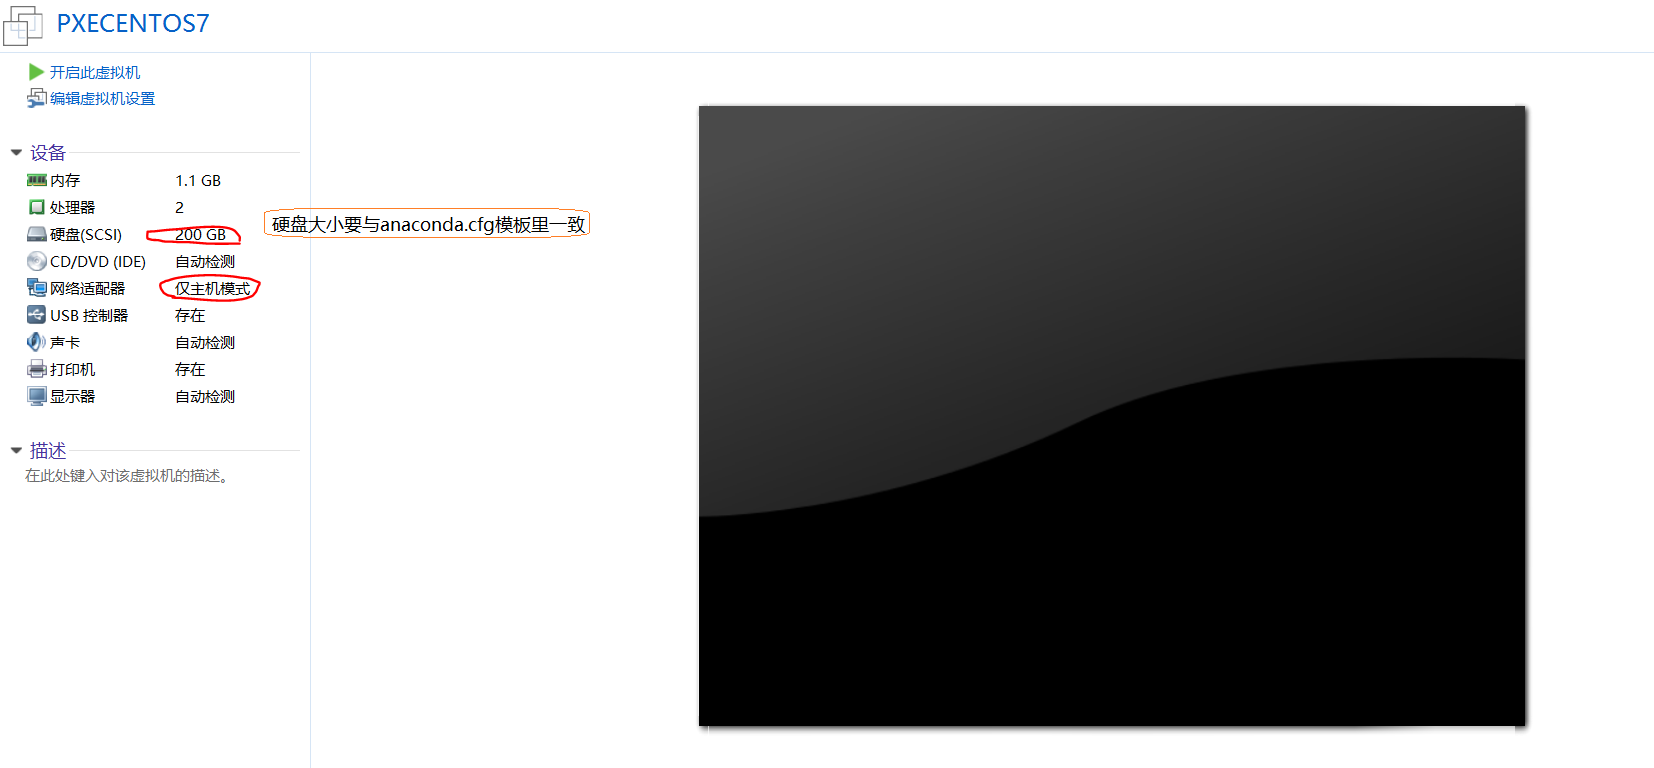
a.使用VMware实验,根据以上步骤配置PXE Server,然后新建虚拟机
b.开机进入启动菜单,选择最小化安装
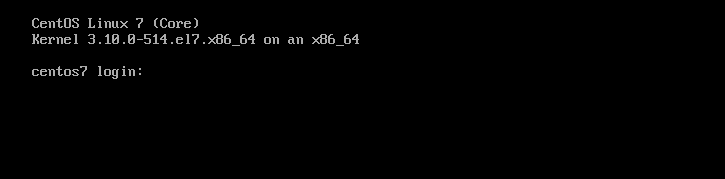
c.安装完成
原创文章,作者:ffu,如若转载,请注明出处:http://www.178linux.com/82613
