

一、复制/etc/skel目录为/home/tuser1,要求/home/tuser1及其内部文件的属组和其它用户均没有任何访问权限。
思路:先用递归操作复制文件,再用chmod改变文件及其下目录权限。
方法一:
[root@promote ~]# cp -r /etc/skel /home/tuser1 #复制文件并改名
[root@promote ~]# chmod -R 700 /home/tuser1 #改变文件权限
[root@promote ~]# ll -d /home/tuser1 #长格式查看文件权限
drwx——. 3 root root 74 5月 7 14:25 /home/tuser1
[root@promote ~]#
方法二:
[root@promote skel]# rm -rf /home/tuser1 #删除/home/tuser1文件
[root@promote ~]# cp -r /etc/skel /home/tuser1 #复制文件并改名
[root@promote ~]# chmod -Rv 700 /home/tuser1 #改变文件权限并输出文件信息
mode of “/home/tuser1” changed from 0755 (rwxr-xr-x) to 0700 (rwx——)
mode of “/home/tuser1/.mozilla” changed from 0755 (rwxr-xr-x) to 0700 (rwx——)
mode of “/home/tuser1/.mozilla/extensions” changed from 0755 (rwxr-xr-x) to 0700 (rwx——)
mode of “/home/tuser1/.mozilla/plugins” changed from 0755 (rwxr-xr-x) to 0700 (rwx——)
mode of “/home/tuser1/.bash_logout” changed from 0644 (rw-r–r–) to 0700 (rwx——)
mode of “/home/tuser1/.bash_profile” changed from 0644 (rw-r–r–) to 0700 (rwx——)
mode of “/home/tuser1/.bashrc” changed from 0644 (rw-r–r–) to 0700 (rwx——)
[root@promote ~]#
方法三:
[root@promote ~]#rm -rf /home/tuser1 #删除/home/tuser1文件
[root@promote ~]#cp -r /etc/skel /home/tuser1 #复制文件并改名
[root@promote ~]#chmod -Rv +rwx,go-rwx /home/tuser1 #改变文件权限并输出文件信息
mode of “/home/tuser1” changed from 0755 (rwxr-xr-x) to 0700 (rwx——)
mode of “/home/tuser1/.mozilla” changed from 0755 (rwxr-xr-x) to 0700 (rwx——)
mode of “/home/tuser1/.mozilla/extensions” changed from 0755 (rwxr-xr-x) to 0700 (rwx——)
mode of “/home/tuser1/.mozilla/plugins” changed from 0755 (rwxr-xr-x) to 0700 (rwx——)
mode of “/home/tuser1/.bash_logout” changed from 0644 (rw-r–r–) to 0700 (rwx——)
mode of “/home/tuser1/.bash_profile” changed from 0644 (rw-r–r–) to 0700 (rwx——)
mode of “/home/tuser1/.bashrc” changed from 0644 (rw-r–r–) to 0700 (rwx——)
[root@promote ~]#
二、编辑/etc/group文件,添加组hadoop。
方法一:[root@promote ~]# nano /etc/group
打开文件之后,在文件末行添加hadoop:x:1050: ,保存退出即可。
方法二:[root@promote ~]# echo “hadoop:x:1050:” >> /etc/group #按文件格式编辑组信息,追加重定向至/etc/group文件中
[root@promote ~]# tail -4 /etc/group #查看文件
clouds:x:2019:
nova:x:2020:openstack
mysql:x:983:
hadoop:x:1050:
[root@promote ~]#
三、手动编辑/etc/passwd文件新增一行,添加用户hadoop,其基本组ID为hadoop组的id号;其家目录为/home/hadoop。
方法一:[root@promote ~]# vim /etc/passwd #vim打开文件
在文件尾添加一行hadoop:x:1050:1050::/home/hadoop:/bin/bash
方法二:[root@promote ~]# echo “hadoop:x:1050:1050::/home/hadoop:/bin/bash” >> /etc/passwd #通过输出重定向功能添加帐户
[root@promote ~]# tail -3 /etc/passwd
nologin:x:1008:1008::/home/nologin:nologin
llxk:x:1051:1051::/home/llxk:/bin/bash
hadoop:x:1050:1050::/home/hadoop:/bin/bash
[root@promote ~]#
PS:现在只是添加了用户,没给用户创建家目录,su用户至hadoop之后,命令提示符变的不一样了,通过查看PS1值可以看出。
[root@promote ~]# echo $PS1
[\u@\h \W]\$
[root@promote ~]# su hadoop
bash-4.2$ echo $PS1
\s-\v\$
bash-4.2$ export PS1='[\u@\h \W]\$’ #通过export命令临时修改命令提示符
[hadoop@promote root]$
可以通过定义环境变量改变用户命令提示符的格式。不过这个定义只对当前shell有效。也可以通过修改用户家目录下.bash_profile文件改变命令提示符格式(但是我改了半天改不对!!!不过看了第四题,复制/etc/skel文件为/home/hadoop之后,再试就可以了。)
四、复制/etc/skel目录为/home/hadoop,要求修改hadoop目录的属组和其它用户没有任何访问权限。
[root@promote ~]# cp -r /etc/skel /home/hadoop
[root@promote ~]# chmod -Rv 700 /home/hadoop
mode of “/home/hadoop” changed from 0755 (rwxr-xr-x) to 0700 (rwx——)
mode of “/home/hadoop/.bash_logout” changed from 0644 (rw-r–r–) to 0700 (rwx——)
mode of “/home/hadoop/.bash_profile” changed from 0644 (rw-r–r–) to 0700 (rwx——)
mode of “/home/hadoop/.bashrc” changed from 0644 (rw-r–r–) to 0700 (rwx——)
[root@promote ~]#
与第一题一样,不再赘述其他方法。
五、修改/home/hadoop目录及其内部所有文件的属主为hadoop,属组为hadoop。
[root@promote ~]# chown hadoop.hadoop /home/hadoop #属主和属组之间可用:也可用.。
[root@promote ~]# stat /home/hadoop
文件:”/home/hadoop”
大小:59 块:0 IO 块:4096 目录
设备:fd02h/64770d Inode:134217875 硬链接:2
权限:(0700/drwx——) Uid:( 1050/ hadoop) Gid:( 1050/ hadoop)
环境:unconfined_u:object_r:home_root_t:s0
最近访问:2017-05-07 19:10:26.619631840 +0800
最近更改:2017-05-07 19:09:15.191227895 +0800
最近改动:2017-05-07 19:16:46.318042439 +0800
创建时间:-
[root@promote ~]#
六、显示/proc/meminfo文件中以大写或小写S开头的行;用两种方式;
方法一:利用 –i参数忽略字符大小写
[root@promote ~]# grep -i “^s” /proc/meminfo
SwapCached: 0 kB
SwapTotal: 2097148 kB
SwapFree: 2097148 kB
Shmem: 6828 kB
Slab: 63660 kB
SReclaimable: 20788 kB
SUnreclaim: 42872 kB
方法二:直接指定行首为S或s开头。
[root@promote ~]# grep “^[Ss]” /proc/meminfo
SwapCached: 0 kB
SwapTotal: 2097148 kB
SwapFree: 2097148 kB
Shmem: 6828 kB
Slab: 63660 kB
SReclaimable: 20788 kB
SUnreclaim: 42872 kB
[root@promote ~]#
方法三:利用-v选项显示不能被匹配到的行
[root@promote ~]# grep -v “^[^Ss]” /proc/meminfo
SwapCached: 0 kB
SwapTotal: 2097148 kB
SwapFree: 2097148 kB
Shmem: 6828 kB
Slab: 63660 kB
SReclaimable: 20788 kB
SUnreclaim: 42872 kB
[root@promote ~]#
七、显示/etc/passwd文件中其默认shell为非/sbin/nologin的用户;
利用grep命令中-v选项反向显示命令,查找行结尾不为nologin用户的行,再用cut命令剪切出用户名。
[root@promote ~]# cat /etc/passwd |grep -v “nologin$” |cut -d : -f1
root
sync
shutdown
halt
lxk
001
002
003
004
bash
testbash
basher
llxk
hadoop
[root@promote ~]#
八、显示/etc/passwd文件中其默认shell为/bin/bash的用户;
直接匹配结尾为/bin/bash的行,利用cut命令剪切出用户名
方式一:
[root@promote ~]# grep ‘/bin/bash$’ /etc/passwd |cut -d : -f 1
root
lxk
001
002
003
004
bash
testbash
basher
llxk
hadoop
[root@promote ~]#
方式二:[root@promote home]# grep “\/bin/bash$” /etc/passwd | cut –d : -f 1
方式三:[root@promote home]# grep -E “/bin/bash$” /etc/passwd | cut -d : -f 1
以上三种方式结果完全相同。
方式一中,grep后用单引号,强引用,直接引用引号内的内容。方式二中加双引号,/需要转义,所以前面加\,方式三中,直接用egrep更加简单。
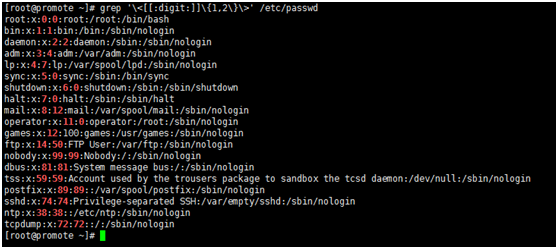
九、找出/etc/passwd文件中的一位数或两位数;
[root@promote ~]# grep ‘\<[[:digit:]]\{1,2\}\>’ /etc/passwd

十、显示/boot/grub/grub.conf中以至少一个空白字符开头的行;
[root@promote ~]# ll /boot/grub/grub.conf
ls: 无法访问/boot/grub/grub.conf: 没有那个文件或目录
[root@promote ~]#
没有这个文件,只好换个文件了。
换成/etc/virc这个文件,然后文件好多行,删除了一部分,重要的不是文件是哪个,而是命令对不对。
方式一:直接grep匹配字符查找
[root@promote home]# grep “^[[:space:]]\+” /tmp/virc
set fileencodings=ucs-bom,utf-8,latin1
” than 50 lines of registers
augroup redhat
autocmd!
” autocmd BufRead *.txt set tw=78
” When editing a file, always jump to the last cursor position
autocmd BufReadPost *
\ exe “normal! g’\”” |
\ endif
” don’t write swapfile on most commonly used directories for NFS mounts or USB sticks
” start with spec file template
[root@promote home]#
方式二:用egrep匹配字符查找
[root@promote home]# grep -E “^[[:space:]]+” /tmp/virc
set fileencodings=ucs-bom,utf-8,latin1
” than 50 lines of registers
augroup redhat
autocmd!
” autocmd BufRead *.txt set tw=78
” When editing a file, always jump to the last cursor position
autocmd BufReadPost *
\ exe “normal! g’\”” |
\ endif
” don’t write swapfile on most commonly used directories for NFS mounts or USB sticks
” start with spec file template
[root@promote home]#
十一、显示/etc/rc.d/rc.sysinit文件中以#开头,后面跟至少一个空白字符,而后又有至少一个非空白字符的行;
这个文件也没有,换/etc/rc.d/rc.local
方法一:grep直接查找
[root@promote rc.d]# grep ‘^#[[:space:]]\+[^[:space:]]’ rc.local
# THIS FILE IS ADDED FOR COMPATIBILITY PURPOSES
# It is highly advisable to create own systemd services or udev rules
# to run scripts during boot instead of using this file.
# In contrast to previous versions due to parallel execution during boot
# this script will NOT be run after all other services.
# Please note that you must run ‘chmod +x /etc/rc.d/rc.local’ to ensure
# that this script will be executed during boot.
方法二:也可用egrep去掉转义符查找
[root@promote ~]# grep -E “^#[[:space:]]+[^[:space:]]” /etc/rc.d/rc.local
# THIS FILE IS ADDED FOR COMPATIBILITY PURPOSES
# It is highly advisable to create own systemd services or udev rules
# to run scripts during boot instead of using this file.
# In contrast to previous versions due to parallel execution during boot
# this script will NOT be run after all other services.
# Please note that you must run ‘chmod +x /etc/rc.d/rc.local’ to ensure
# that this script will be executed during boot.
[root@promote ~]#
十二、打出netstat -tan命令执行结果中以‘LISTEN’,后或跟空白字符结尾的行;
方法一:用grep查找
[root@promote rc.d]# netstat -tan |grep ‘LISTEN[[:space:]]\+$’
tcp 0 0 0.0.0.0:22 0.0.0.0:* LISTEN
tcp 0 0 127.0.0.1:25 0.0.0.0:* LISTEN
tcp6 0 0 :::22 :::* LISTEN
tcp6 0 0 ::1:25 :::* LISTEN
[root@promote rc.d]#
方法二:用egrep查找
[root@promote ~]# netstat -tan | grep -E “LISTEN[[:space:]]+$”
tcp 0 0 192.168.122.1:53 0.0.0.0:* LISTEN
tcp 0 0 0.0.0.0:22 0.0.0.0:* LISTEN
tcp 0 0 127.0.0.1:631 0.0.0.0:* LISTEN
tcp 0 0 127.0.0.1:25 0.0.0.0:* LISTEN
tcp6 0 0 :::22 :::* LISTEN
tcp6 0 0 ::1:631 :::* LISTEN
tcp6 0 0 ::1:25 :::* LISTEN
[root@promote ~]#
十三、添加用户bash, testbash, basher, nologin (此一个用户的shell为/sbin/nologin),而后找出当前系统上其用户名和默认shell相同的用户的信息;
[root@promote ~]# useradd bash
[root@promote ~]# useradd testbash
[root@promote ~]# useradd basher
[root@promote ~]# useradd -s /sbin/nologin nologin
[root@promote ~]# grep ‘^\([[:alnum:]]\+\):.*\1$’ /etc/passwd
sync:x:5:0:sync:/sbin:/bin/sync
shutdown:x:6:0:shutdown:/sbin:/sbin/shutdown
halt:x:7:0:halt:/sbin:/sbin/halt
bash:x:3004:3004::/home/bash:/bin/bash
nologin:x:3007:3007::/home/nologin:/sbin/nologin
[root@promote ~]# grep ‘^\([[:alnum:]]\{1,\}\):.*\1$’ /etc/passwd
sync:x:5:0:sync:/sbin:/bin/sync
shutdown:x:6:0:shutdown:/sbin:/sbin/shutdown
halt:x:7:0:halt:/sbin:/sbin/halt
bash:x:3004:3004::/home/bash:/bin/bash
nologin:x:3007:3007::/home/nologin:/sbin/nologin
[root@promote ~]#
[root@promote ~]# grep -E ‘^([[:alnum:]]+):.*\1$’ /etc/passwd
sync:x:5:0:sync:/sbin:/bin/sync
shutdown:x:6:0:shutdown:/sbin:/sbin/shutdown
halt:x:7:0:halt:/sbin:/sbin/halt
bash:x:3004:3004::/home/bash:/bin/bash
nologin:x:3007:3007::/home/nologin:/sbin/nologin
[root@promote ~]#
吐槽一下,我在WORD排版排的挺好的,复制到这上面来完全乱了。项目编号缩进各种不能看。只好粘贴成无格式文本。
原创文章,作者:lixinkuan,如若转载,请注明出处:http://www.178linux.com/74987

评论列表(1条)
学习进度要跟上了,第四周已经算是很落后了,很多学员的都开始10周作业了。