

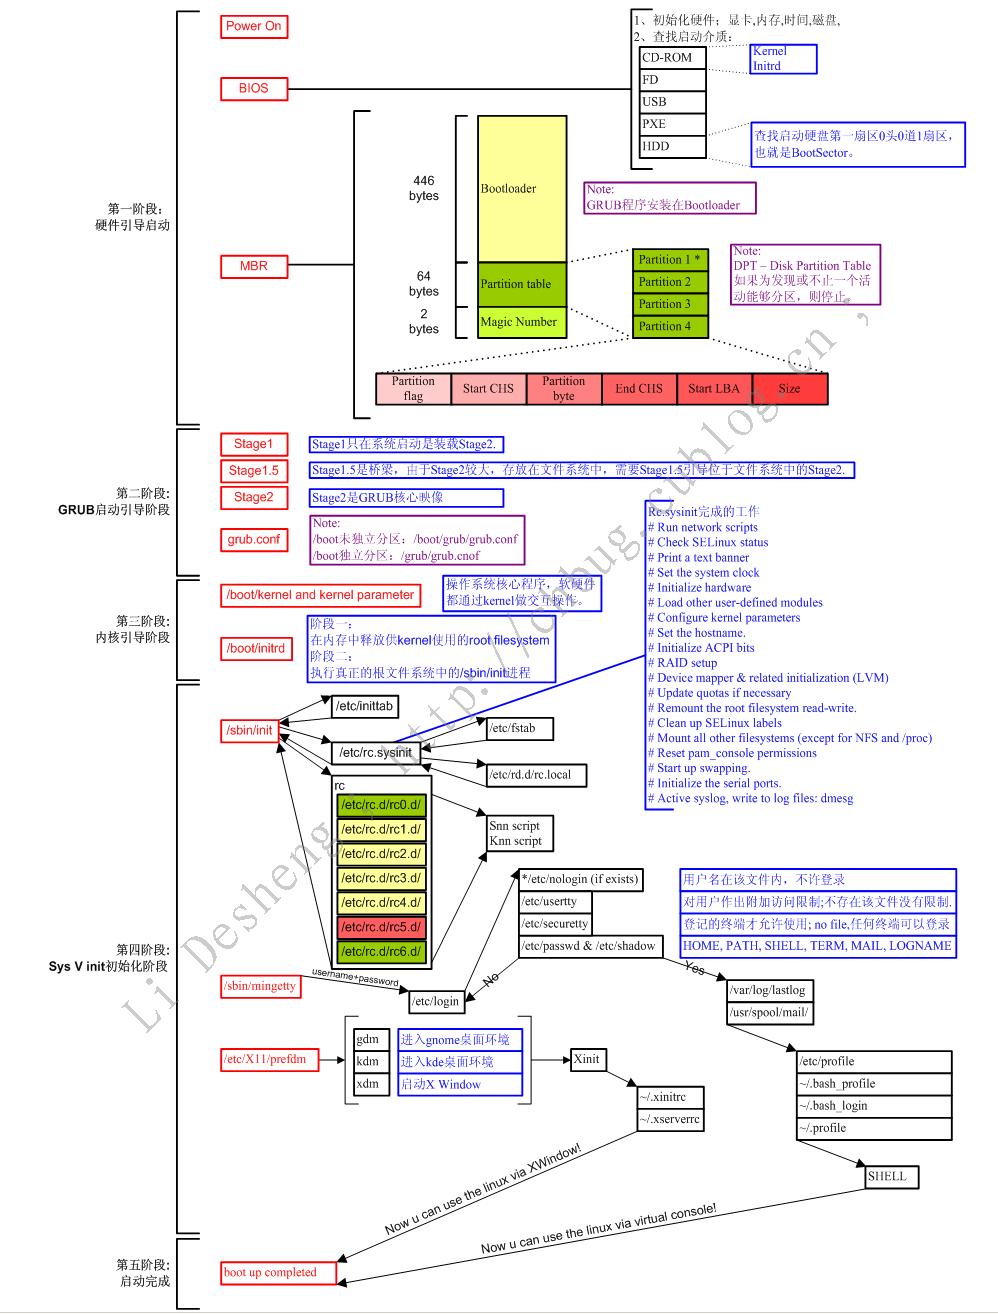
1、请详细描述CentOS系统的启动流程(详细到每个过程系统做了哪些事情)
一张图足以说明一切:

2、为运行于虚拟机上的CentOS 6添加一块新硬件,提供两个主分区;
(1) 为硬盘新建两个主分区;并为其安装grub;
(2) 为硬盘的第一个主分区提供内核和ramdisk文件;为第二个分区提供rootfs;
(3) 为rootfs提供bash、ls、cat程序及所依赖的库文件;
(4) 为grub提供配置文件;
(5) 将新的硬盘设置为第一启动项并能够正常启动目标主机;
1.创建2个主分区,sdb1,sdb2
[root@bogon ~]# fdisk -l /dev/sdb

Disk /dev/sdb: 11.8 GB, 11811160064 bytes
255 heads, 63 sectors/track, 1435 cylinders
Units = cylinders of 16065 * 512 = 8225280 bytes
Sector size (logical/physical): 512 bytes / 512 bytes
I/O size (minimum/optimal): 512 bytes / 512 bytes
Disk identifier: 0xa5b8f2f4

   Device Boot      Start         End      Blocks   Id  System
/dev/sdb1               1         654     5253223+  83  Linux
/dev/sdb2             655        1308     5253255   83  Linux
2.格式化分区,格式为ext4
[root@bogon ~]# mke2fs -t ext4 /dev/sdb{1,2}
3.挂载分区sdb1到/mnt下
[root@bogon ~]# mount /dev/sdb1  /mnt/boot
4.安装grub到sdb1上
[root@bogon ~]# grub-install  --root-directory=/mnt /dev/sdb
Probing devices to guess BIOS drives. This may take a long time.
Installation finished. No error reported.
This is the contents of the device map /mnt/boot/grub/device.map.
Check if this is correct or not. If any of the lines is incorrect,
fix it and re-run the script `grub-install'.

(fd0)   /dev/fd0
(hd0)   /dev/sda
(hd1)   /dev/sdb
5.复制内核及ramdisk文件到sdb1上
[root@bogon ~]# cp /boot/initramfs-2.6.32-431.el6.x86_64.img  /mnt/boot/initramfs.img
[root@bogon ~]# cp /boot/vmlinuz-2.6.32-431.el6.x86_64 /mnt/boot/vmlinuz
6.编辑grub.conf文件,/mnt/boot/grub/grub.conf
[root@bogon grub]# vim grub.conf
default=0
timeout=5
title CentOS6(test)
root (hd0,0)
kernel /vmlinuz ro root=/dev/sda2 selinux=0 init=/bin/bash
initrd /initramfs.img
7.卸载/mnt目录
[root@bogon /]# umount /mnt
8.挂载分区/dev/sdb2到/mnt下
[root@bogon /]# mount /dev/sdb2 /mnt/sysroot
9.创建系统必须的目录
[root@bogon mnt]# mkdir -p /mnt/sysroot{bin,dev,etc/{rc.d/init.d,sysconfig/network-scripts},lib/modules,lib64,proc,sbin,sys,tmp,usr/local/{bin,sbin},var/{lock,log,run}}
10.拷贝命令的到/mnt下
[root@bogon boot]# cp /bin/{bash,ls,cat} /mnt/bin/
10.拷贝命令的依赖文件
[root@bogon boot]# cp `ldd /bin/{bash,ls,cat}  |grep -oe "/lib.*[[:space:]]"|sort -u` /mnt/lib64/
12.测试并同步
[root@bogon boot]# chroot /mnt/sysroot
bash-4.1# ls
bin  boot  dev  etc  lib  lib64  lost+found  proc  sbin  sys  tmp  usr  var
bash-4.1# ls
bin  boot  dev  etc  lib  lib64  lost+found  proc  sbin  sys  tmp  usr  var
bash-4.1# cat bin
cat: bin: Is a directory
bash-4.1# cd bin
bash-4.1# ls
bash  cat  ls
bash-4.1# exit
exit
[root@bogon boot]# sync
13.重启后,将这块硬盘添加到新创建的虚拟机做引导盘
3、制作一个kickstart文件以及一个引导镜像。描述其过程。
可以直接手动编辑或使用工具在桌面模式下用system-config-kickstart(centos6.x)来创建ks.cfg
#命令段
firewall --disabled//禁用防火墙
install//执行新安装
cdrom//用光盘安装
lang en_US.UTF-8//默认安装语言
keyboard us//选择键盘
rootpw --iscrypted $1$gWoGuWzn$E7polUWsUlS6qPXzQryRm //管理员密码
authconfig --enableshadow --passalgo=sha512
selinux --enforcing//激活selinux
logging --level=info//信息等级
timezone --utc Asia/Shanghai//系统时区
bootloader --location=mbr --driveorder=sdb --append="crashkernel=auto rhgb quiet"
clearpart --all//删除所有现在分区
part /boot --fstype=ext4 --size=500//分区挂载
part / --fstype=ext4 --size=20480
part swap --size=4096
#脚本段
%pre//安装前脚本
echo "start install"
%end
%post//安装后脚本
echo "install end"
#程序包段
%packages
@chinese-support//中文支持
@development//开发工具
@graphical-desktop-clients//图形化工具
@remote-desktop-clients//远程桌面客户端
%end
简单引导镜像光盘制作:
1)复制系统安装光盘除Packages和repodata外的所有目录下的所有文件到一自定义目录(/centos6.5)
mount -r /dev/cdrom /mnt/
mkdir /centos6.5
cp -arf /mnt/{CentOS_BuildTag,isolinux,R*,E*,GPL,T*,images} /centos6.5/
cd /centos6.6/
2)创建引导光盘:把/centos6.5目录创建为光盘镜像boot.iso
mkisofs -R -J -T -v --no-emul-boot --boot-load-size 4 --boot-info-table -V
 "CentOS 6.5 x86_64 boot" -b isolinux/isolinux.bin -c isolinux/boot.cat
  -o /root/boot.iso /centos6.5/
简单自动安装系统光盘制作
1)复制安装系统光盘的所有目录下的所有文件和ks.cfg文件到一自制目录(/centos6.5)
cd /centos6.6/
cp -r /mnt/* .
cp /root/ks.cfg .
2)在/centos6.5/isolinux/isolinux.cfg文件中append initrd=initrd.img条目中添加ks文件读取路径 ks=cdrom:/ks.cfg
3)创建引导光盘:把centos6.5目录创建为光盘镜像centos.iso
mkisofs -R -J -T -v --no-emul-boot --boot-load-size 4 --boot-info-table
 -V "CentOS 6.5 x86_64 boot"  -b isolinux/isolinux.bin -c isolinux/boot.cat
 -o /root/boot.iso /centos6.5
图形界面制造kistart文件的补充说明:
通过system-config-kickstart图像工具制造kickstart文件
(1)必须按照桌面图形化工具
yum groupinstall "Desktop"
yum groupinstall "X Window System"
yum groupinstall "Chinese Support"
(2)按照system-config-kickstart图形工具
yum install system-config-kickstart
(3)执行system-config-kickstart命令
system-config-kickstart
(4)通过File里的Open File打开/root/目录下,按照本系统自动生成的anaconda-ks.cfg文件,根据此文件作为模板编辑,就简单多了


4、写一个脚本
(1) 能接受四个参数:start, stop, restart, status
start: 输出“starting 脚本名 finished.”
…
(2) 其它任意参数,均报错退出;
#!/bin/bash
if [ $# -eq 0 ]; then
        echo "Input arug"
        exit 1
fi
case $1 in
        start)
                echo "starting finished";;
        stop)
                echo "stoping finished";;
        restart)
                echo "restart finished";;
        *)
                exit 2
esac
5、写一个脚本,判断给定的用户是否登录了当前系统;
(1) 如果登录了,则显示用户登录,脚本终止;
(2) 每3秒钟,查看一次用户是否登录;
#!/bin/bash
#
if [ $# -eq 0 ]; then
        echo "Input argu"
        exit 1
fi

while true; do
        if `w | grep "^$1\>" &>/dev/null`; then
                echo "$1 is login"
                exit 1
        fi
        sleep 3
done
6、写一个脚本,显示用户选定要查看的信息;
cpu) display cpu info
mem) display memory info
disk) display disk info
quit) quit
非此四项选择,则提示错误,并要求用户重新选择,只到其给出正确的选择为止;
#!/bin/bash
#
while true; do
read -p "Input you argu(cpu/mem/disk/quit):" argu
case $argu in
        cpu)
                lscpu;;
        mem)
                cat /proc/meminfo;;
        disk)
                fdisk -l s[hd][a-z];;
        quit)
                exit 1;;
        *)
                echo "error"
                continue;;
esac
done
7、写一个脚本
(1) 用函数实现返回一个用户的UID和SHELL;用户名通过参数传递而来;
(2) 提示用户输入一个用户名或输入“quit”退出;
当输入的是用户名,则调用函数显示用户信息;
当用户输入quit,则退出脚本;进一步地:显示键入的用户相关信息后,再次提醒输出用户名或quit:
#!/bin/bash
cat << EOR
user) show user uid and shell
quit) quit
EOR


while true; do
read -p "Please input username or quit:"  username
  if id $username &> /dev/null; then
   uid=`cat /etc/passwd |grep "^$username\>"|cut -d: -f3`
   shell=`cat /etc/passwd |grep "$username\>"|cut -d: -f7`
   echo "userid is:" $uid
   echo "usershell is:" $shell
   continue
   elif [ $username == quit ];then
    exit 0
   else
    echo "ERROR option"
   fi
done
8、写一个脚本,完成如下功能(使用函数)
(1) 提示用户输入一个可执行命令的名字;获取此命令依赖的所有库文件;
(2) 复制命令文件至/mnt/sysroot目录下的对应的rootfs的路径上,例如,如果复制的文件原路径是/usr/bin/useradd,则复制到/mnt/sysroot/usr/bin/目录中;
(3) 复制此命令依赖的各库文件至/mnt/sysroot目录下的对应的rootfs的路径上;规则同上面命令相关的要求;
#!/bin/bash
#

cpcomd () {
read -p "input a command:" comd
dirname=`dirname $(which --skip-alias $comd)`
if [ -d /mnt/sysroot$dirname ]; then
        \cp $(which --skip-alias $comd) /mnt/sysroot$dirname
else
        mkdir -p /mnt/sysroot$dirname
        \cp $(which --skip-alias $comd) /mnt/sysroot$dirname
fi
for i in `ldd $(which --skip-alias $comd) | grep -o "/lib.*[[:space:]]"`; do
        dirname=`dirname $i`
        if [ -d /mnt/sysroot$dirname ]; then
                \cp $i /mnt/sysroot$dirname
        else
                mkdir /mnt/sysroot$dirname
                \cp $i /mnt/sysroot$dirname
        fi
done
}
cpcomd
原创文章,作者:dawning,如若转载,请注明出处:http://www.178linux.com/61601

评论列表(1条)
一张图足以说明一切 ,这个装逼我给满分!!!