

一、Linux上的文件管理类命令及其使用方法和相关演示
目录管理命令
- mkdir
在shell中执行命令 man mkdir,显示出以下内容(部分重要内容):
NAME
mkdir – make directories
SYNOPSIS
mkdir [OPTION]… DIRECTORY…
DESCRIPTION
Create the DIRECTORY(ies), if they do not already exist.
Mandatory arguments to long options are mandatory for short options
too.
-m, –mode=MODE
set file mode (as in chmod), not a=rwx – umask
-p, –parents
no error if existing, make parent directories as needed
-v, –verbose
print a message for each created directory
-Z set SELinux security context of each created directory to the
default type
–context[=CTX]
like -Z, or if CTX is specified then set the SELinux or SMACK
security context to CTX
–help display this help and exit
–version
output version information and exit
GNU coreutils online help: <http://www.gnu.org/software/coreutils/>
Report mkdir translation bugs to <http://translationproject.org/team/>
可以看出mkdir实为make diretories的简写,即为创建目录之意,下面将着重描述几个主要的参数
用法:mkdir [OPTION]… DIRECTORY…
-p: 自动按需创建父目录;
在shell终端中输入 mkdir /test/filep,显示结果如下:
[root@localhost /]# mkdir /test/filep
mkdir: cannot create directory ‘/test/filep’: No such file or directory
查其原因为不存在/test/目录,而-p这个参数则可以解决这个问题,直接创建相关父目录,显示结果如下:
[root@localhost /]# mkdir -p /test/filep
[root@localhost /]# ls
12-07-20 bin etc lib64 opt root srv tmp var
12-07-26 boot home media practise run sys tools
12-07-27 dev lib mnt proc sbin test usr
[root@localhost /]# cd /test/
[root@localhost test]# ls
filep
-v: verbose,显示详细过程;
在创建目录过程中到底发生了什么,则可以使用-v参数,示例如下:
[root@localhost /]# mkdir -pv /test/filev
mkdir: created directory ‘/test’
mkdir: created directory ‘/test/filev’
-m MODE:直接给定权限;
该功能为文件、目录授权,尚未涉猎,暂不说明
- rmdir
在shell中执行命令 man rmdir,显示出以下内容(部分重要内容):
NAME
rmdir – remove empty directories
SYNOPSIS
rmdir [OPTION]… DIRECTORY…
DESCRIPTION
Remove the DIRECTORY(ies), if they are empty.
–ignore-fail-on-non-empty
ignore each failure that is solely because a directory
is non-empty
-p, –parents
remove DIRECTORY and its ancestors; e.g., ‘rmdir -p a/b/c’ is
similar to ‘rmdir a/b/c a/b a’
-v, –verbose
output a diagnostic for every directory processed
–help display this help and exit
–version
output version information and exit
GNU coreutils online help: <http://www.gnu.org/software/coreutils/>
Report rmdir translation bugs to <http://translationproject.org/team/>
可以看出rmdir实为remove move diretories的简写,即为移除空目录之意,下面将着重描述几个主要的参数:
rmdir [OPTION]… DIRECTORY…
-p:删除某目录后,如果其父目录为空,则一并删除之;
-v: 显示过程;
可以发现,这两个参数实际上与mkdir的参数意义基本相同,我则以一个命令展示:
[root@localhost /]# rmdir -pv /test/filev/
rmdir: removing directory, ‘/test/filev/’
rmdir: removing directory, ‘/test’
rmdir: removing directory, ‘/’
rmdir: failed to remove directory ‘/’: Device or resource busy
由于我在命令中加入了根目录,根目录正在使用,最终根目录移除失败,所以输入命令的时候一定要多加小心!!!!!!
文件管理命令
- cp
在shell中执行命令 man cp,显示出以下内容(部分重要内容):
NAME
cp – copy files and directories
SYNOPSIS
cp [OPTION]… [-T] SOURCE DEST
cp [OPTION]… SOURCE… DIRECTORY
cp [OPTION]… -t DIRECTORY SOURCE…
DESCRIPTION
Copy SOURCE to DEST, or multiple SOURCE(s) to DIRECTORY.
Mandatory arguments to long options are mandatory for short options
too.
-a, –archive
same as -dR –preserve=all
–attributes-only
don’t copy the file data, just the attributes
–backup[=CONTROL]
make a backup of each existing destination file
-b like –backup but does not accept an argument
–copy-contents
copy contents of special files when recursive
-d same as –no-dereference –preserve=links
-f, –force
if an existing destination file cannot be opened, remove it and
try again (this option is ignored when the -n option is also
used)
-i, –interactive
prompt before overwrite (overrides a previous -n option)
-H follow command-line symbolic links in SOURCE
-l, –link
hard link files instead of copying
-L, –dereference
always follow symbolic links in SOURCE
-n, –no-clobber
do not overwrite an existing file (overrides a previous -i
option)
-P, –no-dereference
never follow symbolic links in SOURCE
-p same as –preserve=mode,ownership,timestamps
–preserve[=ATTR_LIST]
preserve the specified attributes (default: mode,ownership,time‐
stamps), if possible additional attributes: context, links,
xattr, all
-c deprecated, same as –preserve=context
–no-preserve=ATTR_LIST
don’t preserve the specified attributes
–parents
use full source file name under DIRECTORY
-R, -r, –recursive
copy directories recursively
–reflink[=WHEN]
control clone/CoW copies. See below
–remove-destination
remove each existing destination file before attempting to open
it (contrast with –force)
–sparse=WHEN
control creation of sparse files. See below
–strip-trailing-slashes
remove any trailing slashes from each SOURCE argument
-s, –symbolic-link
make symbolic links instead of copying
-S, –suffix=SUFFIX
override the usual backup suffix
-t, –target-directory=DIRECTORY
copy all SOURCE arguments into DIRECTORY
-T, –no-target-directory
treat DEST as a normal file
-u, –update
copy only when the SOURCE file is newer than the destination
file or when the destination file is missing
-v, –verbose
explain what is being done
-x, –one-file-system
stay on this file system
-Z set SELinux security context of destination file to default type
–context[=CTX]
like -Z, or if CTX is specified then set the SELinux or SMACK
security context to CTX
–help display this help and exit
–version
output version information and exit
By default, sparse SOURCE files are detected by a crude heuristic and
the corresponding DEST file is made sparse as well. That is the behav‐
ior selected by –sparse=auto. Specify –sparse=always to create a
sparse DEST file whenever the SOURCE file contains a long enough
sequence of zero bytes. Use –sparse=never to inhibit creation of
sparse files.
When –reflink[=always] is specified, perform a lightweight copy, where
the data blocks are copied only when modified. If this is not possible
the copy fails, or if –reflink=auto is specified, fall back to a stan‐
dard copy.
The backup suffix is ‘~’, unless set with –suffix or SIM‐
PLE_BACKUP_SUFFIX. The version control method may be selected via the
–backup option or through the VERSION_CONTROL environment variable.
Here are the values:
none, off
never make backups (even if –backup is given)
numbered, t
make numbered backups
existing, nil
numbered if numbered backups exist, simple otherwise
simple, never
always make simple backups
As a special case, cp makes a backup of SOURCE when the force and
backup options are given and SOURCE and DEST are the same name for an
existing, regular file.
GNU coreutils online help: <http://www.gnu.org/software/coreutils/>
Report cp translation bugs to <http://translationproject.org/team/>
可以看出cp实为copy的简写,即为复制之意,下面将着重描述几个主要的参数:
cp命令:copy
源文件;目标文件;
单源复制:cp [OPTION]… [-T] SOURCE DEST
多源复制:cp [OPTION]… SOURCE… DIRECTORY
cp [OPTION]… -t DIRECTORY SOURCE…
单源复制:cp [OPTION]… [-T] SOURCE DEST
如果DEST不存在:则事先创建此文件,并复制源文件的数据流至DEST中;
如果DEST存在:
如果DEST是非目录文件:则覆盖目标文件;
如果DEST是目录文件:则先在DEST目录下创建一个与源文件同名的文件,并复制其数据流;
[root@localhost practise]# cp test/cp1.txt /practise/cptest/
cp: cannot stat ‘test/cp1.txt’: No such file or directory
[root@localhost practise]# mkdir /practise/cptest
[root@localhost /]# cp /test/cp1.out /practise/cptest/
[root@localhost /]# ll practise/cptest/
total 4
-rw-r–r–. 1 root root 370 Jul 27 14:34 cp1.out
[root@localhost /]# cp /test/cp1.out /practise/cptest/
cp: overwrite ‘/practise/cptest/cp1.out’? y
以上命令部分即为单源复制的相关操作。
多源复制:cp [OPTION]… SOURCE… DIRECTORY
cp [OPTION]… -t DIRECTORY SOURCE…
如果DEST不存在:错误;
如果DEST存在:
如果DEST是非目录文件:错误;
如果DEST是目录文件:分别复制每个文件至目标目录中,并保持原名;
多源复制和单源复制的功能基本相同,就不一一赘述了。
常用选项:
-i:交互式复制,即覆盖之前提醒用户确认;
之前覆盖命令行时,即时没有输入-i也出现了覆盖提示,是因为使用了别名,输入alias即可查询。
alias cp=’cp -i’
alias date=’date “+%a %b %d %H:%M:%S %Z %Y”‘
alias egrep=’egrep –color=auto’
alias fgrep=’fgrep –color=auto’
alias grep=’grep –color=auto’
alias l.=’ls -d .* –color=auto’
alias ll=’ls -l –color=auto’
alias ls=’ls –color=auto’
alias mv=’mv -i’
alias rm=’rm -i’
alias which=’alias | /usr/bin/which –tty-only –read-alias –show-dot –show-tilde’
可以看出实际上输入的cp就是cp -i的命令。
-f:强制覆盖目标文件;
[root@localhost /]# cp -f /test/cp1.out /practise/cptest/
cp: overwrite ‘/practise/cptest/cp1.out’?
[root@localhost /]# \cp -f /test/cp1.out /practise/cptest/
[root@localhost /]# ll /practise/cptest/
total 4
-rw-r–r–. 1 root root 370 Jul 27 14:41 cp1.out
与之前相比,cp1.out这个文件的修改时间已经发生了变化,说明这个命令强制覆盖了,而最前面的‘\’的使用则是为了不使用别名的功能。
-r, -R:递归复制目录;
[root@localhost cptest]# pwd
/practise/cptest
[root@localhost cptest]# ls
cp1.out
[root@localhost cptest]# cp -r /home/gentoo/ /practise/cptest/gentoo/
[root@localhost cptest]# cd /practise/cptest/gentoo/
[root@localhost gentoo]# ls
[root@localhost gentoo]# cd ..
[root@localhost cptest]# ls
cp1.out gentoo
此段命令可以看出-r的使用方法。
-d:复制符号链接文件本身,而非其指向的源文件;
-a:-dR –preserve=all, archive,用于实现归档;
–preserv=
mode:权限
ownership:属主和属组
timestamps: 时间戳
context:安全标签
xattr:扩展属性
links:符号链接
all:上述所有属性
- mv
mv命令:move
mv [OPTION]… [-T] SOURCE DEST
mv [OPTION]… SOURCE… DIRECTORY
mv [OPTION]… -t DIRECTORY SOURCE..
常用选项:
-i:交互式;
-f:force
- rm
rm命令:remove
rm [OPTION]… FILE…
常用选项:
-i:interactive
-f:force
-r: recursive
删除目录:rm -rf /PATH/TO/DIR
危险操作:rm -rf /*
鉴于mv、rm命令与cp命令的相似性,在此就不再一一解释了
注意:所有不用的文件建议不要直接删除,而是移动至某个专用目录;(模拟回收站)
二、bash的工作特性之命令执行状态返回值和命令行展开所涉及的内容及其示例演示
- 命令执行状态返回值
由于man bash查询出的命令过于庞大,就不在此处复制。每一条命令的执行,默认都会返回一个状态值,其中0代表成功,1-255代表各种失败的状态,二这个状态返回值保存于bash的特殊变量$?中,通过echo $?即可查询,示例如下:
[root@localhost /]# mkdir -pv /test/file
mkdir: created directory ‘/test’
mkdir: created directory ‘/test/file’
[root@localhost /]# echo $?
0
[root@localhost /]# rmdir -pv /test/file1
rmdir: removing directory, ‘/test/file1’
rmdir: failed to remove ‘/test/file1’: No such file or directory
[root@localhost /]# echo $?
1
- 命令行展开
~:自动展开为用户的家目录,或指定的用户的家目录;
{}:可承载一个以逗号分隔的路径列表,并能够将其展开为多个路径;
例如:/tmp/{a,b} 相当于 /tmp/a /tmp/b
[root@localhost ~]# cd /etc/ntp/crypto/
[root@localhost crypto]# pwd
/etc/ntp/crypto
[root@localhost crypto]# cd ~
[root@localhost ~]# pwd
/root
如上所示,正确的使用~可以快速的返回用户的家目录。
三、使用命令行展开功能来完成以下练习
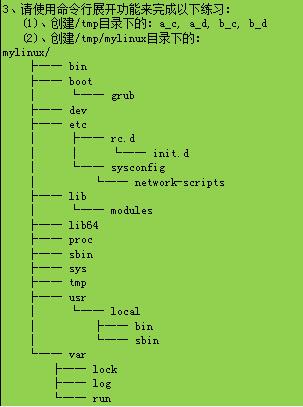

我会将所有练习中的tmp目录统一更换为practise目录
3.1
[root@localhost practise]# mkdir -pv /practise/{a,b}_{c,d}
mkdir: created directory ‘/practise/a_c’
mkdir: created directory ‘/practise/a_d’
mkdir: created directory ‘/practise/b_c’
mkdir: created directory ‘/practise/b_d’
[root@localhost practise]# ls
a_c cptest mail.rc man6 modprobe.d
a_d filep makedumpfile.conf.sample man7 modules-load.d
a.txt functions.out man man8 motd
a-z issue1 man1 man9 mtab
A-Z issue.tee man2 man_db.conf multipath
b_c machine-id man3 maven my.cnf
b_d magic man4 mime.types my.cnf.d
cat.out mailcap man5 mke2fs.conf system-release
3.2
[root@localhost practise]# mkdir -pv /practise/mylinux/{bin,boot/grub,dev,etc/{rc.d/ini.d,sysconfig/network-scripts},lib/modules,lib64,proc,sbin,sys,tmp,user/local/{bin,sbin},var/{lock,log,run}}
mkdir: created directory ‘/practise/mylinux’
mkdir: created directory ‘/practise/mylinux/bin’
mkdir: created directory ‘/practise/mylinux/boot’
mkdir: created directory ‘/practise/mylinux/boot/grub’
mkdir: created directory ‘/practise/mylinux/dev’
mkdir: created directory ‘/practise/mylinux/etc’
mkdir: created directory ‘/practise/mylinux/etc/rc.d’
mkdir: created directory ‘/practise/mylinux/etc/rc.d/ini.d’
mkdir: created directory ‘/practise/mylinux/etc/sysconfig’
mkdir: created directory ‘/practise/mylinux/etc/sysconfig/network-scripts’
mkdir: created directory ‘/practise/mylinux/lib’
mkdir: created directory ‘/practise/mylinux/lib/modules’
mkdir: created directory ‘/practise/mylinux/lib64’
mkdir: created directory ‘/practise/mylinux/proc’
mkdir: created directory ‘/practise/mylinux/sbin’
mkdir: created directory ‘/practise/mylinux/sys’
mkdir: created directory ‘/practise/mylinux/tmp’
mkdir: created directory ‘/practise/mylinux/user’
mkdir: created directory ‘/practise/mylinux/user/local’
mkdir: created directory ‘/practise/mylinux/user/local/bin’
mkdir: created directory ‘/practise/mylinux/user/local/sbin’
mkdir: created directory ‘/practise/mylinux/var’
mkdir: created directory ‘/practise/mylinux/var/lock’
mkdir: created directory ‘/practise/mylinux/var/log’
mkdir: created directory ‘/practise/mylinux/var/run’
为了更直观的看清楚,可以使用tree命令
[root@localhost practise]# tree mylinux/
mylinux/
├── bin
├── boot
│ └── grub
├── dev
├── etc
│ ├── rc.d
│ │ └── ini.d
│ └── sysconfig
│ └── network-scripts
├── lib
│ └── modules
├── lib64
├── proc
├── sbin
├── sys
├── tmp
├── user
│ └── local
│ ├── bin
│ └── sbin
└── var
├── lock
├── log
└── run
24 directories, 0 files
四、文件的元数据信息
先查看一下文件的源信息有哪些
[root@localhost ~]# stat /practise/cptest/cp1.out
File: ‘/practise/cptest/cp1.out’
Size: 370 Blocks: 8 IO Block: 4096 regular file
Device: fd00h/64768d Inode: 4494 Links: 1
Access: (0644/-rw-r–r–) Uid: ( 0/ root) Gid: ( 0/ root)
Context: unconfined_u:object_r:default_t:s0
Access: 2018-07-31 15:26:41.169470109 +0800
Modify: 2018-07-31 15:26:41.169470109 +0800
Change: 2018-07-31 15:26:41.169470109 +0800
Birth: –
那这些原数据代表什么含义呢?可以通过命令检索所需要的内容
[root@localhost ~]# whatis stat
stat (2) – get file status
stat (3p) – get file status
stat (1) – display file or file system status
[root@localhost ~]# man 2 stat
The stat structure
All of these system calls return a stat structure, which contains the
following fields:
struct stat {
dev_t st_dev; /* ID of device containing file */ 文件名称
ino_t st_ino; /* inode number */文件的inode
mode_t st_mode; /* file type and mode */文件的权限
nlink_t st_nlink; /* number of hard links */文件的硬链接个数
uid_t st_uid; /* user ID of owner */文件的UID
gid_t st_gid; /* group ID of owner */文件的GID(组ID)
dev_t st_rdev; /* device ID (if special file) */设备ID号
off_t st_size; /* total size, in bytes */文件的大小
blksize_t st_blksize; /* blocksize for filesystem I/O */
blkcnt_t st_blocks; /* number of 512B blocks allocated */
/* Since Linux 2.6, the kernel supports nanosecond
precision for the following timestamp fields.
For the details before Linux 2.6, see NOTES. */
struct timespec st_atim; /* time of last access */文件的最后访问时间
struct timespec st_mtim; /* time of last modification */文件的修改时间
struct timespec st_ctim; /* time of last status change */文件的最后用户改变时间
#define st_atime st_atim.tv_sec /* Backward compatibility */
#define st_mtime st_mtim.tv_sec
#define st_ctime st_ctim.tv_sec
};
上述信息中比较重要的就是三个时间戳信息,如何对他们进行一一修改,就需要用到touch命令
NAME
touch – change file timestamps
SYNOPSIS
touch [OPTION]… FILE…
-a change only the access time
-c, –no-create
do not create any files
-m change only the modification time
-t STAMP
use [[CC]YY]MMDDhhmm[.ss] instead of current time
做几个操作验证一下
[root@localhost ~]# touch -a /practise/cptest/cp1.out
[root@localhost ~]# stat /practise/cptest/cp1.out
File: ‘/practise/cptest/cp1.out’
Size: 370 Blocks: 8 IO Block: 4096 regular file
Device: fd00h/64768d Inode: 4494 Links: 1
Access: (0644/-rw-r–r–) Uid: ( 0/ root) Gid: ( 0/ root)
Context: unconfined_u:object_r:default_t:s0
Access: 2018-08-01 16:09:16.950950710 +0800
Modify: 2018-07-31 15:26:41.169470109 +0800
Change: 2018-08-01 16:09:16.950950710 +0800
Birth: –
[root@localhost ~]# touch -m /practise/cptest/cp1.out
[root@localhost ~]# stat /practise/cptest/cp1.out
File: ‘/practise/cptest/cp1.out’
Size: 370 Blocks: 8 IO Block: 4096 regular file
Device: fd00h/64768d Inode: 4494 Links: 1
Access: (0644/-rw-r–r–) Uid: ( 0/ root) Gid: ( 0/ root)
Context: unconfined_u:object_r:default_t:s0
Access: 2018-08-01 16:09:16.950950710 +0800
Modify: 2018-08-01 16:11:59.061199361 +0800
Change: 2018-08-01 16:11:59.061199361 +0800
Birth: –
通过以上命令可以发现,当修改单独Access或Modify时,Change都会随之改变。
五、如何定义一个命令的别名,如何在命令中引用另一个命令的执行结果
[root@localhost ~]# ls -a /practise/cptest/
. .. cp1.out gentoo
[root@localhost ~]# ls /practise/cptest/
cp1.out gentoo
[root@localhost ~]# alias la=’ls -a’
[root@localhost ~]# la /practise/cptest/
. .. cp1.out gentoo
从上可以看出,红色部分为定义命令的别名。如何在命令中引用另一个命令的执行结果可见下面的示例:
[root@localhost ~]# echo `date` > /practise/errordate.out
[root@localhost ~]# cat /practise/errordate.out
Wed Aug 01 17:08:05 CST 2018
[root@localhost ~]# echo $(date) > /practise/errordate.out
[root@localhost ~]# cat /practise/errordate.out
Wed Aug 01 17:08:32 CST 2018
[root@localhost ~]# echo $(date) >> /practise/errordate.out
[root@localhost ~]# cat /practise/errordate.out
Wed Aug 01 17:08:32 CST 2018
Wed Aug 01 17:08:45 CST 2018
可以看出$(COMMAND)或者`COMMAND`都可以达到引用命令执行结果。
六、一些基础命令的使用
1、显示/var目录下所有以l开头,以一个小写字母结尾,且中间至少出现一个数字(可以有其他字符)的文件或目录。
[root@localhost ~]# ls -d /var/l*[0-9]*[[:lower:]]
ls: cannot access /var/l*[0-9]*[[:lower:]]: No such file or directory
[root@localhost ~]# ls -d /var/l*
/var/lib /var/local /var/lock /var/log
2、显示/etc目录下,以任意一个数字开头,且以非数字结尾的文件或目录。
[root@localhost ~]# ls -d /etc/[0-9]*[^0-9]
ls: cannot access /etc/[0-9]*[^0-9]: No such file or directory
3、显示/etc目录下,以非字母开头,后面跟了一个字母以及其他任意长度任意字符的文件或目录。
[root@localhost ~]# ls -d /etc/[^a-z][a-z]*
ls: cannot access /etc/[^a-z][a-z]*: No such file or directory
4、在/tmp目录下创建以tfile开头,后跟当前日期和时间的文件,
[root@bogon ~]# mkdir /tmp/tfile-`date +%F-%H-%M-%S`
[root@bogon ~]# ls /tmp/
[root@bogon ~]# ls -d /tmp/tfile*
/tmp/tfile-2018-08-02-10-40-45
5、复制/etc目录下所有以p开头,以非数字结尾的文件或目录到/tmp/mytest1目录中。
[root@bogon ~]# cp -r /etc/p*[^0-9] /tmp/mytest1
cp: target ‘/tmp/mytest1’ is not a directory
[root@bogon ~]# mkdir /tmp/mytest1
[root@bogon ~]# cp -r /etc/p*[^0-9] /tmp/mytest1
[root@bogon ~]# ll /tmp/mytest1/
total 48
drwxr-xr-x. 2 root root 4096 Aug 2 10:53 pam.d
-rw-r–r–. 1 root root 2012 Aug 2 10:53 passwd
-rw-r–r–. 1 root root 2000 Aug 2 10:53 passwd-
-rw-r–r–. 1 root root 1362 Aug 2 10:53 pbm2ppa.conf
-rw-r–r–. 1 root root 2872 Aug 2 10:53 pinforc
drwxr-xr-x. 10 root root 116 Aug 2 10:53 pki
drwxr-xr-x. 2 root root 28 Aug 2 10:53 plymouth
drwxr-xr-x. 5 root root 52 Aug 2 10:53 pm
-rw-r–r–. 1 root root 6300 Aug 2 10:53 pnm2ppa.conf
drwxr-xr-x. 2 root root 6 Aug 2 10:53 popt.d
drwxr-xr-x. 2 root root 154 Aug 2 10:53 postfix
drwxr-xr-x. 3 root root 219 Aug 2 10:53 ppp
drwxr-xr-x. 2 root root 78 Aug 2 10:53 prelink.conf.d
-rw-r–r–. 1 root root 233 Aug 2 10:53 printcap
-rw-r–r–. 1 root root 1819 Aug 2 10:53 profile
drwxr-xr-x. 2 root root 4096 Aug 2 10:53 profile.d
-rw-r–r–. 1 root root 6545 Aug 2 10:53 protocols
drwxr-xr-x. 2 root root 79 Aug 2 10:53 pulse
drwxr-xr-x. 2 root root 23 Aug 2 10:53 purple
drwxr-xr-x. 2 root root 35 Aug 2 10:53 python
6、复制/etc目录下所有以.d结尾的文件或目录至/tmp/mytest2目录中。
[root@bogon ~]# mkdir /tmp/mytest2
[root@bogon ~]# cp -r /etc/*.d /tmp/mytest2/
[root@bogon ~]# ls -d /etc/*.d
/etc/auto.master.d /etc/logrotate.d /etc/rc5.d
/etc/bash_completion.d /etc/modprobe.d /etc/rc6.d
/etc/binfmt.d /etc/modules-load.d /etc/rc.d
/etc/cgconfig.d /etc/my.cnf.d /etc/reader.conf.d
/etc/chkconfig.d /etc/oddjobd.conf.d /etc/request-key.d
/etc/cron.d /etc/pam.d /etc/rsyslog.d
/etc/depmod.d /etc/popt.d /etc/rwtab.d
/etc/dracut.conf.d /etc/prelink.conf.d /etc/setuptool.d
/etc/exports.d /etc/profile.d /etc/statetab.d
/etc/gdbinit.d /etc/rc0.d /etc/sudoers.d
/etc/grub.d /etc/rc1.d /etc/sysctl.d
/etc/init.d /etc/rc2.d /etc/tmpfiles.d
/etc/krb5.conf.d /etc/rc3.d /etc/xinetd.d
/etc/ld.so.conf.d /etc/rc4.d /etc/yum.repos.d
[root@bogon ~]# ls -d /tmp/mytest2/*.d
/tmp/mytest2/auto.master.d /tmp/mytest2/prelink.conf.d
/tmp/mytest2/bash_completion.d /tmp/mytest2/profile.d
/tmp/mytest2/binfmt.d /tmp/mytest2/rc0.d
/tmp/mytest2/cgconfig.d /tmp/mytest2/rc1.d
/tmp/mytest2/chkconfig.d /tmp/mytest2/rc2.d
/tmp/mytest2/cron.d /tmp/mytest2/rc3.d
/tmp/mytest2/depmod.d /tmp/mytest2/rc4.d
/tmp/mytest2/dracut.conf.d /tmp/mytest2/rc5.d
/tmp/mytest2/exports.d /tmp/mytest2/rc6.d
/tmp/mytest2/gdbinit.d /tmp/mytest2/rc.d
/tmp/mytest2/grub.d /tmp/mytest2/reader.conf.d
/tmp/mytest2/init.d /tmp/mytest2/request-key.d
/tmp/mytest2/krb5.conf.d /tmp/mytest2/rsyslog.d
/tmp/mytest2/ld.so.conf.d /tmp/mytest2/rwtab.d
/tmp/mytest2/logrotate.d /tmp/mytest2/setuptool.d
/tmp/mytest2/modprobe.d /tmp/mytest2/statetab.d
/tmp/mytest2/modules-load.d /tmp/mytest2/sudoers.d
/tmp/mytest2/my.cnf.d /tmp/mytest2/sysctl.d
/tmp/mytest2/oddjobd.conf.d /tmp/mytest2/tmpfiles.d
/tmp/mytest2/pam.d /tmp/mytest2/xinetd.d
/tmp/mytest2/popt.d /tmp/mytest2/yum.repos.d
7、复制/etc目录下所有以l或m或n开头,以.conf结尾的文件至/tmp/mytest3目录中。
[root@bogon ~]# ls -d /etc/{l,m,n}*.conf
/etc/ld.so.conf /etc/locale.conf /etc/mke2fs.conf /etc/nsswitch.conf
/etc/libaudit.conf /etc/logrotate.conf /etc/nfs.conf /etc/ntp.conf
/etc/libuser.conf /etc/man_db.conf /etc/nfsmount.conf
[root@bogon ~]# mkdir /tmp/mytest3
[root@bogon ~]# cp -r /etc/{l,m,n}*.conf /tmp/mytest3
[root@bogon ~]# ls -d /tmp/mytest3/{l,m,n}*.conf
/tmp/mytest3/ld.so.conf /tmp/mytest3/mke2fs.conf
/tmp/mytest3/libaudit.conf /tmp/mytest3/nfs.conf
/tmp/mytest3/libuser.conf /tmp/mytest3/nfsmount.conf
/tmp/mytest3/locale.conf /tmp/mytest3/nsswitch.conf
/tmp/mytest3/logrotate.conf /tmp/mytest3/ntp.conf
/tmp/mytest3/man_db.conf
以上为本次学习内容,如有错误敬请指出~
本文来自投稿,不代表Linux运维部落立场,如若转载,请注明出处:http://www.178linux.com/104013

评论列表(1条)
从文章中学习到基础命令的用法和作者遇到的一些坑,很不错,在排版上优化一下会更好,继续加油。