

本节索引:
一、前期环境准备
二、Playbook中模板templates的用法
三、Playbook中逻辑语句的用法
四、Roles角色详解


一、环境搭建:
前期准备:一台虚拟机作为ansible,三台虚拟机作为被控端node
主控端:
主机名:ansible
系统版本:CentOS6.9
被控端:
主机名:node1
CPU内核数:4
系统版本:CentSO7.4
主机名:node2
CPU内核数:2
系统版本:CentSO6.9
主机名:node3
CPU内核数:1
系统版本:CentSO6.9

/etc/ansible/hosts文件主机列表配置如下:

二、Playbook中模板templates的用法
templates模板:
功能:根据模块文件动态生成对应的配置文件
使用方法:
(1)templates文件必须存放在templates目录下,且以.j2为后缀
(2)templates模块只能被playbook调用
(3)yam文件需和templates目录平级,目录结构如下:
./
├── temnginx.yml
└── templates
└── nginx.conf.j2
templates使用形式:
字符串:使用单引号或双引号
数字:整数,浮点数
列表:[item1, item2, …]
元组:(item1, item2, …)
字典:{key1:value1, key2:value2, …}
布尔型:true/false
算术运算:+, -, *, /, //, %, **
比较操作:==, !=, >, >=, <, <=
逻辑运算:and, or, not
流表达式:For If When
示例1:使用template传输配置文件
cp /etc/nginx/nginx.conf templates/nginx.conf.j2
vim testtemplate.yml
—
– hosts: os6
remote_user: root
tasks:
– name: install package
yum: name=nginx
– name: copy template
template: src=nginx.conf.j2 dest=/etc/nginx/nginx.conf
– name: start service
service: name=nginx state=started enabled=yes
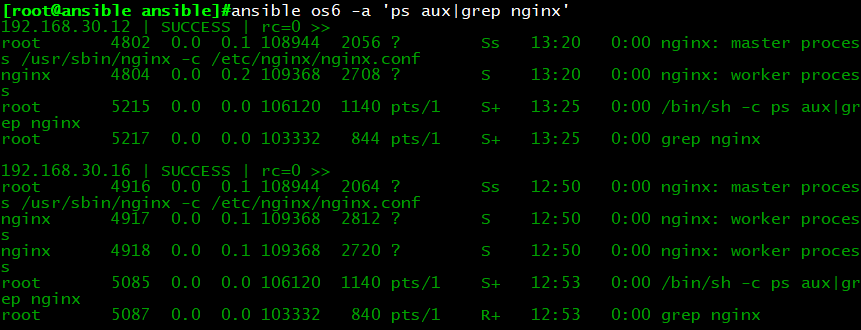
执行结果:运行playbook后,我们发现work process进程数量与虚拟机cpu内核数量是一致的,接下来我
们将把配置模板中的work process进程数量与系统自带变量结合起来引用。
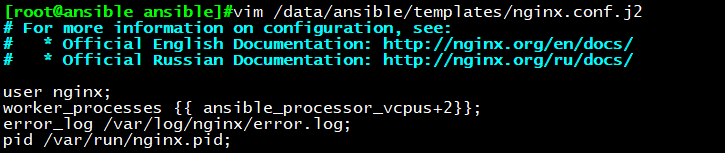
示例2:template引用系统变量
ansible websrvs -m setup |grep ‘cpu’
vim templates/nginx.conf.j2
worker_processes {{ ansible_processor_vcpus+2 }};
vim testtemplate.yml
—
– hosts:os6
remote_user: root
tasks:
– name: install package
yum: name=nginx
– name: copy template
template: src=nginx.conf.j2 dest=/etc/nginx/nginx.conf
notify: restart service
– name: start service
service: name=nginx state=started enabled=yes
handlers:
– name: restart service
service:name=nginx state=restarted
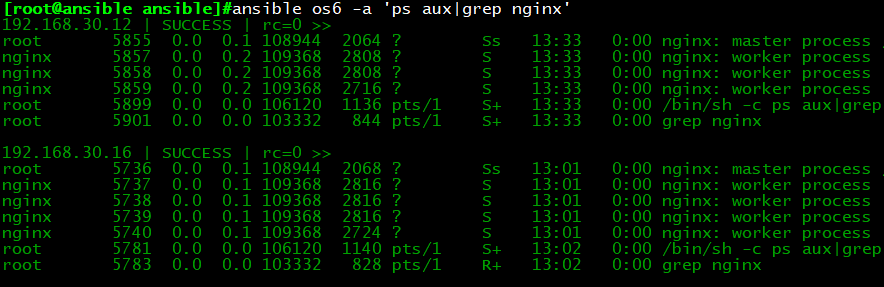
执行结果:再次运行playbook后,我们发现worker process进程数量等于cpu核心数量加2,这样template
就能帮我们实现根据不同主机性能定制相应的配置。
示例3:hosts文件普通变量修改nginx服务端口
vim /etc/ansible/hosts
192.168.30.101 httpd_port=81
192.168.30.102 httpd_port=82
vim templates/nginx.conf.j2
server {
listen {{ http_port }} default server
listen [::]:{{ http_prot }} default server
}
三、Playbook中逻辑语句的使用
When:
条件测试:如果需要根据变量、facts或此前任务的执行结果来做为某task执行与
否的前提时要用到条件测试,通过when语句实现,在task中使用,jinja2的语法
查看发行版本系统变量:
ansible srv -m setup filter=”*distribution”

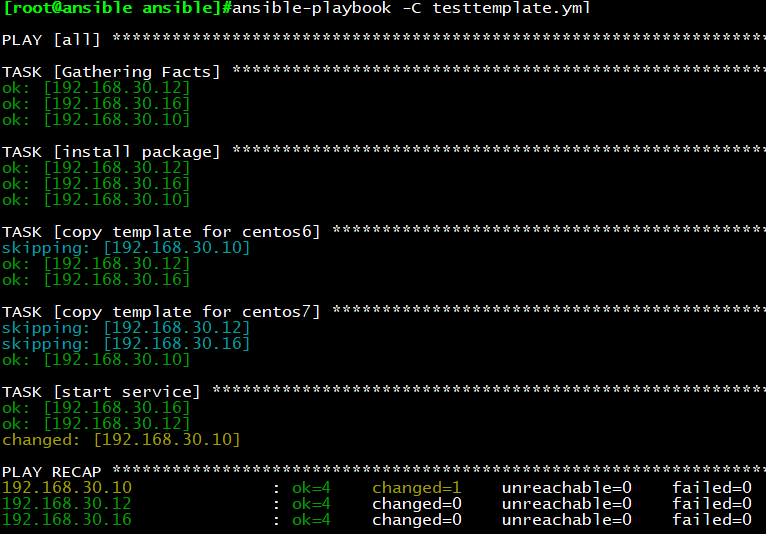
示例1:
vim testtemplate.yml
—
– hosts: all
remote_user: root
tasks:
– name: install package
yum: name=nginx
– name: copy template for centos7
template: src=nginx.conf7.j2 dest=/etc/nginx/nginx.conf
when: ansible_distribution_major_version == “7”
notify: restart service
– name: copy template for centos6
template: src=nginx.conf6.j2 dest=/etc/nginx/nginx.conf
when: ansible_distribution_major_version == “6”
notify: restart service
– name: start service
service: name=nginx state=started enabled=yes
handlers:
– name: restart service
service:name=nginx state=restarted
执行结果:当when语句不匹配时,将skipping直接跳过,仅执行与when语句匹配的语句内容,最终
CentOS6,7根据不同的版本号生成对应的配置并启动服务。
with_items:迭代
迭代:当有需要重复性执行的任务时,可以使用迭代机制
对迭代项的引用,固定变量名为“item”
要在task中使用with_items给定要迭代的元素列表
列表格式:
字符串
字典
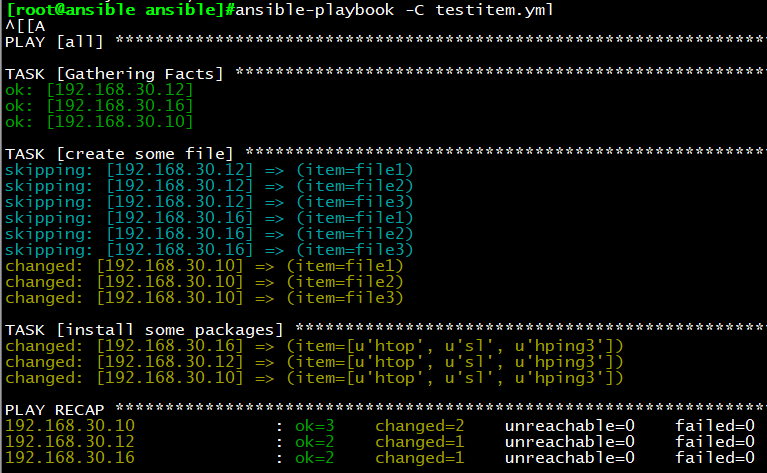
示例1:利用迭代一次创建多个文件,安装多个命令包
vim testitem.yml
—
– hosts: all
remote_user: root
tasks:
– name: create some file
file: name=/data/{{ item}} state=touch
when: ansible_distribution_major_version == “7”
with_items:
– file1
– file2
– file3
– name: install some packages
yum: name={{ item }}
with_items:
– htop
– sl
– hping3
执行结果:当系统为CentOS7版本时,在/data目录下创建file1-3文件,安装htop,sl,hping3命令
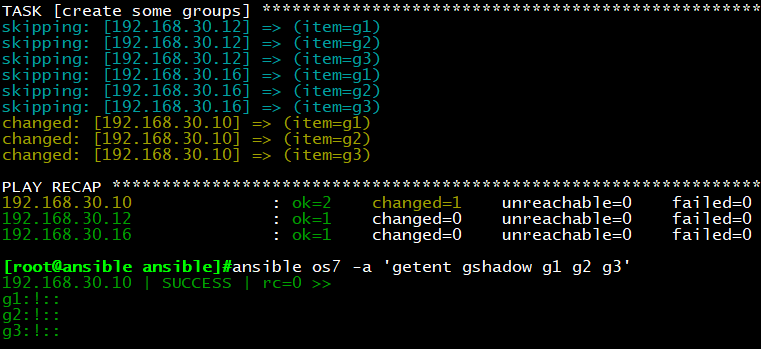
示例2:使用迭代创建组
vim testitem2.yml
—
– hosts: all
remote_user: root
tasks:
– name: create some groups
group: name={{ item }}
when: ansible_distribution_major_version == “7”
with_items:
– g1
– g2
– g3
执行结果:当系统版本为CentOS7时,创建g1,g2,g3组
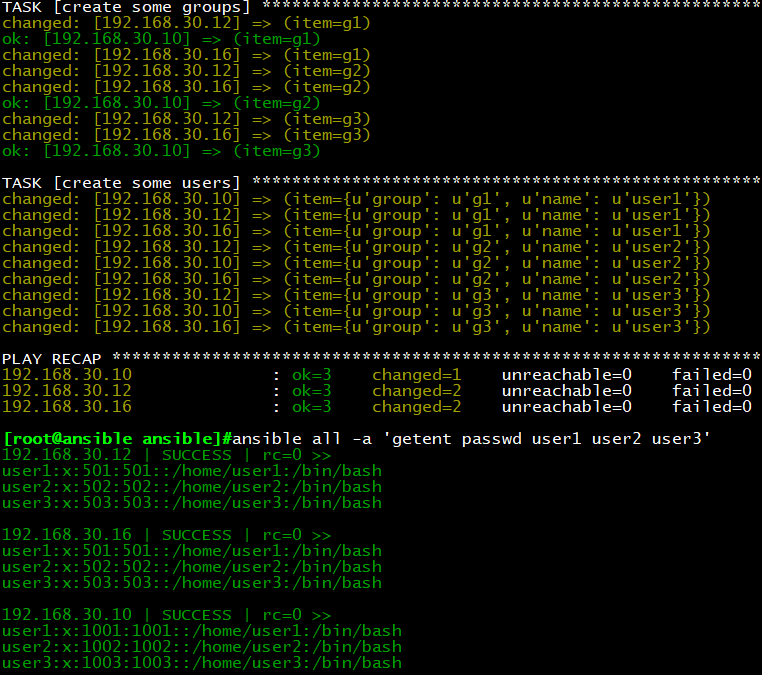
示例3:使用迭代配合字典创建用户与组
vim testitem2.yml
—
– hosts: all
remote_user: root
tasks:
– name: create some groups
group: name={{ item }}
with_items:
– g1
– g2
– g3
– name: create some users
user: name={{ item.name }} group={{ item.group }}
with_items:
– { name: ‘user1’,group: ‘g1’ }
– { name: ‘user2’,group: ‘g2’ }
– { name: ‘user3’,group: ‘g3’ }
执行结果:所有主机上创建user1,user2,user3用户,且主组为g1,g2,g3
for 与 if
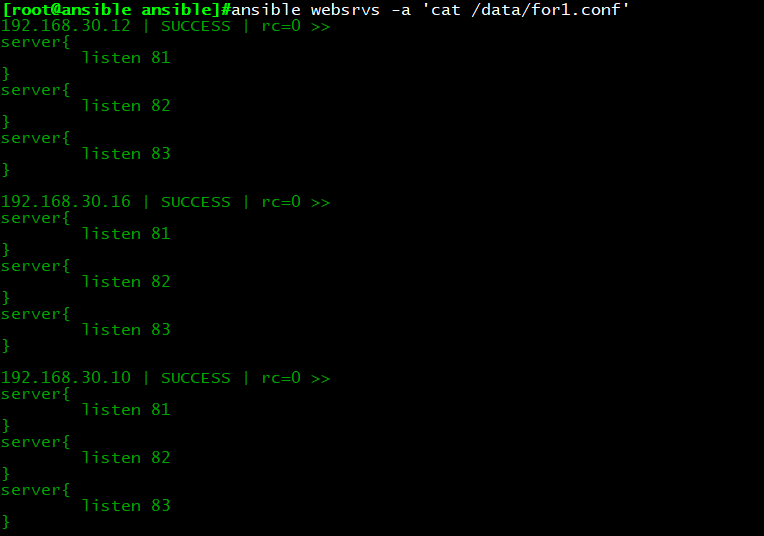
示例1:template,for
vim for1.conf.j2
{% for port in ports %}
server{
listen {{ port }}
}
{% endfor %}
vim testfor.yml
—
– hosts: websrvs
remote_user: root
vars:
ports:
– 81
– 82
– 83
tasks:
– name: copy conf
template: src=for1.conf.j2 dest=/data/for1.conf
执行结果:每台主机生成for1.conf文件,内容如下
示例2:template,for,引用字典
vim for2.conf.j2
{% for port in ports %}
server{
listen {{ port.listen_port }}
}
{% endfor %}
cp testfor.yml testfor2.yml
vim testfor2.yml
—
– hosts: websrvs
remote_user: root
vars:
ports:
– listen_port: 81
– listen_port: 82
– listen_port: 83
tasks:
– name: copy conf
template:src=for2.conf.j2 dest/data/for2.conf
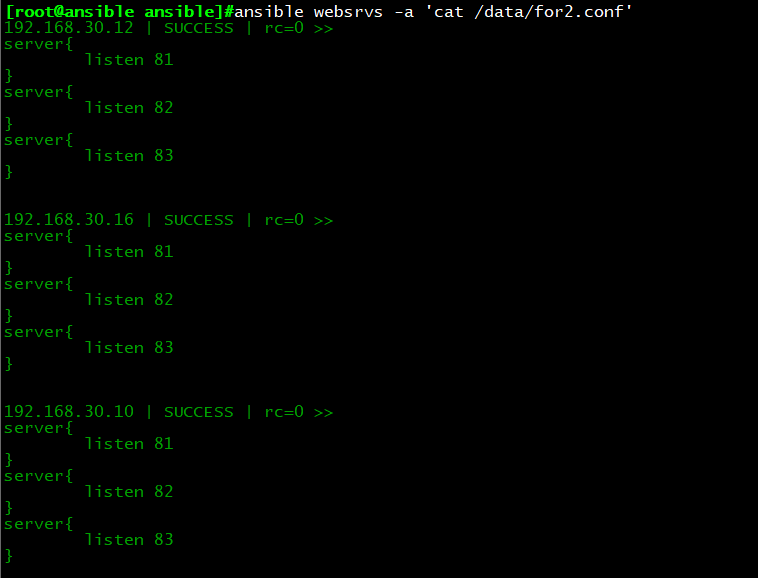
执行结果:每台主机生成for2.conf文件,内容如下
示例3:for循环中调用字典
vim for3.conf.j2
{% for p in ports %}
server{
listen {{ p.port }}
servername {{ p.name }}
documentroot {{ p.rootdir }}
}
{% endfor %}
cp testfor2.yml testfor3.yml
vim testfor3.yml
—
– hosts: websrvs
remote_user: root
vars:
ports:
– web1:
port: 81
name: web1.magedu.com
rootdir: /data/website1
– web2:
port: 82
name: web2.magedu.com
rootdir: /data/website2
– web3:
port: 83
name: web3.magedu.com
rootdir: /data/website3
tasks:
– name: copy conf
template:src=for3.conf.j2 dest/data/for3.conf
执行结果:每台主机生成for3.conf文件,内容如下

示例4:for循环中调用if
vim for4.conf.j2
{% for p in ports %}
server{
listen {{ p.port }}
{% if p.name is defined %}
servername {{ p.name }}
{% endif %}
documentroot {{ p.rootdir }}
}
{% endfor %}
cp testfor3.yml testfor4.yml
vim testfor4.yml
—
– hosts: websrvs
remote_user: root
vars:
ports:
– web1:
port: 81
#name: web1.magedu.com
rootdir: /data/website1
– web2:
port: 82
name: web2.magedu.com
rootdir: /data/website1
– web3:
port: 83
#name: web3.magedu.com
rootdir: /data/website1
tasks:
– name: copy conf
template:src=for4.conf.j2 dest/data/for4.conf
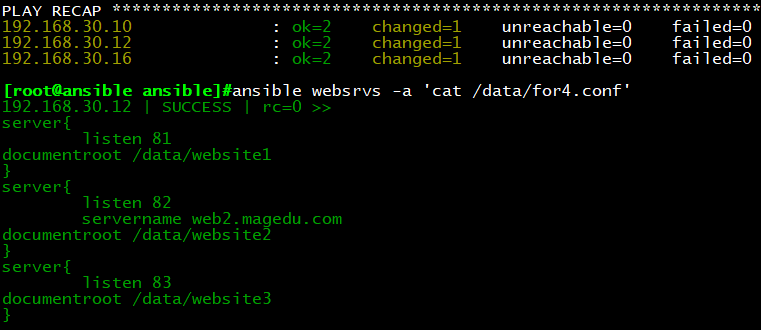
执行结果:每台主机生成for3.conf文件,内容如下,web1与web3的name没赋值,所有跳过,web2的
name被赋值,文件中输出结果
四、Roles角色
角色(roles):角色集合
roles/
mysql/
httpd/
nginx/
memcached/
/roles/project/ :项目名称,有以下子目录
files/ :存放由copy或script模块等调用的文件
templates/:template模块查找所需要模板文件的目录
tasks/:定义task,role的基本元素,至少应该包含一个名为main.yml的文件;其它的文
件需要在此文件中通过include进行包含
handlers/:至少应该包含一个名为main.yml的文件;其它的文件需要在此文件中通过
include进行包含
vars/:定义变量,至少应该包含一个名为main.yml的文件;其它的文件需要在此文件
中通过include进行包含
meta/:定义当前角色的特殊设定及其依赖关系,至少应该包含一个名为main.yml的文
件,其它文件需在此文件中通过include进行包含
default/:设定默认变量时使用此目录中的main.yml文件
建议:roles创建在ansible目录
mkdir roles
mkdir roles/{httpd,mysql,memcache,nginx} -pv
示例1:定义nginx角色
思路:
niginx
1.group:nginx
2.user:nginx
3.yum:nginx
4.template:nigin.conf.j2
5.service:nginx
目录结构如下:
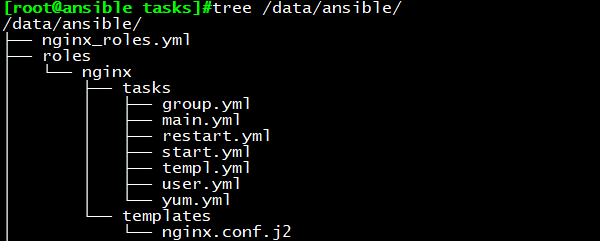
cd nginx
mkdir tasks templates
cd tasks
vim group.yml
– name: create group
group: name=nginx gid=80
vim user.yml
– name: create user
user: name=nginx group=nginx uid=80 shell=/sbin/noligin
vim yum.yml
– name: install package
yum: name=nginx
vim start.yml
– name: start service
service: name=nginx state=started enabled=yes
vim restart.yml
– name: restart service
service: name=nginx state=restarted
cp /etc/nginx/nginx.conf template/nginx.conf.j2
vim template/nginx.conf.j2
worker_processes {{ ansible_processes_vcpus+2 }};
vim templ.yml
– name: copy conf
template: src=nginx.conf.j2 dest=/etc/nginx/nginx.conf
vim main.yml
– include: group.yml
– include: user.yml
– include: yum.yml
– include: templ.yml
– include: start.yml
调用角色的剧本要和roles目录在同一文件夹
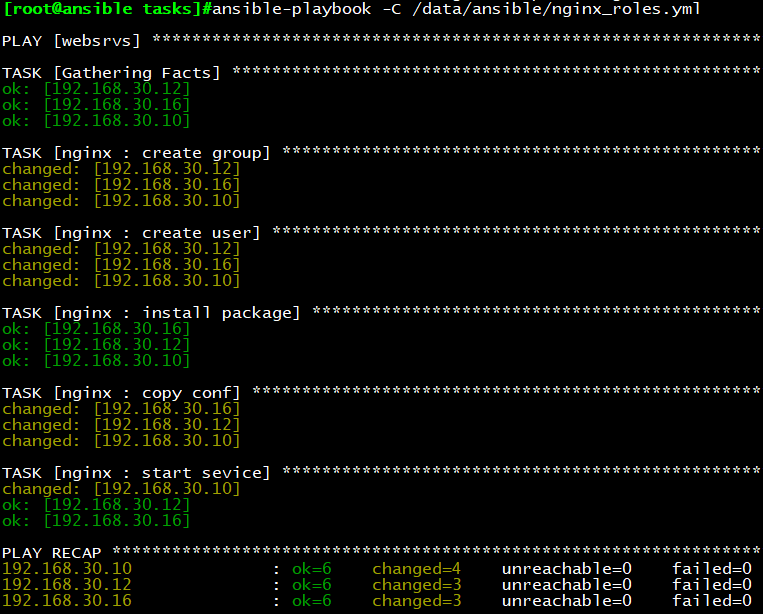
vim nginx_roles.yml
– hosts: websrvs
romete_user: root
roles:
– role: nginx
ansible-playbook -C nginx_role.yml
执行结果如下:
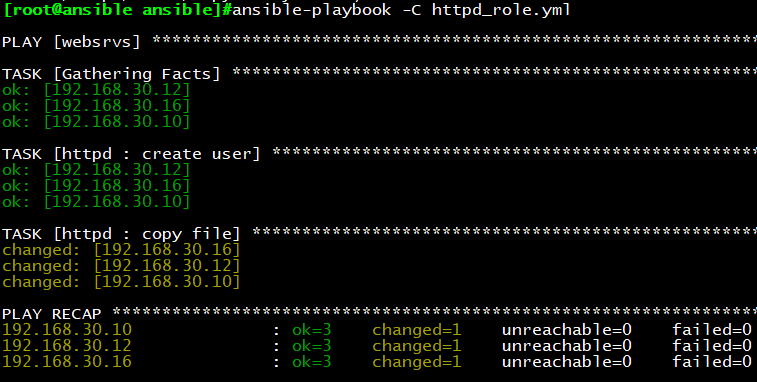
示例2:增加httpd角色
结构目录如下:

cd httpd/
mkdir tasks
cd tasks/
vim user.yml
– name: create user
user: name=apache system=yes shell=/sbin/nologin
cd httpd/
mkdir files
cp httpd.conf files/
cd /tasks/
模拟编译安装yum
vim copyfile.yml
– name: copy files
copy: src=httpd.conf dest=/data/ own=apache
vim main.yml
– incluse: user.yml
– incluse: copyfile.yml
vim httpd_role.yml
– hosts: websrvs
romete_user: root
roles:
– role: httpd
执行结果如下:
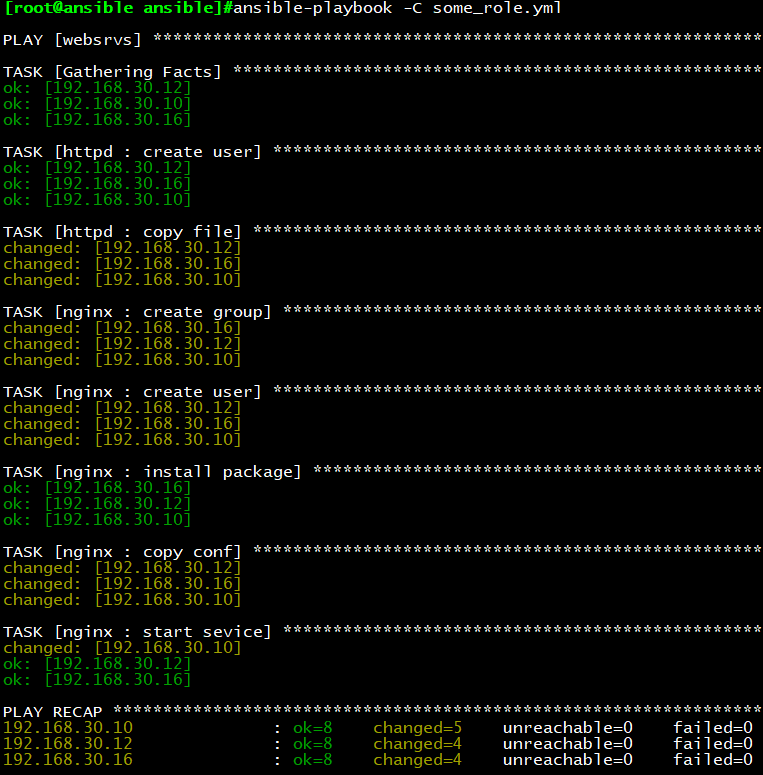
示例3:同时调用两个roles角色
目录结构:
cp niginx_role.yml some_role.yml
vim some_role.yml
– hosts: websrvs
romete_user: root
roles:
– role: httpd
– role: nginx
执行结果如下:
示例4:一个roles角色调用另一个roles角色的task任务
目标:nginx调用httpd的copyfile
vim main.yml
– include: group.yml
– include: user.yml
– include: yum.yml
– include: templ.yml
– include: start.yml
– inclide: roles/httpd/tasks/copyfile.yml
示例5:roles playbook tags
目录结构如下:
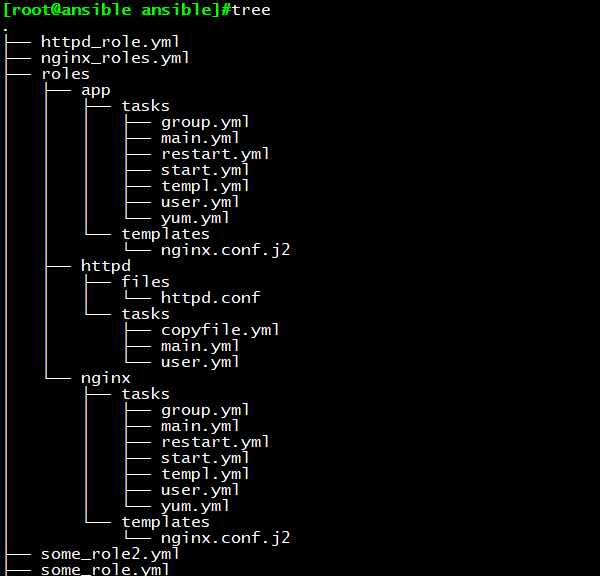
cp -r nginx/ app/ 首先虚构一个app的role
vim some_role2.yml
– hosts: websrvs
romete_user: root
roles:
– { role: httpd,tags:[‘web’,’httpd’]}
– { role: nginx,tags:[‘web’,’nginx’]}
– { role: app,tags:’app’}
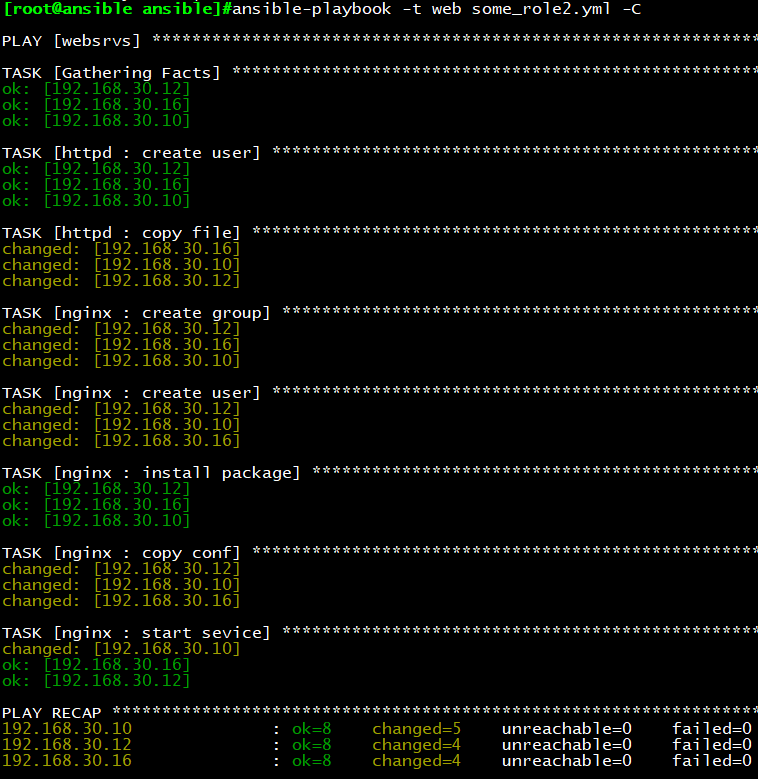
ansible-playbook -t web some_role.yml
执行结果:只执行标签为web的role
示例6:roles playbook tags when
cp -r nginx/ app/ 虚构一个role
vim some_role3.yml
– hosts: all
romete_user: root
roles:
– { role: httpd,tags:[‘web’,’httpd’]}
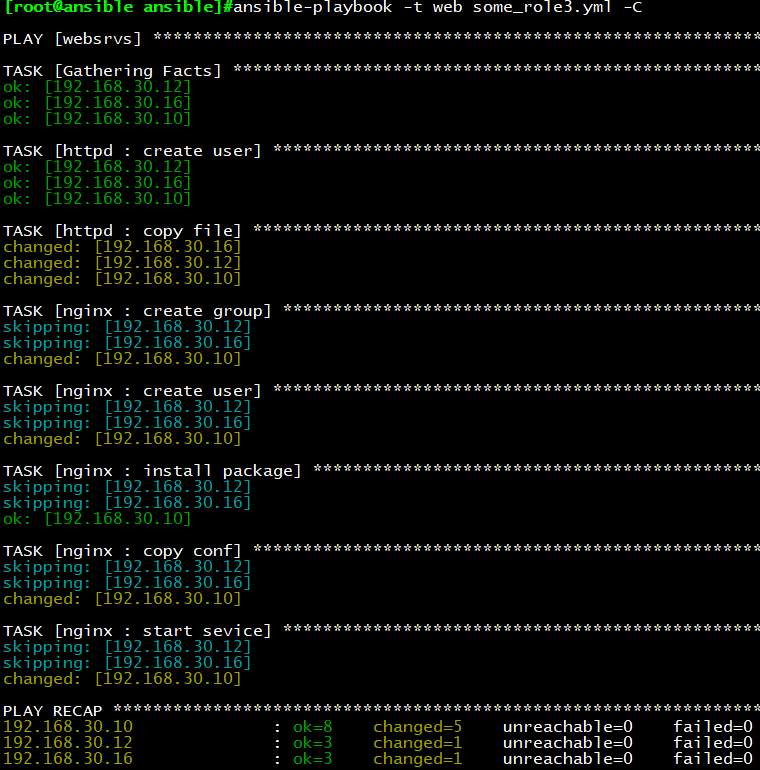
– { role: nginx,tags:[‘web’,’nginx’],when: ansible_distribution_major_version==”7″}
– { role: app,tags:’app’}
ansible-playbook -t web some_role.yml
执行结果:至执行tags标签为web的roles,当主版本号为7时,才执行nginx的role
示例7:综合演示
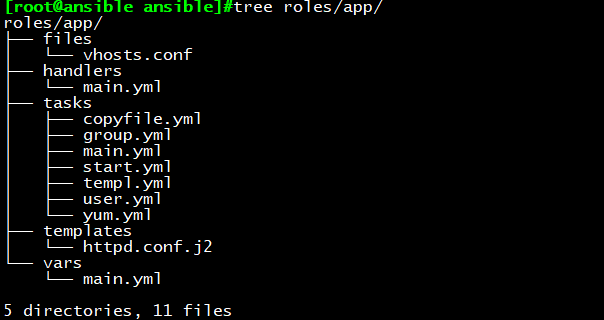
结构目录:
rm -rf /app
mkdir app
cd app
mkdir tasks templates vars handlers files
cd tasks/
vim group.yml
– name: create group
group: name=app system=yes gid=123
vim user.yml
– name: create user
user: name=app group=app system=yes shell=/sbin/nologin uid=123
vim yum.yml
– name: install package
yum: name=httpd
cp /etc/httpd/conf/httpd.conf /templates/httpd.conf.j2
vim temlates/httpd.conf.j2
Listen {{ ansible_processor_vcpus*10 }}
User {{ username }}
Group {{ groupname }}
vim /vars/main.yml
username: app
groupname: app
vim templ.yml
– name: copy conf
temlplate: src=httpd.conf.j2 dest=/etc/httpd/conf/httpd.conf
notify: restart service
vim start.yml
– name: start service
service: name=httpd state=started enabled=yes
vim handlers/main.yml
– name: restart service
service: name=httpd state=restarted
touch files/vhosts.conf
vim copyfile.yml
– name: copy config
copy: src=vhosts.conf dest=/ect/httpd/conf.d/
vim main.yml
– include: group.yml
– include: user.yml
– include: yum.yml
– include: templ.yml
– include: copyfile.yml
– include: start.yml
cd ansible/
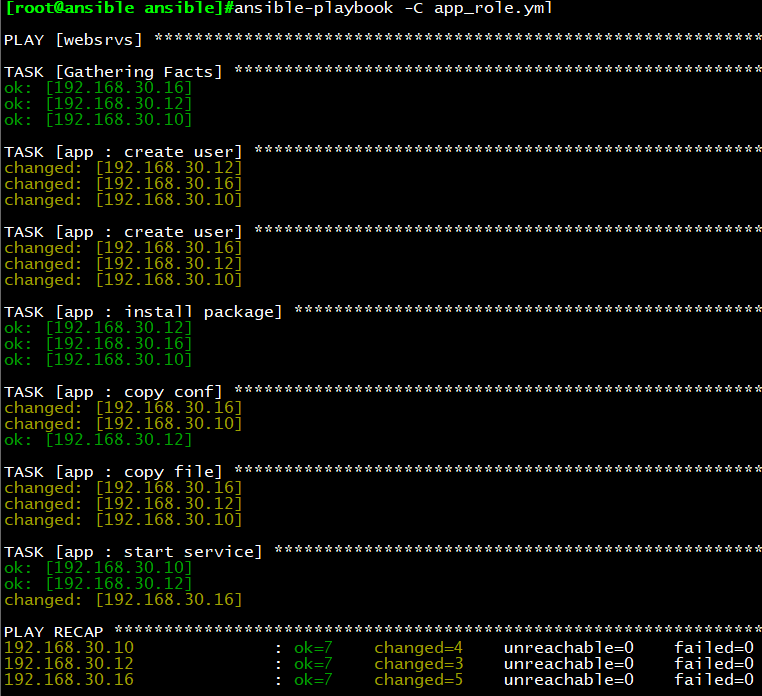
vim app_role.yml
– hosts: websrvs
remote_user: root
roles:
– role: app
执行结果如下:
示例8:部署memcached,占用内存为物理内存1/4

yum install memcached
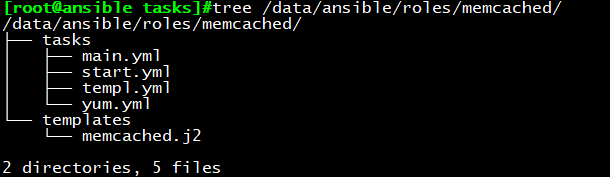
目录结构:
cp /etc/sysconfig/memcached templates/memcached.j2
vim memcached.j2
CACHESIZE=”{{ ansible_memtotal_mb//4 }}”
vim tasks/yum.yml
– name: install package
yum: name=memcached
vim templ.yum
– name: copy conf
template: src=memcached.j2 dest=/etc/sysconfig/memcached
vim start.yml
– name: start service
service: name=memcached state=started enabled=yes
vim main.yml
– include: yum.yml
– include: templ.yml
– inculde: start.yml
vim memcached_role.yml
– hosts: os6
remote_user: root
roles:
– role: memcached
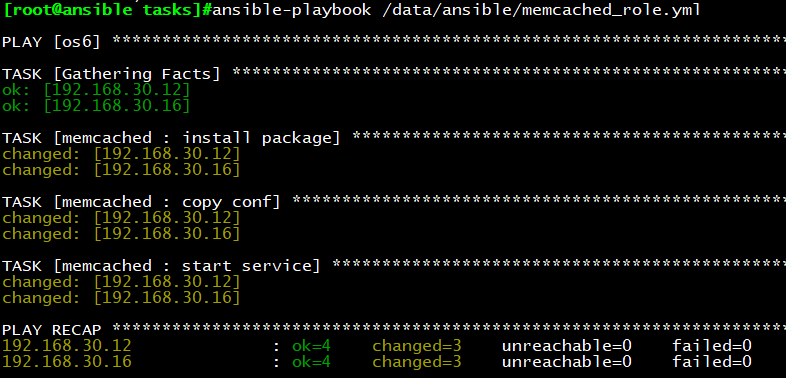
ansible-playbook memcached_role.yml
执行结果如下:
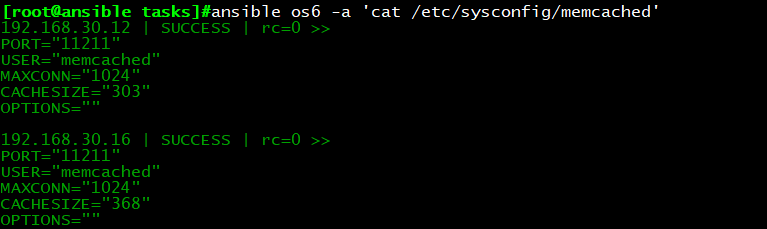
远程查看配置文件,确认生效:
本文来自投稿,不代表Linux运维部落立场,如若转载,请注明出处:http://www.178linux.com/99910
