

1.Linux上的文件管理类型命令都有哪些,其常用的使用方法及其相关示例演示
|
|
|
|
|
|
|
|
|
|
|
|
|
|
|
|
|
|
|
|
|
|
|
|
|
2.bash的工作特性之命令执行后状态返回值和命令展开所涉及的内容及其示例演示
命令执行的状态结果:
bash通过状态返回值来输出此结果:
成功:0
失败:1-255
命令执行完成之后,其状态返回值保存于bash的特殊变量$?中;
命令正常执行时,有的还回有命令返回值:
根据命令及其功能不同,结果各不相同;
[root@localhost ~]# ls /etc/sysconfig
anaconda ebtables-config irqbalance network selinux
authconfig firewalld kdump network-scripts sshd
cbq grub kernel rdisc wpa_supplicant
console init man-db readonly-root
cpupower ip6tables-config modules rsyslog
crond iptables-config netconsole run-parts
[root@localhost ~]# echo $?
0
[root@localhost ~]# ls /etc/sysconfigg
ls: cannot access /etc/sysconfigg: No such file or directory
[root@localhost ~]# echo $?
2
[root@localhost ~]# lss /etc/sysconfig
-bash: lss: command not found
[root@localhost ~]# echo $?
127
3.请命令行展开功能来完成以下练习:
(1)创建/tmp下 a_c a_d b_c b_d
[root@localhost ~]# mkdir -v /tmp{a,b}_{c,d}
mkdir: created directory ‘/tmpa_c’
mkdir: created directory ‘/tmpa_d’
mkdir: created directory ‘/tmpb_c’
mkdir: created directory ‘/tmpb_d’
(2)创建/tmp/mylinux目录下的:
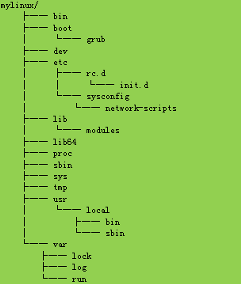

[root@localhost ~]# mkdir -pv /tmp/mylinux/{bin,boot/grub,dev,etc/{rc.d/init.d,sysconfig/network-scripts},lib
/modules,lib64,proc,sbin,sys,tmp,usr/local/{bin,sbin},var/{lock,log,run}}
mkdir: created directory ‘/tmp/mylinux’
mkdir: created directory ‘/tmp/mylinux/bin’
mkdir: created directory ‘/tmp/mylinux/boot’
mkdir: created directory ‘/tmp/mylinux/boot/grub’
mkdir: created directory ‘/tmp/mylinux/dev’
mkdir: created directory ‘/tmp/mylinux/etc’
mkdir: created directory ‘/tmp/mylinux/etc/rc.d’
mkdir: created directory ‘/tmp/mylinux/etc/rc.d/init.d’
mkdir: created directory ‘/tmp/mylinux/etc/sysconfig’
mkdir: created directory ‘/tmp/mylinux/etc/sysconfig/network-scripts’
mkdir: created directory ‘/tmp/mylinux/lib’
mkdir: created directory ‘/tmp/mylinux/lib/modules’
mkdir: created directory ‘/tmp/mylinux/lib64’
mkdir: created directory ‘/tmp/mylinux/proc’
mkdir: created directory ‘/tmp/mylinux/sbin’
mkdir: created directory ‘/tmp/mylinux/sys’
mkdir: created directory ‘/tmp/mylinux/tmp’
mkdir: created directory ‘/tmp/mylinux/usr’
mkdir: created directory ‘/tmp/mylinux/usr/local’
mkdir: created directory ‘/tmp/mylinux/usr/local/bin’
mkdir: created directory ‘/tmp/mylinux/usr/local/sbin’
mkdir: created directory ‘/tmp/mylinux/var’
mkdir: created directory ‘/tmp/mylinux/var/lock’
mkdir: created directory ‘/tmp/mylinux/var/log’
mkdir: created directory ‘/tmp/mylinux/var/run’
4.文件元数据信息有哪些,分别表示什么含义,如何查看,如何修改文件的时间戳信息
文件:每一文件都有两类数据
元数据:metadata
数据: data
|
|
|
|
|
|
|
5.如何定义一个命令别名,如何在引用另一个命令的执行结果
命令别名:
获取所有可用别名的定义:
[root@localhost ~]# alias
alias cp=’cp -i’
alias egrep=’egrep –color=auto’
alias fgrep=’fgrep –color=auto’
alias grep=’grep –color=auto’
alias l.=’ls -d .* –color=auto’
alias ll=’ls -l –color=auto’
alias ls=’ls –color=auto’
alias mv=’mv -i’
alias rm=’rm -i’
alias which=’alias | /usr/bin/which –tty-only –read-alias –show-dot –show-tilde’
定义别名:
[root@localhost ~]# alias cls=clear
[root@localhost ~]# alias
alias cls=’clear’
alias cp=’cp -i’
alias egrep=’egrep –color=auto’
alias fgrep=’fgrep –color=auto’
alias grep=’grep –color=auto’
alias l.=’ls -d .* –color=auto’
alias ll=’ls -l –color=auto’
alias ls=’ls –color=auto’
alias mv=’mv -i’
alias rm=’rm -i’
alias which=’alias | /usr/bin/which –tty-only –read-alias –show-dot –show-tilde’
注意:定义别名使用小写,如果命令之间没有空格,不需要加单引号,但仅对当前shell进程有效
引用命令的执行结果:
$(COMMAND)
或`COMMAND`
[root@localhost ~]# date
Tue Dec 5 18:23:28 CST 2017
[root@localhost ~]# date +%T
18:23:46
[root@localhost ~]# date +%H-%M-%S
18-24-44
[root@localhost ~]# mkdir $(date +%H-%M-%S)
[root@localhost ~]# ls
18-25-29 anaconda-ks.cfg
[root@localhost ~]# mkdir $(date +%H-%M-%S)
[root@localhost ~]# ls
18-25-29 18-25-50 anaconda-ks.cfg
[root@localhost ~]# mkdir `date +%H-%M-%S`
[root@localhost ~]# ls
18-25-29 18-25-50 18-27-01 anaconda-ks.cfg
6.显示/var目录下以l开头,以一个小写字母结尾,且中间至少出现一位数字(可有其它字符)的文件或目录
[root@localhost ~]# ls -d /var/l*[[:digit:]]*[[:lower:]]
7.显示/etc目录下,以任意一个数字开头,且以非数字结尾的文件或目录
[root@localhost ~]# ls -d /etc/[0-9]*[^0-9]
8.显示/etc目录下,以非字母开头,后面跟了一个字母以及其它任意长度任意字符的文件或目录
[root@localhost ~]# ls /etc/[^a-z][a-z]*
9.在/tmp目录下创建以tfile开头,后跟当前日期和时间的文件,文件名形如:tfile-2016-05-27-09-32-22
[root@localhost ~]# mkdir -pv /tmp/tfile-$(date +”%F-%H-%M-%S”)
mkdir: created directory ‘/tmp/tfile-2017-12-10-18-22-43’
[root@localhost ~]# ls -d /tmp/tfile*[0-9]
/tmp/tfile-2017-12-10-18-22-43
[root@localhost ~]# touch /tmp/file-$(date +”%F-%H-%M-%S”)
[root@localhost ~]# ls -d /tmp/tfile*[0-9]
/tmp/tfile-2017-12-10-18-22-43
[root@localhost ~]# touch /tmp/tfile-$(date +”%F-%H-%M-%S”)
[root@localhost ~]# ls -d /tmp/tfile*[0-9]
/tmp/tfile-2017-12-10-18-22-43 /tmp/tfile-2017-12-10-18-26-16
10.复制/etc目录下所有以p开头,以非数字结尾的文件或目录到/tmp/mytest1目录中
[root@localhost ~]# mkdir /tmp/mytest1
[root@localhost ~]# cp -a /etc/p*[^0-9] /tmp/mytest1/
[root@localhost ~]# ls -d /tmp/mytest1/*
/tmp/mytest1/pam.d /tmp/mytest1/pm /tmp/mytest1/printcap
/tmp/mytest1/passwd /tmp/mytest1/popt.d /tmp/mytest1/profile
/tmp/mytest1/passwd- /tmp/mytest1/postfix /tmp/mytest1/profile.d
/tmp/mytest1/pki /tmp/mytest1/ppp /tmp/mytest1/protocols
/tmp/mytest1/plymouth /tmp/mytest1/prelink.conf.d /tmp/mytest1/python
[root@localhost ~]# \cp -rf /etc/p*[^0-9] /tmp/mytest1/
[root@localhost ~]# ls -d /tmp/mytest1/*
/tmp/mytest1/pam.d /tmp/mytest1/pm /tmp/mytest1/printcap
/tmp/mytest1/passwd /tmp/mytest1/popt.d /tmp/mytest1/profile
/tmp/mytest1/passwd- /tmp/mytest1/postfix /tmp/mytest1/profile.d
/tmp/mytest1/pki /tmp/mytest1/ppp /tmp/mytest1/protocols
/tmp/mytest1/plymouth /tmp/mytest1/prelink.conf.d /tmp/mytest1/python
11.复制/etc目录下所有以.d结尾的文件或目录至/tmp/mytest2目录中
[root@localhost ~]# mkdir -v /tmp/mytest2
mkdir: created directory ‘/tmp/mytest2’
[root@localhost ~]# ls -d /etc/*.d
/etc/bash_completion.d /etc/ld.so.conf.d /etc/rc0.d /etc/rwtab.d
/etc/binfmt.d /etc/logrotate.d /etc/rc1.d /etc/statetab.d
/etc/chkconfig.d /etc/modprobe.d /etc/rc2.d /etc/sudoers.d
/etc/cron.d /etc/modules-load.d /etc/rc3.d /etc/sysctl.d
/etc/depmod.d /etc/my.cnf.d /etc/rc4.d /etc/tmpfiles.d
/etc/dracut.conf.d /etc/pam.d /etc/rc5.d /etc/xinetd.d
/etc/grub.d /etc/popt.d /etc/rc6.d /etc/yum.repos.d
/etc/init.d /etc/prelink.conf.d /etc/rc.d
/etc/krb5.conf.d /etc/profile.d /etc/rsyslog.d
[root@localhost ~]# cp -a /etc/*.d /tmp/mytest2
[root@localhost ~]# ls -d /tmp/mytest2/*
/tmp/mytest2/bash_completion.d /tmp/mytest2/modules-load.d /tmp/mytest2/rc6.d
/tmp/mytest2/binfmt.d /tmp/mytest2/my.cnf.d /tmp/mytest2/rc.d
/tmp/mytest2/chkconfig.d /tmp/mytest2/pam.d /tmp/mytest2/rsyslog.d
/tmp/mytest2/cron.d /tmp/mytest2/popt.d /tmp/mytest2/rwtab.d
/tmp/mytest2/depmod.d /tmp/mytest2/prelink.conf.d /tmp/mytest2/statetab.d
/tmp/mytest2/dracut.conf.d /tmp/mytest2/profile.d /tmp/mytest2/sudoers.d
/tmp/mytest2/grub.d /tmp/mytest2/rc0.d /tmp/mytest2/sysctl.d
/tmp/mytest2/init.d /tmp/mytest2/rc1.d /tmp/mytest2/tmpfiles.d
/tmp/mytest2/krb5.conf.d /tmp/mytest2/rc2.d /tmp/mytest2/xinetd.d
/tmp/mytest2/ld.so.conf.d /tmp/mytest2/rc3.d /tmp/mytest2/yum.repos.d
/tmp/mytest2/logrotate.d /tmp/mytest2/rc4.d
/tmp/mytest2/modprobe.d /tmp/mytest2/rc5.d
12.复制/etc/目录下所有以l或m或n开头,以.conf结尾的文件或目录至/tmp/mytest3目录中
[root@localhost ~]# mkdir -v /tmp/mytest3
mkdir: created directory ‘/tmp/mytest3’
[root@localhost ~]# ls -d /etc/[lmn]*.conf
/etc/ld.so.conf /etc/libuser.conf /etc/logrotate.conf /etc/mke2fs.conf
/etc/libaudit.conf /etc/locale.conf /etc/man_db.conf /etc/nsswitch.conf
[root@localhost ~]# cp -a /etc/[lmn]*.conf /tmp/mytest3
[root@localhost ~]# ls -d /tmp/mytest3/*
/tmp/mytest3/ld.so.conf /tmp/mytest3/locale.conf /tmp/mytest3/mke2fs.conf
/tmp/mytest3/libaudit.conf /tmp/mytest3/logrotate.conf /tmp/mytest3/nsswitch.conf
/tmp/mytest3/libuser.conf /tmp/mytest3/man_db.conf
本文来自投稿,不代表Linux运维部落立场,如若转载,请注明出处:http://www.178linux.com/89813

评论列表(1条)
总结很详细的一篇。继续加油~