

1、源码编译安装LNMP架构环境
IP:192.168.12.137
Nginx:1.8.1
MariaDB:5.5.57
PHP:5.6.31

安装开发环境包组
    yum groupinstall "Development Tools" "Server Platform Development" -y
安装开发程序包
    yum install pcre-devel -y

(1)安装nginx
# yum -y install openssl-devel zlib-devel

安装nginx
添加用户nginx,实现以之运行nginx服务进程:
# groupadd -r nginx
# useradd -r -g nginx nginx

# tar xf nginx-1.8.1.tar.gz
# cd nginx-1.8.1/
# ./configure \
  --prefix=/usr/local/nginx \
  --sbin-path=/usr/local/nginx/sbin/nginx \
  --conf-path=/etc/nginx/nginx.conf \
  --error-log-path=/var/log/nginx/error.log \
  --http-log-path=/var/log/nginx/access.log \
  --pid-path=/var/run/nginx/nginx.pid  \
  --lock-path=/var/lock/nginx.lock \
  --user=nginx \
  --group=nginx \
  --with-http_ssl_module \
  --with-http_flv_module \
  --with-http_stub_status_module \
  --with-http_gzip_static_module \
  --http-client-body-temp-path=/var/tmp/nginx/client/ \
  --http-proxy-temp-path=/var/tmp/nginx/proxy/ \
  --http-fastcgi-temp-path=/var/tmp/nginx/fcgi/ \
  --http-uwsgi-temp-path=/var/tmp/nginx/uwsgi \
  --http-scgi-temp-path=/var/tmp/nginx/scgi \
  --with-pcre

为nginx提供SysV init脚本
#vim /etc/rc.d/init.d/nginx

#!/bin/sh
#
# nginx - this script starts and stops the nginx daemon
#
# chkconfig:   - 85 15
# description:  Nginx is an HTTP(S) server, HTTP(S) reverse \
#               proxy and IMAP/POP3 proxy server
# processname: nginx
# config:      /etc/nginx/nginx.conf
# config:      /etc/sysconfig/nginx
# pidfile:     /var/run/nginx/nginx.pid

# Source function library.
. /etc/rc.d/init.d/functions

# Source networking configuration.
. /etc/sysconfig/network

# Check that networking is up.
[ "$NETWORKING" = "no" ] && exit 0

nginx="/usr/local/nginx/sbin/nginx"
prog=$(basename $nginx)

NGINX_CONF_FILE="/etc/nginx/nginx.conf"

[ -f /etc/sysconfig/nginx ] && . /etc/sysconfig/nginx

lockfile=/var/lock/subsys/nginx

make_dirs() {
   # make required directories
   user=`nginx -V 2>&1 | grep "configure arguments:" | sed 's/[^*]*--user=\([^ ]*\).*/\1/g' -`
   options=`$nginx -V 2>&1 | grep 'configure arguments:'`
   for opt in $options; do
       if [ `echo $opt | grep '.*-temp-path'` ]; then
           value=`echo $opt | cut -d "=" -f 2`
           if [ ! -d "$value" ]; then
               # echo "creating" $value
               mkdir -p $value && chown -R $user $value
           fi
       fi
   done
}

start() {
    [ -x $nginx ] || exit 5
    [ -f $NGINX_CONF_FILE ] || exit 6
    make_dirs
    echo -n $"Starting $prog: "
    daemon $nginx -c $NGINX_CONF_FILE
    retval=$?
    echo
    [ $retval -eq 0 ] && touch $lockfile
    return $retval
}

stop() {
    echo -n $"Stopping $prog: "
    killproc $prog -QUIT
    retval=$?
    echo
    [ $retval -eq 0 ] && rm -f $lockfile
    return $retval
}

restart() {
    configtest || return $?
    stop
    sleep 1
    start
}

reload() {
    configtest || return $?
    echo -n $"Reloading $prog: "
    killproc $nginx -HUP
    RETVAL=$?
    echo
}

force_reload() {
    restart
}

configtest() {
  $nginx -t -c $NGINX_CONF_FILE
}

rh_status() {
    status $prog
}

rh_status_q() {
    rh_status >/dev/null 2>&1
}

case "$1" in
    start)
        rh_status_q && exit 0
        $1
        ;;
    stop)
        rh_status_q || exit 0
        $1
        ;;
    restart|configtest)
        $1
        ;;
    reload)
        rh_status_q || exit 7
        $1
        ;;
    force-reload)
        force_reload
        ;;
    status)
        rh_status
        ;;
    condrestart|try-restart)
        rh_status_q || exit 0
            ;;
    *)
        echo $"Usage: $0 {start|stop|status|restart|condrestart|try-restart|reload|force-reload|configtest}"
        exit 2
esac

为此脚本赋予执行权限:
# chmod +x /etc/rc.d/init.d/nginx

把Nginx加入系统变量
# cd /etc/profile.d/
# vim nginx.sh
# . nginx.sh

添加至服务管理列表,并让其开机自动启动:
# chkconfig --add nginx
# chkconfig nginx on

(1)安装MariaDB
# yum -y install ncurses-devel

安装cmake
# tar xf cmake-3.8.1.tar.gz
# cd cmake-3.8.1/
# ./configure
# make -j 8 && make install

安装MariaDB
添加mysql运行组及用户、创建数据库数据文件文件夹并授予合适权限
# groupadd -r mysql
# useradd -r -g mysql mysql
# mkdir -p /data/mysql
# chown -R mysql:mysql /data/mysql

# tar xf mariadb-5.5.57.tar.gz
# cd mariadb-5.5.57/
# cmake . -DCMAKE_INSTALL_PREFIX=/usr/local/mysql -DMYSQL_DATADIR=/data/mysql -DSYSCONFDIR=/etc
# make -j 8 && make install

备份原有mariadb配置文件
# mv /etc/my.cnf /etc/my.cnf.bak

初始化数据库,配置启动脚本
# cd /usr/local/mysql
# ./scripts/mysql_install_db --user=mysql --basedir=/usr/local/mysql --datadir=/data/mysql
# ln -s /usr/local/mysql/my.cnf /etc/my.cnf
# cp ./support-files/mysql.server /etc/rc.d/init.d/mysqld
# vim /etc/rc.d/init.d/mysqld
basedir=/usr/local/mysql
datadir=/data/mysql
# chmod +x /etc/rc.d/init.d/mysqld
# chkconfig mysqld on
# service mysqld start

把MariaDB加入系统环境变量
# cd /etc/profile.d
# vim mysql.sh
export PATH=/usr/local/mysql/bin:$PATH
# . mysql.sh

把MariaDB的库文件链接到系统默认的位置,在编译PHP等软件时可以不用指定其库文件地址
# ln -s /usr/local/mysql/lib/mysql /usr/lib/mysql
# ln -s /usr/local/mysql/include/mysql/ /usr/include/mysql
# mkdir /var/lib/mysql
# ln -s /tmp/mysql.sock /var/lib/mysql/mysql.sock

交互式设置数据库
# mysql_secure_installation
NOTE: RUNNING ALL PARTS OF THIS SCRIPT IS RECOMMENDED FOR ALL MariaDB
      SERVERS IN PRODUCTION USE!  PLEASE READ EACH STEP CAREFULLY!

In order to log into MariaDB to secure it, we'll need the current
password for the root user.  If you've just installed MariaDB, and
you haven't set the root password yet, the password will be blank,
so you should just press enter here.

Enter current password for root (enter for none):
OK, successfully used password, moving on...

Setting the root password ensures that nobody can log into the MariaDB
root user without the proper authorisation.

Set root password? [Y/n] Y
New password:
Re-enter new password:
Password updated successfully!
Reloading privilege tables..
 ... Success!


By default, a MariaDB installation has an anonymous user, allowing anyone
to log into MariaDB without having to have a user account created for
them.  This is intended only for testing, and to make the installation
go a bit smoother.  You should remove them before moving into a
production environment.

Remove anonymous users? [Y/n] Y
 ... Success!

Normally, root should only be allowed to connect from 'localhost'.  This
ensures that someone cannot guess at the root password from the network.

Disallow root login remotely? [Y/n] Y
 ... Success!

By default, MariaDB comes with a database named 'test' that anyone can
access.  This is also intended only for testing, and should be removed
before moving into a production environment.

Remove test database and access to it? [Y/n] Y
 - Dropping test database...
 ... Success!
 - Removing privileges on test database...
 ... Success!

Reloading the privilege tables will ensure that all changes made so far
will take effect immediately.

Reload privilege tables now? [Y/n] Y
 ... Success!

Cleaning up...

All done!  If you've completed all of the above steps, your MariaDB
installation should now be secure.

Thanks for using MariaDB!

(3)安装php
安装libmcrypt
# tar xf libmcrypt-2.5.7.tar.gz
# cd libmcrypt-2.5.7/
# ./configure
# make -j 8 && make install

解决依赖关系
yum -y install gcc gcc-c++ libxml2 libxml2-devel bzip2 bzip2-devel libmcrypt libmcrypt-devel openssl openssl-devel libcurl-devel libjpeg-devel libpng-devel freetype-devel readline readline-devel libxslt-devel perl perl-devel psmisc.x86_64 recode recode-devel libtidy libtidy-devel

安装php
# tar xf php-5.6.31.tar.gz
# cd php-5.6.31/
# ./configure --prefix=/usr/local/php --with-mysql=/usr/local/mysql --with-openssl --enable-fpm --enable-sockets --enable-sysvshm  --with-mysqli=/usr/local/mysql/bin/mysql_config --enable-mbstring --with-freetype-dir --with-jpeg-dir --with-png-dir --with-zlib-dir --with-libxml-dir=/usr --enable-xml  --with-mhash --with-mcrypt  --with-config-file-path=/etc --with-config-file-scan-dir=/etc/php.d --with-bz2 --with-curl
# make -j 8 && make install

复制php配置文件到安装目录
# cp php.ini-production /usr/local/php/etc/php.ini

添加软链接到 /etc目录
# ln -s /usr/local/php/etc/php.ini /etc/php.ini

拷贝模板文件为php-fpm配置文件
# cp /usr/local/php/etc/php-fpm.conf.default  /usr/local/php/etc/php-fpm.conf

添加软连接到 /etc目录
# ln -s /usr/local/php/etc/php-fpm.conf /etc/php-fpm.conf

修改PHP配置文件
# vim /usr/local/php/etc/php.ini
disable_functions = passthru,exec,system,chroot,scandir,chgrp,chown,shell_exec,proc_open,proc_get_status,ini_alter,ini_alter,ini_restore,dl,openlog,syslog,readlink,symlink,popepassthru,stream_socket_server,escapeshellcmd,dll,popen,disk_free_space,checkdnsrr,checkdnsrr,getservbyname,getservbyport,disk_total_space,posix_ctermid,posix_get_last_error,posix_getcwd, posix_getegid,posix_geteuid,posix_getgid, posix_getgrgid,posix_getgrnam,posix_getgroups,posix_getlogin,posix_getpgid,posix_getpgrp,posix_getpid, posix_getppid,posix_getpwnam,posix_getpwuid, posix_getrlimit, posix_getsid,posix_getuid,posix_isatty, posix_kill,posix_mkfifo,posix_setegid,posix_seteuid,posix_setgid, posix_setpgid,posix_setsid,posix_setuid,posix_strerror,posix_times,posix_ttyname,posix_uname

date.timezone = Asia/Shanghai
expose_php = Off
short_open_tag = On
opcache.enable=1
zend_extension = "opcache.so"
opcache.memory_consumption=128
opcache.interned_strings_buffer=8
opcache.max_accelerated_files=4000
opcache.revalidate_freq=60
opcache.fast_shutdown=1
opcache.enable_cli=1

配置php-fpm
#vim /usr/local/php/etc/php-fpm.conf
pid = run/php-fpm.pid
user = www
group = www

拷贝php-fpm脚本到启动目录,给予执行权限, 设置开机启动
# cp /root/php-5.6.31/sapi/fpm/init.d.php-fpm.in /etc/rc.d/init.d/php-fpm
# vim /etc/rc.d/init.d/php-fpm
php_fpm_BIN=/usr/local/php/sbin/php-fpm
php_fpm_CONF=/usr/local/php/etc/php-fpm.conf
php_fpm_PID=/usr/local/php/var/run/php-fpm.pid

# chmod +x /etc/rc.d/init.d/php-fpm
# chkconfig php-fpm on

把php加入系统变量
# cd /etc/profile.d/
# vim php.sh
export PATH=/usr/local/php/bin/:$PATH
# . php.sh

配置nginx支持php
# vim /etc/nginx/nginx.conf
user www www;

index index.php index.html index.htm;

location ~ \.php$ {
root html;
fastcgi_pass 127.0.0.1:9000;
fastcgi_index index.php;
fastcgi_param SCRIPT_FILENAME $document_root$fastcgi_script_name;
include fastcgi_params;
}
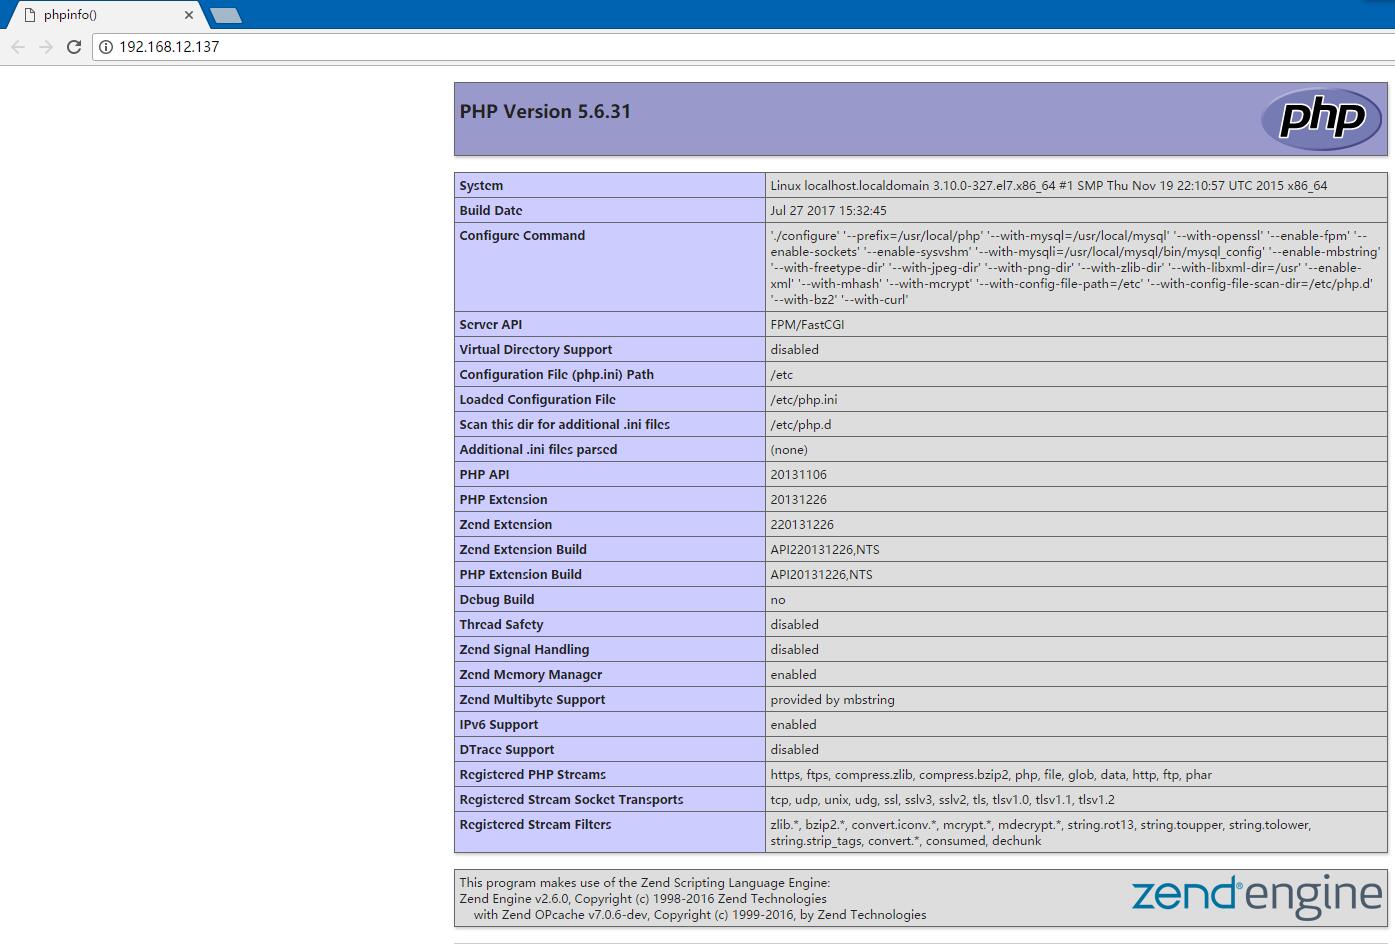
测试php
# service nginx restart
# service php-fpm start
# cd /usr/local/nginx/html/
# vim index.php
<?php phpinfo(); ?>

2、编写一个脚本完成以下功能:
(1)、一键搭建LNMP源码编译环境;
(2)、可通过在脚本后面跟上一些参数来自定义安装目录等其他选项。
#!/bin/bash
lnmp() {
    echo "安装前环境准备..."
    sleep 3
    yum remove nginx mysql mariadb php -y
    yum groupinstall "Development Tools" "Development Libraries" -y
    yum install openssl-devel \
    ncurses-devel \
    cmake \
    pcre-devel \
    libxml2-devel \
    bzip2-devel \
    libcurl-devel \
    libmcrypt-devel -y

    iptables -F
    systemctl stop firewalld.service
    systemctl disable firewalld.service
    setenforce 0
    sed -i '/^SELINUX\>/d' /etc/selinux/config
    echo "SELINUX=disabled" >>/etc/selinux/config

    echo "开始安装nginx..."
    sleep 3

    #编译安装nginx
    id nginx &>/dev/null && userdel -r nginx
    groupdel nginx
    groupadd -r nginx
    useradd -r -g nginx nginx
    tar xf $PWD/nginx-1.8.1.tar.gz
    cd $PWD/nginx-1.8.1
    ./configure \
    --prefix=$dir/nginx \
    --sbin-path=$dir/nginx/sbin/nginx \
    --conf-path=/etc/nginx/nginx.conf \
    --error-log-path=/var/log/nginx/error.log \
    --http-log-path=/var/log/nginx/access.log \
    --pid-path=/var/run/nginx/nginx.pid  \
    --lock-path=/var/lock/nginx.lock \
    --user=nginx \
    --group=nginx \
    --with-http_ssl_module \
    --with-http_flv_module \
    --with-http_stub_status_module \
    --with-http_gzip_static_module \
    --http-client-body-temp-path=/var/tmp/nginx/client/ \
    --http-proxy-temp-path=/var/tmp/nginx/proxy/ \
    --http-fastcgi-temp-path=/var/tmp/nginx/fcgi/ \
    --http-uwsgi-temp-path=/var/tmp/nginx/uwsgi \
    --http-scgi-temp-path=/var/tmp/nginx/scgi \
    --with-pcre
    make -j 8 && make install

    mkdir -p /var/tmp/nginx/client

    #添加对php的支持
    sed -i '65,71s/^[[:space:]]\+#//g' /etc/nginx/nginx.conf
    sed -i '45s/index.html/index.php index.html/g' /etc/nginx/nginx.conf
    echo "fastcgi_param  SCRIPT_FILENAME    \$document_root\$fastcgi_script_name;" >> /etc/nginx/fastcgi_params

    #添加环境变量
    echo "export PATH=$dir/nginx/sbin:$PATH" >/etc/profile.d/nginx.sh
    source /etc/profile

    nginx

    #Nginx测试
    if curl 127.0.0.1 &>/dev/null;then
        echo "Nginx安装成功!"
    else
        echo "Nginx安装失败!"
    fi

    echo "开始安装MariaDB..."
    sleep 3

    #编译安装MariaDB
    id mysql &>/dev/null && userdel -r mysql
    groupadd -r mysql
    useradd -g mysql -r -s /sbin/nologin
    chown -R mysql:mysql /mydata/data/
    tar xf $PWD/mariadb-5.5.57.tar.gz
    cd $PWD/mariadb-5.5.57
    cmake \
    -DCMAKE_INSTALL_PREFIX=$dir/mysql \
    -DMYSQL_DATADIR=/mydata/data \
    -DSYSCONFDIR=/etc \
    -DWITH_MYISAM_STORAGE_ENGINE=1 \
    -DWITH_INNOBASE_STORAGE_ENGINE=1 \
    -DWITH_MEMORY_STORAGE_ENGINE=1 \
    -DWITH_READLINE=1 \
    -DMYSQL_UNIX_ADDR=/var/lib/mysql/mysql.sock \
    -DMYSQL_TCP_PORT=3306 \
    -DENABLED_LOCAL_INFILE=1 \
    -DWITH_PARTITION_STORAGE_ENGINE=1 \
    -DEXTRA_CHARSETS=all \
    -DDEFAULT_CHARSET=utf8 \
    -DDEFAULT_COLLATION=utf8_general_ci \
    -DMYSQL_USER=mysql \
    -DWITH_DEBUG=0 \
    -DWITH_SSL=system
    make -j 8 && make install

    #初始化数据库
    cd $dir/mysql
    chown -R mysql:mysql ./*
    [ ! -d /mydata/data ] && mkdir -p /mydata/data
    scripts/mysql_install_db --user=mysql --datadir=/mydata/data/

    #修改MySQL参数文件
    /usr/bin/cp support-files/my-large.cnf /etc/my.cnf
    sed -i '/\[mysqld\]/a datadir= /mydata/data\ninnodb_file_per_table= ON\nskip_name_resolve= ON' /etc/my.cnf

    #生成MySQL启动文件
    /usr/bin/cp support-files/mysql.server /etc/rc.d/init.d/mysqld

    ln -s $dir/mysql/include/ /usr/include/mysql
    echo "$dir/mysql/lib/" >/etc/ld.so.conf.d/mysql.conf
    ldconfig

    #添加MySQL环境变量
    echo "export PATH=$dir/mysql/bin:$PATH" >/etc/profile.d/mysql.sh
    source /etc/profile

    #启动MySQL
    /etc/init.d/mysqld start

    echo "开始安装php..."
    sleep 3
    tar xf $PWD/php-5.6.31.tar.gz
    cd $PWD/php-5.6.31
    #打补丁,解决编译安装过程中的报错

    ./configure --prefix=$dir/php \
    --with-mysql=$dir/mysql \
    --with-openssl \
    --enable-fpm \
    --enable-sockets \
    --enable-sysvshm \
    --with-mysqli=$dir/mysql/bin/mysql_config \
    --enable-mbstring \
    --with-freetype-dir \
    --with-jpeg-dir \
    --with-png-dir \
    --with-zlib-dir \
    --with-libxml-dir=/usr/include/libxml2/libxml \
    --enable-xml \
    --with-mhash \
    --with-mcrypt \
    --with-config-file-path=/etc \
    --with-config-file-scan-dir=/etc/php.d \
    --with-bz2 \
    --with-curl
    make -j 8 && make install

    #生成php-fpm启动文件
    /usr/bin/cp sapi/fpm/init.d.php-fpm /etc/rc.d/init.d/php-fpm
    chmod +x /etc/rc.d/init.d/php-fpm

    #修改php参数文件
    /usr/bin/cp $dir/php/etc/php-fpm.conf.default $dir/php/etc/php-fpm.conf
    sed -i -e '/pm.max_children/d' -e \
    '/\<pm.start_servers\>/d' -e \
    '/\<pm.min_spare_servers\>/d' -e \
    '/\<pm.max_spare_servers\>/d' -e \
    '/pid = run\/php-fpm.pid/s/^;//g' $dir/php/etc/php-fpm.conf
    cat >>$dir/php/etc/php-fpm.conf <<EOF
    pm.max_children = 150
    pm.start_servers = 8
    pm.min_spare_servers = 5
    pm.max_spare_servers = 10
    EOF

    /etc/init.d/php-fpm start
    echo "php安装完毕!"
}

PWD=$(pwd)

if [ ! -f $PWD/mariadb-5.5.57.tar.gz ] || [ ! -f $PWD/nginx-1.8.1.tar.gz ] || [ ! -f $PWD/php-5.6.31.tar.gz ];then
    echo "请将安装文件与脚本放在同一目录下!"
    exit 1
fi

if [ $# -eq 0 ];then
    echo "请输入安装位置"
    exit 1
elif [ $# -eq 1 ];then
    dir=$1
    if [ ! -d $dir ];then
    mkdir -p $dir
    fi
else
    echo "参数无效,请重新执行!"
    exit 1
fi

lnmp
原创文章,作者:浙江-咲,如若转载,请注明出处:http://www.178linux.com/83559
