

1、回顾并详细总结MySQL的存储引擎、索引;
常用存储引擎的对比:
| 特点 | MyISAM | InnoDB | MEMORY | MERGE | NDB |
| 存储限制 | 有 | 64TB | 有 | 没有 | 有 |
| 事务安全 | 支持 | ||||
| 锁机制 | 表锁 | 行锁 | 表锁 | 表锁 | 行锁 |
| B树索引 | 支持 | 支持 | 支持 | 支持 | 支持 |
| 哈希索引 | 支持 | ||||
| 全文索引 | 支持 | ||||
| 集群索引 | 支持 | ||||
| 数据缓存 | 支持 | 支持 | 支持 | ||
| 索引缓存 | 支持 | 支持 | 支持 | 支持 | 支持 |
| 数据可压缩 | 支持 | ||||
| 空间使用 | 低 | 高 | N/A | 低 | 低 |
| 内存使用 | 低 | 高 | 中等 | 低 | 高 |
| 批量插入的速度 | 高 | 低 | 高 | 高 | 高 |
| 支持外键 | 支持 |
InnoDB:5.5版本之后默认的存储引擎,具有提交、回滚和崩溃恢复能力的事务安全机制,但是对比MyISAM,InnoDB写处理效率差一些,并且会占用更多的磁盘空间以保留数据和索引。
处理大量的短期事务;
数据存储于“表空间(table space)”中;
(1) 所有InnoDB表的数据和索引放置于同一个表空间中;
表空间文件:datadir定义的目录下
数据文件:ibddata1, ibddata2, …
(2) 每个表单独使用一个表空间存储表的数据和索引;
innodb_file_per_table=ON
数据文件(存储数据和索引):tbl_name.ibd,
表格式定义:tbl_name.frm
基于MVCC来支持高并发,支持所有的四个隔离级别,默认级别为REPEATABLE READ; 间隙锁防止幻读;
使用聚集索引
支持“自适应hash索引”
锁粒度:行级锁
MariaDB (XtraDB (percona))
数据存储:表空间
并发:MVCC, 间隙锁
索引:聚集索引、辅助索引
性能:预计操作、自适应hash、插入缓存区
备份:支持热备(xtrabacup)
MyISAM:5.5之前版本的默认存储引擎,MyISAM不支持事务、外键,其优势是访问速度快,并且支持全文索引,对事务完整性没有要求或者以SELECT、INSERT为主的应用基本上都可以使用这个引擎来创建表。
支持全文索引(FULLTEXT index)、压缩、空间函数(GIS); 但不支持事务,且为表级锁;
崩溃后无法安全恢复
适用场景:只读(或者写较少)、表较小(可以接受长时间进行修复操作)
Aria:crash-safe
文件:
tbl_name.frm: 表格式定义
tbl_name.MYD: 数据文件
tbl_name.MYI: 索引文件
特性:
加锁和并发:表级锁
修复:手工或自动修复、但可能丢失数据
索引:非聚集索引
延迟更新索引键:
压缩表
行格式:dynamic, fixed, compressed, compact, redundent
其它的存储引擎:
CSV:将普通的CSV(字段通过逗号分隔)作为MySQL表使用;
MRG_MYISAM:将多个MyISAM表合并成为一个虚拟表;
BLACKHOLE:类似于/dev/null,不真正存储任何数据;
MEMORY:所有数据都保存于内存中,内存表;支持hash索引;表级锁;
临时表
PERFORMANCE_SCHEMA:伪存储引擎;
ARCHIVE:只支持SELECT和INSERT操作;支持行级锁和专用缓存区;
FEDERATED:用于访问其它远程MySQL服务器一个代理,它通过创建一个到远程MySQL服务器的客户端连接,并将查询传输到远程服务器执行,而后完成数据存取;
在MariaDB的上实现是FederatedX
MariaDB支持的其它存储引擎:
OQGraph
SphinxSE
TokuDB
Cassandra
CONNECT
SQUENCE
MySQL中的索引:
基本法则:索引应该构建在被用作查询条件的字段上;
索引类型:
B+ Tree索引:顺序存储,每一个叶子节点到根结点的距离是相同的;左前缀索引,适合查询范围类的数据;
可以使用B-Tree索引的查询类型:
全值匹配:精确某个值, “Jinjiao King”;
匹配最左前缀:只精确匹配起头部分,”Jin%”
匹配范围值:
精确匹配某一列并范围匹配另一列:
只访问索引的查询
不适合使用B-Tree索引的场景:
如果不从最左列开始,索引无效; (Age,Name)
不能跳过索引中的列;(StuID,Name,Age)
如果查询中某个列是为范围查询,那么其右侧的列都无法再使用索引优化查询;(StuID,Name)
Hash索引:基于哈希表实现,特别适用于精确匹配索引中的所有列;
注意:只有Memory存储引擎支持显式hash索引;
适用场景:
只支持等值比较查询,包括=, IN(), <=>;
不适合使用hash索引的场景:
存储的非为值的顺序,因此,不适用于顺序查询;
不支持模糊匹配;
空间索引(R-Tree):
MyISAM支持空间索引,它可以使用诸如GEOMETRY这样的地址空间数据类型。和B-Tree索引不同,空间索引不会要求WHERE子句使用索引的最左前缀。它同时全方位的索引了数据。这样就可以高效的使用任何数据组合进行查找,然而,必须使用MySQL GIS函数,例如MBRCONTAINS(),才能得到这个好处。
全文索引(FULLTEXT):
FULLTEXT是MyISAM表的一种特殊索引,它从文本中找到关键字,而不是直接和索引中的值进行比较。
索引优点:
索引可以降低服务需要扫描的数据量,减少了IO次数;
索引可以帮助服务器避免排序和使用临时表;
索引可以帮助将随机I/O转为顺序I/O;
高性能索引策略:
独立使用列,尽量避免其参与运算;
左前缀索引:索引构建于字段的左侧的多少个字符,要通过索引选择性来评估
索引选择性:不重复的索引值和数据表的记录总数的比值;
多列索引:
AND操作时更适合使用多列索引;
选择合适的索引列次序:将选择性最高放左侧;
2、以实战案例的形式总结MySQL的备份类型以及如何恢复等详细操作;
MySQL常见的三种备份方式:
1)mysqldump+binlog,完全备份,通过备份二进制日志实现增量备份
2)lvm2快照+binlog:几乎热备,物理备份
3)xtrabackup:
对InnoDB:热备,支持完全备份和增量备份
对MyISAM引擎:温备,只支持完全备份
环境:
源库:192.168.0.23
目标库:192.168.0.24
方式1:mysqldump+binlog
#+++++++++++++++++++++源库++++++++++++++++++++++++++#
###开启数据库的二机制日志###
~]# vim /etc/my.cnf
[mysqld]
log-bin=mysql_bin
~]# systemctl start mariadb.service
> show global variables like '%log_bin%';
+---------------------------------+-------+
| Variable_name                   | Value |
+---------------------------------+-------+
| log_bin                         | ON    |
| log_bin_trust_function_creators | OFF   |
| sql_log_bin                     | ON    |
+---------------------------------+-------+

###使用mysqldump工具对数据库进行全备###
~]# mysqldump -A --single-transaction --master-data=2 >/tmp/all.sql

###对数据库做一些操作###
> create database mydb;
> use mydb;
> create table t1 (id int,name char(10));
> insert into t1 values (1,'Tom');
> select * from t1;
+------+------+
| id   | name |
+------+------+
|    1 | Tom  |
+------+------+

###假设此时数据库发生故障,需要通过最近一次的全备和二进制日志在备库上将数据库恢复到故障点前的状态###
###在备份文件确定起始pos和日志文件名###
~]# vim /tmp/all.sql
...
CHANGE MASTER TO MASTER_LOG_FILE='mysql_bin.000003', MASTER_LOG_POS=245;
...

###在源库上导出全备后生成的log日志###
~]# mysqlbinlog --start-position=245 /var/lib/mysql/mysql_bin.000003 >/tmp/incre.sql

###将全备和增备数据传送到目标库系统上###
~]# scp /tmp/all.sql /tmp/incre.sql root@192.168.0.24:/tmp/

#+++++++++++++++++++++目标库++++++++++++++++++++++++++#
###在目标库上分别恢复全备和增备###
> set sql_log_bin=0;            #临时关闭二进制日志,为了防止导入全备时产生大量二进制日志
> source /tmp/all.sql;       #导入全备
~]# mysql </tmp/incre.sql    #导入增备

###恢复后库和表数据都存在,恢复成功!###
> select * from mydb.t1;
+------+------+
| id   | name |
+------+------+
|    1 | Tom  |
+------+------+
1 row in set (0.00 sec)
方式2:基于lvm2的快照
#+++++++++++++++++++++源库++++++++++++++++++++++++++#
###创建一个LV,专门用来存放MySQL的数据文件###
~]# pvcreate /dev/sdb1
~]# vgcreate myvg /dev/sdb1
~]# lvcreate -n mydata -L 2G myvg
~]# mke2fs -t ext4 /dev/myvg/mydata
~]# mount /dev/myvg/mydata /var/lib/mysql

###制作lvm2快照###
mysql> FLUSH TABLES WITH READ LOCK;  #锁定所有表
mysql> FLUSH LOGS;
mysql> SHOW MASTER STATUS;   #记录二进制日志文件及事件位置
+------------------+----------+--------------+------------------+
| File             | Position | Binlog_Do_DB | Binlog_Ignore_DB |
+------------------+----------+--------------+------------------+
| mysql_bin.000004 |      245 |              |                  |
+------------------+----------+--------------+------------------+
~]# lvcreate -L 1G -s -n mydata_snap /dev/myvg/mydata   #创建快照
mysql> UNLOCK TABLES;

###对数据库做一些操作###
mysql> create database mydb;
mysql> use mydb;
mysql> create table t1 (id int,name char(20));
mysql> insert into t1 values (1,'Tom'),(2,'Jerry');
mysql> select * from t1;
+------+-------+
| id   | name  |
+------+-------+
|    1 | Tom   |
|    2 | Jerry |
+------+-------+

###假设此时数据库发生故障,需要使用lvm快照和二进制日志在备库上将数据库恢复到故障点前的状态
###挂载并备份快照备份###
~]# mount /dev/myvg/mydata_snap /mnt/mydata_snap/
~]# cd /mnt/mydata_snap/
~]# tar -zcvf /tmp/mydata.tar.gz ./*

###在源库上导出全备后生成的log日志###
~]# mysqlbinlog --start-position=245 /var/lib/mysql/mysql_bin.000004 >/tmp/incre.sql  ###将快照备份包和增量日志备份发送到目标库###
~]# scp /tmp/mydata.tar.gz /tmp/incre.sql root@192.168.0.24:/tmp

#+++++++++++++++++++++目标库++++++++++++++++++++++++++#
###在目标库上进行全备和增量日志恢复###
~]# tar xf /tmp/mydata.tar.gz -C /var/lib/mysql
~]# systemctl start mariadb.service
mysql </tmp/incre.sql    #导入增量日志
###恢复后库和表数据都存在,恢复成功!###
mysql> select * from mydb.t1;
+------+-------+
| id   | name  |
+------+-------+
|    1 | Tom   |
|    2 | Jerry |
+------+-------+
方式3:xtrabackup
#+++++++++++++++++++++源库++++++++++++++++++++++++++#
###安装xtrabackup包###
~]# rpm -ivh percona-xtrabackup-24-2.4.7-1.el7.x86_64.rpm

###进行全备###
~]# mkdir /backup
~]# innobackupex --user=root /backup
~]# ls /backup/
2017-07-14_21-08-00      #生成的全备文件夹

###对数据库做一些操作后进行增量备份###
mysql> create database mydb; mysql> use mydb;
mysql> create table t1 (id int,name char(20));
mysql> insert into t1 values (1,'Tom'),(2,'Jerry');
mysql> select * from t1;
+------+-------+
| id   | name  |
+------+-------+
|    1 | Tom   |
|    2 | Jerry |
+------+-------+
~]# innobackupex --incremental /backup/ --incremental-basedir=/backup/2017-07-14_20-23-25           #这里要指明最近一次全备文件夹名称
~]# ls /backup/
2017-07-14_21-08-00  2017-07-14_21-09-15
~]# scp -r /backup/* root@192.168.0.24:/backup

#+++++++++++++++++++++目标库++++++++++++++++++++++++++#
###在目标库上对全量和增量备份集进行准备(prepare),准备的目的是对已提交的事务进行重放,未提交的事务进行回滚。###
~]# innobackupex --apply-log --redo-only /backup/2017-07-14_21-08-00/
~]# innobackupex --apply-log --redo-only /backup/2017-07-14_21-08-00/ --incremental-dir=/backup/2017-07-14_21-09-15/

###使用合并后的全量备份集进行恢复###
~]# innobackupex --copy-back /backup/2017-07-14_21-08-00/

###修改恢复后的数据文件权限,并启动mysql服务###
~]# chown -R mysql.mysql /var/lib/mysql/*
~]# systemctl start mariadb.service

###恢复后库和表数据都存在,恢复成功!###
mysql> select * from mydb.t1;
+------+-------+
| id   | name  |
+------+-------+
|    1 | Tom   |
|    2 | Jerry |
+------+-------+
3、MySQL的复制有哪些类型,详细描述复制原理,并完成实际的操作。
方式1:主从模式
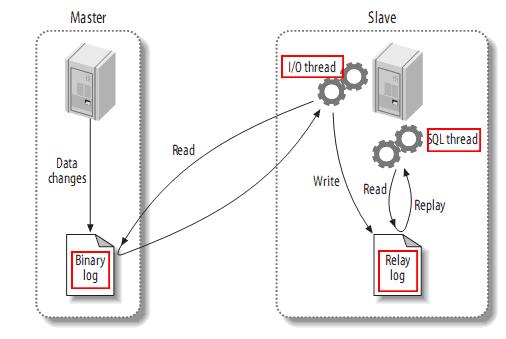

主从复制原理:
1) Slave服务器上执行start slave,开启主从复制开关。
2) 此时,Slave服务器的IO线程会通过在Master上授权的复制用户权限请求连接Master服务器,并请求从指定binlog日志文件的指定位置(日志文件名和位置就是在配置主从复制服务时执行change master命令时指定的)之后发送binlog日志内容。
3) Master服务器接收到来自Slave服务器的IO线程的请求后,Master服务器上负责复制IO线程根据Slave服务器的IO线程请求的信息读取指定binlog日志文件指定位置之后的binlog日志信息,然后返回给Slave端的IO线程。返回信息中除了binlog日志内容外,还有本次返回日志内容后在Master服务器的新的Binlog文件名称以及在binlog中的下一个指定更新位置。
4) 当Slave服务器的IO线程获取到来自Master服务器上IO线程发送日志内容及日志文件位置点后,将binlog日志内容依次写入到Slave端自身的relay log(即中继日志)文件(MySQL-relay-bin.xxxxxx)的最末端,并将新的binlog文件名和位置记录到master-info文件中,以便下一次读取Master端新binlog日志时能够告诉Master服务器需要新binlog日志的哪个文件哪个位置开始请求的binlog日志内容。
5) Slave服务器端的SQL线程会实时的检测本地RelayLog中新增加的日志内容,然后及时的把Log文件中的内容解析成在Master端曾经执行的SQL语句的内容,并在自身Slave服务器上按语句的顺序执行应用这些SQL语句,应用完毕后清理应用过的日志。
6) 经过了上面的过程,就可以确保在Master端和Slave端执行了同样的SQL语句。当复制状态正常的情况下,Master端和Slave端的数据是完全一样的。
配置过程:
环境:
主库:192.168.0.23
备库:192.168.0.24
#+++++++++++++++++++++主库++++++++++++++++++++++++++#
###修改主库配置文件###
~]# vim /etc/my.cnf
[mysqld]
...
server-id=1     #此处server-id必须唯一
log-bin=master-bin  #开启binlog日志
~]# systemctl start mariadb.service
###创建复制账号###
mysql> grant replication slave,replication client on *.* to 'repluser'@'192.168.0.%' identified by 'replpass';
mysql> flush privileges;
mysql> show master status;   #查看主库当前的日志pos
+------------------+----------+--------------+------------------+
| File             | Position | Binlog_Do_DB | Binlog_Ignore_DB |
+------------------+----------+--------------+------------------+
| mysql_bin.000003 |      497 |              |                  |
+------------------+----------+--------------+------------------+
#+++++++++++++++++++++备库++++++++++++++++++++++++++#
###修改备库配置文件###
~]# vim /etc/my.cnf
[mysqld]
...
server-id=2     #此处server-id必须唯一
~]# systemctl start mariadb.service
###配置slave参数###
mysql> change master to master_host='192.168.0.23',master_user='repluser',master_password='replpass',master_log_file='mysql_bin.000003',master_log_pos=497;
mysql> start slave;
mysql> show slave status\G;
*************************** 1. row ***************************
               Slave_IO_State: Waiting for master to send event
                  Master_Host: 192.168.0.23
                  Master_User: repluser
                  Master_Port: 3306
                Connect_Retry: 60
              Master_Log_File: mysql_bin.000004
          Read_Master_Log_Pos: 421
               Relay_Log_File: mariadb-relay-bin.000004
                Relay_Log_Pos: 616
        Relay_Master_Log_File: mysql_bin.000004
             Slave_IO_Running: Yes      #只要Slave_IO_Running和Slave_SQL_Running都为Yes,主从复制就配置成功了
            Slave_SQL_Running: Yes
              Replicate_Do_DB:
          Replicate_Ignore_DB:
           Replicate_Do_Table:
       Replicate_Ignore_Table:
      Replicate_Wild_Do_Table:
  Replicate_Wild_Ignore_Table:
                   Last_Errno: 0
                   Last_Error:
                 Skip_Counter: 0
          Exec_Master_Log_Pos: 421
              Relay_Log_Space: 1285
              Until_Condition: None
               Until_Log_File:
                Until_Log_Pos: 0
           Master_SSL_Allowed: No
           Master_SSL_CA_File:
           Master_SSL_CA_Path:
              Master_SSL_Cert:
            Master_SSL_Cipher:
               Master_SSL_Key:
        Seconds_Behind_Master: 0
Master_SSL_Verify_Server_Cert: No
                Last_IO_Errno: 0
                Last_IO_Error:
               Last_SQL_Errno: 0
               Last_SQL_Error:
  Replicate_Ignore_Server_Ids:
             Master_Server_Id: 1
注意:如果主节点已经运行了一段时间,且有大量数据时,应当通过备份主服务器并恢复数据至从服务器;复制起始位置为备份时,二进制日志文件及其POS;
方式2:主主模式
主主同步实现原理与主从同步相似,只不过两个节点互为主从,相对于主从模式,主主模式具有下列特点:
(1) 都启用binlog和relay log
(2) 定义自动增长的id字段的增长方式
(3) 都授权有复制权限的用户账号
(4) 各自把对方指定为主服务器
配置过程:
环境:
主库:192.168.0.23
备库:192.168.0.24
#+++++++++++++++++++++主库1++++++++++++++++++++++++++#
###修改主库1配置文件###
~]# vim /etc/my.cnf
[mysqld]
...
server-id=1     #此处server-id必须唯一
log-bin=master-bin  #开启binlog日志
#下面两个参数并非必须,但可以避免自增序列发生冲突
auto_increment_offset=1     #序列初始值,此处从奇数最小值开始
auto_increment_increment=2  #每次递增的步长

~]# systemctl start mariadb.service


###创建复制账号###
mysql> grant replication slave,replication client on *.* to 'repluser'@'192.168.0.%' identified by 'replpass';
mysql> flush privileges;
mysql> show master status;   #查看主库当前的日志pos
+------------------+----------+--------------+------------------+
| File             | Position | Binlog_Do_DB | Binlog_Ignore_DB |
+------------------+----------+--------------+------------------+
| mysql_bin.000003 |      507 |              |                  |
+------------------+----------+--------------+------------------+

#+++++++++++++++++++++主库2++++++++++++++++++++++++++#
###修改备库配置文件###
~]# vim /etc/my.cnf
[mysqld]
...
server-id=1     #此处server-id必须唯一
log-bin=master-bin  #开启binlog日志
#下面两个参数并非必须,但可以避免自增序列发生冲突
auto_increment_offset=2     #序列初始值,此处从偶数最小值开始
auto_increment_increment=2  #每次递增的步长

~]# systemctl start mariadb.service

###创建复制账号###
mysql> grant replication slave,replication client on *.* to 'repluser'@'192.168.0.%' identified by 'replpass';
mysql> flush privileges;
mysql> show master status;   #查看主库当前的日志pos
+------------------+----------+--------------+------------------+
| File             | Position | Binlog_Do_DB | Binlog_Ignore_DB |
+------------------+----------+--------------+------------------+
| mysql_bin.000003 |      507 |              |                  |
+------------------+----------+--------------+------------------+

###配置slave参数###
mysql> change master to master_host='192.168.0.23',master_user='repluser',master_password='replpass',master_log_file='mysql_bin.000003',master_log_pos=507;
mysql> start slave;
mysql> show slave status\G;
*************************** 1. row ***************************
               Slave_IO_State: Waiting for master to send event
                  Master_Host: 192.168.0.23
                  Master_User: repluser
                  Master_Port: 3306
                Connect_Retry: 60
              Master_Log_File: mysql_bin.000003
          Read_Master_Log_Pos: 507
               Relay_Log_File: mariadb-relay-bin.000002
                Relay_Log_Pos: 529
        Relay_Master_Log_File: mysql_bin.000003
             Slave_IO_Running: Yes
            Slave_SQL_Running: Yes
              Replicate_Do_DB:
          Replicate_Ignore_DB:
           Replicate_Do_Table:
       Replicate_Ignore_Table:
      Replicate_Wild_Do_Table:
  Replicate_Wild_Ignore_Table:
                   Last_Errno: 0
                   Last_Error:
                 Skip_Counter: 0
          Exec_Master_Log_Pos: 507
              Relay_Log_Space: 825
              Until_Condition: None
               Until_Log_File:
                Until_Log_Pos: 0
           Master_SSL_Allowed: No
           Master_SSL_CA_File:
           Master_SSL_CA_Path:
              Master_SSL_Cert:
            Master_SSL_Cipher:
               Master_SSL_Key:
        Seconds_Behind_Master: 0
Master_SSL_Verify_Server_Cert: No
                Last_IO_Errno: 0
                Last_IO_Error:
               Last_SQL_Errno: 0
               Last_SQL_Error:
  Replicate_Ignore_Server_Ids:
             Master_Server_Id: 1

#+++++++++++++++++++++主库1++++++++++++++++++++++++++#
###配置slave参数###
mysql> change master to master_host='192.168.0.24',master_user='repluser',master_password='replpass',master_log_file='mysql_bin.000003',master_log_pos=507;
mysql> start slave;
mysql> show slave status\G;
*************************** 1. row ***************************
               Slave_IO_State: Waiting for master to send event
                  Master_Host: 192.168.0.24
                  Master_User: repluser
                  Master_Port: 3306
                Connect_Retry: 60
              Master_Log_File: mysql_bin.000003
          Read_Master_Log_Pos: 507
               Relay_Log_File: mariadb-relay-bin.000002
                Relay_Log_Pos: 529
        Relay_Master_Log_File: mysql_bin.000003
             Slave_IO_Running: Yes
            Slave_SQL_Running: Yes
              Replicate_Do_DB:
          Replicate_Ignore_DB:
           Replicate_Do_Table:
       Replicate_Ignore_Table:
      Replicate_Wild_Do_Table:
  Replicate_Wild_Ignore_Table:
                   Last_Errno: 0
                   Last_Error:
                 Skip_Counter: 0
          Exec_Master_Log_Pos: 507
              Relay_Log_Space: 825
              Until_Condition: None
               Until_Log_File:
                Until_Log_Pos: 0
           Master_SSL_Allowed: No
           Master_SSL_CA_File:
           Master_SSL_CA_Path:
              Master_SSL_Cert:
            Master_SSL_Cipher:
               Master_SSL_Key:
        Seconds_Behind_Master: 0
Master_SSL_Verify_Server_Cert: No
                Last_IO_Errno: 0
                Last_IO_Error:
               Last_SQL_Errno: 0
               Last_SQL_Error:
  Replicate_Ignore_Server_Ids:
             Master_Server_Id: 2
方式3:半同步模式
半同步工作方式:介于异步复制和全同步复制之间,主库在执行完客户端提交的事务后不是立刻返回给客户端,而是等待至少一个从库接收到并写到relay log中才返回给客户端。相对于异步复制,半同步复制提高了数据的安全性,同时它也造成了一定程度的延迟,这个延迟最少是一个TCP/IP往返的时间。所以,半同步复制最好在低延时的网络中使用。
原理图:

存在的问题:
客户端事务在存储引擎层提交后,在得到从库确认的过程中,主库宕机了,此时,可能的情况有两种:
1)事务还没发送到从库上。此时,客户端会收到事务提交失败的信息,客户端会重新提交该事务到新的主上,当宕机的主库重新启动后,以从库的身份重新加入到该主从结构中,会发现,该事务在从库中被提交了两次,一次是之前作为主的时候,一次是被新主同步过来的。
2)事务已经发送到从库上。此时,从库已经收到并应用了该事务,但是客户端仍然会收到事务提交失败的信息,重新提交该事务到新的主上。
配置方式:
环境:
主节点:192.168.0.23
备节点:192.168.0.24
1)在主备节点上均安装半同步插件
#+++++++++++++++++++++主库++++++++++++++++++++++++++#
mysql> INSTALL PLUGIN rpl_semi_sync_master SONAME 'semisync_master.so';
mysql> SELECT PLUGIN_NAME, PLUGIN_STATUS FROM INFORMATION_SCHEMA.PLUGINS  WHERE PLUGIN_NAME LIKE '%semi%';
+----------------------+---------------+
| PLUGIN_NAME          | PLUGIN_STATUS |
+----------------------+---------------+
| rpl_semi_sync_master | ACTIVE        |
+----------------------+---------------+

#+++++++++++++++++++++备库++++++++++++++++++++++++++#
mysql> INSTALL PLUGIN rpl_semi_sync_slave SONAME 'semisync_slave.so';
mysql> SELECT PLUGIN_NAME, PLUGIN_STATUS FROM INFORMATION_SCHEMA.PLUGINS  WHERE PLUGIN_NAME LIKE '%semi%';
+----------------------+---------------+
| PLUGIN_NAME          | PLUGIN_STATUS |
+----------------------+---------------+
| rpl_semi_sync_slave  | ACTIVE        |
+----------------------+---------------+
2)修改主备节点上的配置文件
#+++++++++++++++++++++主库++++++++++++++++++++++++++#
~]# vim /etc/my.cnf
[mysqld]
log-bin=mysql_bin
server-id=1

#+++++++++++++++++++++备库++++++++++++++++++++++++++#
~]# vim /etc/my.cnf
[mysqld]
log-bin=mysql_bin
server-id=2
3)在主库上创建复制用户
mysql> grant replication slave,replication client on *.* to 'repluser'@'192.168.0.%' identified by 'replpass';
mysql> flush privileges;
4)查看主库当前的binlog日志位置
mysql> show master status;
+------------------+----------+--------------+------------------+
| File             | Position | Binlog_Do_DB | Binlog_Ignore_DB |
+------------------+----------+--------------+------------------+
| mysql_bin.000003 |      507 |              |                  |
+------------------+----------+--------------+------------------+
5)在备库上配置slave
mysql> change master to master_host='192.168.0.23',master_user='repluser',master_password='replpass',master_log_file='mysql_bin.000003',master_log_pos=507;
6)在主备节点上分别启动半同步服务
#+++++++++++++++++++++主库++++++++++++++++++++++++++#
mysql> set global rpl_semi_sync_slave_enabled=1;
mysql> show global variables like '%semi%';
+------------------------------------+-------+
| Variable_name                      | Value |
+------------------------------------+-------+
| rpl_semi_sync_master_enabled       | ON    |
| rpl_semi_sync_master_timeout       | 10000 |
| rpl_semi_sync_master_trace_level   | 32    |
| rpl_semi_sync_master_wait_no_slave | ON    |
+------------------------------------+-------+

#+++++++++++++++++++++备库++++++++++++++++++++++++++#
mysql> set global rpl_semi_sync_slave_enabled=1;
mysql> show global variables like '%semi%';
+------------------------------------+-------+
| Variable_name                      | Value |
+------------------------------------+-------+
| rpl_semi_sync_slave_enabled        | ON    |
| rpl_semi_sync_slave_trace_level    | 32    |
+------------------------------------+-------+
7)从节点上启用半同步
mysql> start slave;
Query OK, 0 rows affected (0.00 sec)

mysql> show slave status\G;
*************************** 1. row ***************************
               Slave_IO_State: Waiting for master to send event
                  Master_Host: 192.168.0.23
                  Master_User: repluser
                  Master_Port: 3306
                Connect_Retry: 60
              Master_Log_File: mysql_bin.000003
          Read_Master_Log_Pos: 507
               Relay_Log_File: mariadb-relay-bin.000002
                Relay_Log_Pos: 529
        Relay_Master_Log_File: mysql_bin.000003
             Slave_IO_Running: Yes
            Slave_SQL_Running: Yes
              Replicate_Do_DB:
          Replicate_Ignore_DB:
           Replicate_Do_Table:
       Replicate_Ignore_Table:
      Replicate_Wild_Do_Table:
  Replicate_Wild_Ignore_Table:
                   Last_Errno: 0
                   Last_Error:
                 Skip_Counter: 0
          Exec_Master_Log_Pos: 507
              Relay_Log_Space: 825
              Until_Condition: None
               Until_Log_File:
                Until_Log_Pos: 0
           Master_SSL_Allowed: No
           Master_SSL_CA_File:
           Master_SSL_CA_Path:
              Master_SSL_Cert:
            Master_SSL_Cipher:
               Master_SSL_Key:
        Seconds_Behind_Master: 0
Master_SSL_Verify_Server_Cert: No
                Last_IO_Errno: 0
                Last_IO_Error:
               Last_SQL_Errno: 0
               Last_SQL_Error:
  Replicate_Ignore_Server_Ids:
             Master_Server_Id: 1
方式4:基于SSL的主从复制
配置过程:
环境:
主库:192.168.0.23
备库:192.168.0.24
1)在主备节点分别搭建CA服务器和客户端
#+++++++++++++++++++++主库++++++++++++++++++++++++++#
###生成一个私钥###
~]# (umask 077;openssl genrsa -out /etc/pki/CA/private/cakey.pem 4096)
Generating RSA private key, 4096 bit long modulus
.........................................................................................................................................................++
.......................++
e is 65537 (0x10001)

###生成自签证书###
~]# openssl req -new -x509 -key /etc/pki/CA/private/cakey.pem -out /etc/pki/CA/cacert.pem
You are about to be asked to enter information that will be incorporated
into your certificate request.
What you are about to enter is what is called a Distinguished Name or a DN.
There are quite a few fields but you can leave some blank
For some fields there will be a default value,
If you enter '.', the field will be left blank.
-----
Country Name (2 letter code) [XX]:CN
State or Province Name (full name) []:SHANXI
Locality Name (eg, city) [Default City]:XIAN
Organization Name (eg, company) [Default Company Ltd]:DCITS
Organizational Unit Name (eg, section) []:Ops
Common Name (eg, your name or your server's hostname) []:ca.dcits.com
Email Address []:fangtao@dcits.com

###为CA提供所需的目录及文件###
~]# touch /etc/pki/CA/{serial,index.txt}
~]# echo 01>/etc/pki/CA/serial

#+++++++++++++++++++++备库++++++++++++++++++++++++++#
###生成签署请求###
~]# mkdir /etc/mysql/ssl
~]# cd /etc/mysql/ssl
~]# (umask 077;openssl genrsa -out mysql.key 2048)
Generating RSA private key, 2048 bit long modulus
.....................................................................+++
...................+++
e is 65537 (0x10001)
~]# openssl req -new -key mysql.key -out mysql.csr -days 365
You are about to be asked to enter information that will be incorporated
into your certificate request.
What you are about to enter is what is called a Distinguished Name or a DN.
There are quite a few fields but you can leave some blank
For some fields there will be a default value,
If you enter '.', the field will be left blank.
-----
Country Name (2 letter code) [XX]:CN
State or Province Name (full name) []:SHANXI
Locality Name (eg, city) [Default City]:XIAN
Organization Name (eg, company) [Default Company Ltd]:DCITS
Organizational Unit Name (eg, section) []:Ops
Common Name (eg, your name or your server's hostname) []:ca.dcits.com
Email Address []:fangtao@dcits.com

Please enter the following 'extra' attributes
to be sent with your certificate request
A challenge password []:
An optional company name []:

###将请求发送给主库(CA主机)###
~]# scp mysql.csr mysql.key root@192.168.0.23:/tmp/

###

#+++++++++++++++++++++主库++++++++++++++++++++++++++#
###在主库(CA服务器)上签署证书###
~]# openssl ca -in /tmp/mysql.csr -out /etc/pki/CA/certs/mysql.crt -days 365
Using configuration from /etc/pki/tls/openssl.cnf
Check that the request matches the signature
Signature ok
Certificate Details:
        Serial Number: 1 (0x1)
        Validity
            Not Before: Jul 19 10:05:05 2017 GMT
            Not After : Jul 19 10:05:05 2018 GMT
        Subject:
            countryName               = CN
            stateOrProvinceName       = SHANXI
            organizationName          = DCITS
            organizationalUnitName    = Ops
            commonName                = ca.dcits.com
            emailAddress              = fangtao@dcits.com
        X509v3 extensions:
            X509v3 Basic Constraints:
                CA:FALSE
            Netscape Comment:
                OpenSSL Generated Certificate
            X509v3 Subject Key Identifier:
                A4:59:A0:16:FB:D4:C2:27:1A:09:61:FA:C4:39:B7:CE:01:60:2A:28
            X509v3 Authority Key Identifier:
                keyid:0B:15:FD:99:9B:55:BB:52:B1:F3:37:50:42:BC:59:52:0A:13:CB:D9

Certificate is to be certified until Jul 19 10:05:05 2018 GMT (365 days)
Sign the certificate? [y/n]:y


1 out of 1 certificate requests certified, commit? [y/n]y
Write out database with 1 new entries
Data Base Updated

###将证书发送给备库###
~]# scp mysql.crt cacert.pem root@192.168.0.24:/etc/mysql/ssl

###修改主库上证书相关文件的权限###
~]# chown -R mysql.mysql /etc/pki/CA
2)分别在主备库上修改配置文件,启用ssl
#+++++++++++++++++++++主库++++++++++++++++++++++++++#
~]# vim /etc/my.cnf
[mysqld]
log-bin=mysql_bin
server-id=1
ssl
ssl_ca=/etc/pki/CA/cacert.pem
ssl_cert=/etc/pki/CA/certs/mysql.crt
ssl_key=/etc/pki/CA/private/mysql.key

~]# systemctl start mariadb.service
mysq> show variables like '%ssl%';
+---------------+-------------------------------+
| Variable_name | Value                         |
+---------------+-------------------------------+
| have_openssl  | YES                           |
| have_ssl      | YES                           |
| ssl_ca        | /etc/pki/CA/cacert.pem        |
| ssl_capath    |                               |
| ssl_cert      | /etc/pki/CA/certs/mysql.crt   |
| ssl_cipher    |                               |
| ssl_key       | /etc/pki/CA/private/mysql.key |
+---------------+-------------------------------+

#+++++++++++++++++++++备库++++++++++++++++++++++++++#
~]# vim /etc/my.cnf
[mysqld]
server-id=2
log-bin=mysql_bin
ssl
ssl_ca=/etc/mysql/cacert.pem
ssl_cert=/etc/mysql/mysql.crt
ssl_key=/etc/mysql/mysql.key

~]# systemctl start mariadb.service
mysq> show variables like '%ssl%';
+---------------+-----------------------+
| Variable_name | Value                 |
+---------------+-----------------------+
| have_openssl  | DISABLED              |
| have_ssl      | DISABLED              |
| ssl_ca        | /etc/mysql/cacert.pem |
| ssl_capath    |                       |
| ssl_cert      | /etc/mysql/mysql.crt  |
| ssl_cipher    |                       |
| ssl_key       | /etc/mysql/mysql.key  |
+---------------+-----------------------+
3)在主库上创建复制账号
mysql> grant replication slave,replication client on *.* to 'repluser'@'192.168.0.%' require ssl;
mysql> set password for repluser=PASSWORD('replpass');
mysql> flush privileges;
mysql> show master status;
+------------------+----------+--------------+------------------+
| File             | Position | Binlog_Do_DB | Binlog_Ignore_DB |
+------------------+----------+--------------+------------------+
| mysql_bin.000004 |      484 |              |                  |
+------------------+----------+--------------+------------------+
4)在从库上开启同步
mysql> change master to
master_host='192.168.0.23',
master_user='repluser',
master_password='replpass',
master_log_file='mysql_bin.000004',
master_ssl=1,
master_ssl_ca='/etc/mysql/ssl/cacert.pem',
master_ssl_cert='/etc/mysql/ssl/mysql.crt',
master_ssl_key='/etc/mysql/ssl/mysql.key';
5)启动主从同步并查看状态
mysql> start slave;
mysql> show slave status\G;
*************************** 1. row ***************************
               Slave_IO_State: Waiting for master to send event
                  Master_Host: 192.168.0.23
                  Master_User: repluser
                  Master_Port: 3306
                Connect_Retry: 60
              Master_Log_File: mysql_bin.000008
          Read_Master_Log_Pos: 245
               Relay_Log_File: mariadb-relay-bin.000009
                Relay_Log_Pos: 529
        Relay_Master_Log_File: mysql_bin.000008
             Slave_IO_Running: Yes        #同步状态正常! Slave_SQL_Running: Yes
              Replicate_Do_DB:
          Replicate_Ignore_DB:
           Replicate_Do_Table:
       Replicate_Ignore_Table:
      Replicate_Wild_Do_Table:
  Replicate_Wild_Ignore_Table:
                   Last_Errno: 0
                   Last_Error:
                 Skip_Counter: 0
          Exec_Master_Log_Pos: 245
              Relay_Log_Space: 825
              Until_Condition: None
               Until_Log_File:
                Until_Log_Pos: 0
           Master_SSL_Allowed: Yes
           Master_SSL_CA_File: /etc/mysql/ssl/cacert.pem    #证书已被应用
           Master_SSL_CA_Path:
              Master_SSL_Cert: /etc/mysql/ssl/mysql.crt
            Master_SSL_Cipher:
               Master_SSL_Key: /etc/mysql/ssl/mysql.key
        Seconds_Behind_Master: 0
Master_SSL_Verify_Server_Cert: No
                Last_IO_Errno: 0
                Last_IO_Error:
               Last_SQL_Errno: 0
               Last_SQL_Error:
  Replicate_Ignore_Server_Ids:
             Master_Server_Id: 1
方式5:过滤器
同步方式说明:让从节点仅复制指定的数据库,或指定数据库的指定表;
有两种实现方式:
1) 主服务器仅向二进制日志中记录与特定数据库(特定表)相关的事件;
问题:时间还原无法实现;不建议使用;
2) 从服务器SQL_THREAD在replay中继日志中的事件时,仅读取与特定数据库(特定表)相关的事件并应用于本地;
问题:会造成网络及磁盘IO浪费
配置过程:
环境:
主库:192.168.0.23
备库:192.168.0.24
1)基于数据库过滤
#+++++++++++++++++++++主库++++++++++++++++++++++++++#
###修改主库配置文件###
~]# vim /etc/my.cnf
[mysqld]
...
server-id=1
log-bin=master-bin
~]# systemctl start mariadb.service
###创建复制账号###
mysql> grant replication slave,replication client on *.* to 'repluser'@'192.168.0.%' identified by 'replpass';
mysql> flush privileges;
mysql> show master status;   #查看主库当前的日志pos
+------------------+----------+--------------+------------------+
| File             | Position | Binlog_Do_DB | Binlog_Ignore_DB |
+------------------+----------+--------------+------------------+
| mysql_bin.000009 |      497 |              |                  |
+------------------+----------+--------------+------------------+
#+++++++++++++++++++++备库++++++++++++++++++++++++++#
###修改备库配置文件###
~]# vim /etc/my.cnf
[mysqld]
...
server-id=2
replicate-do-db=mydb        #表示和哪个数据库相关的写入类、修改类指令会被写入
replicate-ignore-db=testdb      #表示忽略(黑名单)
~]# systemctl start mariadb.service
###配置slave参数###
mysql> change master to master_host='192.168.0.23',master_user='repluser',master_password='replpass',master_log_file='mysql_bin.000009',master_log_pos=497;
mysql> start slave;
mysql> show slave status\G;
mysql> show global variables like 'replicate%';
+----------------------------------+-----------+
| Variable_name                    | Value     |
+----------------------------------+-----------+
| replicate_annotate_row_events    | OFF       |
| replicate_do_db                  | mydb      |
| replicate_do_table               |           |
| replicate_events_marked_for_skip | replicate |
| replicate_ignore_db              | testdb    |
| replicate_ignore_table           |           |
| replicate_wild_do_table          |           |
| replicate_wild_ignore_table      |           |
+----------------------------------+-----------+
2)基于表过滤
步骤与基于库一致,只是在修改备库参数文件时使用:
replication-do-table=TABLE_NAME
replication-ignore-table=TABLE_NAME
3)基于表的通配符
步骤与基于库一致,只是在修改备库参数文件时使用:
replicate-wild-do-table=PATTERN
replicate-wild-ignore-table=PATTERN
原创文章,作者:N27_Vicent,如若转载,请注明出处:http://www.178linux.com/83255

评论列表(1条)
从理论到实践,展示的非常好,这样的文章很帮助到很多人。很棒!!!