

开发puppet模块,nginx负载均衡并反代动态请求至httpd,httpd用ajp连接器将反代请求至tomcat,并部署tomcat-session-memcached
架构图为


在master主机上开发的模块为:
1、chrony模块;
├── chrony
│ ├── files
│ │ └── chrony.conf
│ ├── lib
│ ├── manifests
│ │ └── init.pp
│ ├── spec
│ ├── templates
│ └── test
vim init.pp
class chrony {
package{‘chrony’:
ensure => latest,
} ->
file{‘chrony.conf’:
path => ‘/etc/chrony.conf’,
source => ‘puppet:///modules/chrony/chrony.conf’,
} ~>
service{‘chronyd’:
ensure => running,
enable => true,
}
}
vim chrony/files/chrony.conf
# Use public servers from the pool.ntp.org project.
# Please consider joining the pool (http://www.pool.ntp.org/join.html).
#server 0.centos.pool.ntp.org iburst
#server 1.centos.pool.ntp.org iburst
#server 2.centos.pool.ntp.org iburst
#在这里输入我们要根据那个主机同步时间
server 172.16.252.187 iburst
# Ignore stratum in source selection.
stratumweight 0
# Record the rate at which the system clock gains/losses time.
driftfile /var/lib/chrony/drift
# Enable kernel RTC synchronization.
rtcsync
# In first three updates step the system clock instead of slew
# if the adjustment is larger than 10 seconds.
makestep 10 3
# Allow NTP client access from local network.
#allow 192.168/16
# Listen for commands only on localhost.
bindcmdaddress 127.0.0.1
bindcmdaddress ::1
# Serve time even if not synchronized to any NTP server.
#local stratum 10
keyfile /etc/chrony.keys
# Specify the key used as password for chronyc.
commandkey 1
# Generate command key if missing.
generatecommandkey
# Disable logging of client accesses.
noclientlog
# Send a message to syslog if a clock adjustment is larger than 0.5 seconds.
logchange 0.5
logdir /var/log/chrony
#log measurements statistics tracking
2、nginx模块:
── nginx
│ ├── files
│ ├── lib
│ ├── manifests
│ │ └── init.pp
│ ├── spec
│ ├── templates
│ │ └── nginx-proxy.conf.erb
│ └── tests
init.pp;
class nginx {
package{‘nginx’:
ensure => latest,
} ->
file{‘nginx-proxy.conf’:
path => ‘/etc/nginx/nginx.conf’,
content => template(‘/etc/puppet/modules/nginx/templates/nginx-proxy.conf.erb’),
} ~>
service{‘nginx’:
ensure => running,
enable => true,
restart => ‘systemctl restart nginx.service’,
}
}
vim nginx/templates/nginx-proxy.conf.erb
# For more information on configuration, see:
# * Official English Documentation: http://nginx.org/en/docs/
# * Official Russian Documentation: http://nginx.org/ru/docs/
user nginx;
worker_processes <%= @processorcount %>;
error_log /var/log/nginx/error.log;
pid /run/nginx.pid;
# Load dynamic modules. See /usr/share/nginx/README.dynamic.
include /usr/share/nginx/modules/*.conf;
events {
worker_connections 1024;
}
http {
log_format main ‘$remote_addr – $remote_user [$time_local] “$request” ‘
‘$status $body_bytes_sent “$http_referer” ‘
‘”$http_user_agent” “$http_x_forwarded_for”‘;
access_log /var/log/nginx/access.log main;
sendfile on;
tcp_nopush on;
tcp_nodelay on;
keepalive_timeout 65;
types_hash_max_size 2048;
include /etc/nginx/mime.types;
default_type application/octet-stream;
upstream tcs {
server tomcat0.zcylinux.io:80;
server tomcat1.zcylinux.io:80;
}
# Load modular configuration files from the /etc/nginx/conf.d directory.
# See http://nginx.org/en/docs/ngx_core_module.html#include
# for more information.
include /etc/nginx/conf.d/*.conf;
server {
listen 80 default_server;
listen [::]:80 default_server;
server_name _;
root /usr/share/nginx/html;
# Load configuration files for the default server block.
include /etc/nginx/default.d/*.conf;
location / {
}
location ~* \.jsp$ {
proxy_pass http://tcs;
}
error_page 404 /404.html;
location = /40x.html {
}
error_page 500 502 503 504 /50x.html;
location = /50x.html {
}
}
}
3、httpd模块:
├── httpd
│ ├── files
│ ├── lib
│ ├── manifests
│ │ └── init.pp
│ ├── spec
│ ├── templates
│ │ └── zcylinux-ajp.conf.erb
│ └── tests
vim init.pp
class httpd {
package{‘httpd’:
ensure => latest,
} ->
file{‘httpd-ajp.conf’:
path => ‘/etc/httpd/conf.d/zcylinux.conf’,
content => template(‘/etc/puppet/modules/httpd/templates/zcylinux-ajp.conf.erb’),
} ~>
service{‘httpd’:
ensure => running,
enable => true,
restart => ‘systemctl restart httpd.service’,
}
}
vim httpd/templates/zcylinux-ajp.conf.erb
<VirtualHost *:80>
ServerName <%= @fqdn %>
ProxyRequests off
ProxyPreserveHost on
ProxyVia on
<Proxy *>
Require all granted
</Proxy>
ProxyPass / ajp://<%= @ipaddress %>:8009/
ProxyPassReverse / ajp://<%= @ipaddress %>:8009/
<Location />
Require all granted
</Location>
</VirtualHost>
4、jdk:
── jdk
│ ├── files
│ │ └── java.sh
│ ├── lib
│ ├── manifests
│ │ └── init.pp
│ ├── spec
│ ├── templates
│ └── tests
init.pp:
class jdk {
package{‘java-1.8.0-openjdk-devel’:
ensure => latest,
}
file{‘java.sh’:
ensure => file,
path => ‘/etc/profile.d/java.sh’,
source => ‘puppet:///modules/jdk/java.sh’,
mode => 0766,
}
}
vim jdk/files/java.sh
export JAVA_HOME=/usr
5、tomcat
├── files
│ ├── index-testA.jsp
│ ├── index-testB.jsp
│ ├── javolution-5.4.3.1.jar
│ ├── memcached-session-manager-2.1.1.jar
│ ├── memcached-session-manager-tc7-2.1.1.jar
│ ├── msm-javolution-serializer-2.1.1.jar
│ ├── server.xml
│ ├── spymemcached-2.11.1.jar
│ └── tomcat-users.xml
├── lib
├── manifests
│ └── init.pp
├── spec
├── templates
└── tests
init.pp
class tomcat {
if $fqdn =~ /(?i-mx:tomcat0.zcylinux.io)/ {
$index=’index-testA.jsp’
} else {
$index=’index-testB.jsp’
}
package{[‘tomcat’,’tomcat-webapps’,’tomcat-admin-webapps’,’tomcat-docs-webapp’]:
ensure => latest,
} ->
file{‘server.xml’:
path => ‘/etc/tomcat/server.xml’,
source => ‘puppet:///modules/tomcat/server.xml’,
owner => ‘root’,
group => ‘tomcat’,
} ->
exec{‘mkdir’:
command => ‘mkdir -p /var/lib/tomcat/webapps/test/{classes,lib,WEB-INF,META-INF}’,
path => ‘/bin:/sbin:/usr/bin:/usr/sbin’,
creates => ‘/var/lib/tomcat/webapps/test’,
} ->
file{“$index”:
path => ‘/var/lib/tomcat/webapps/test/index.jsp’,
source => “puppet:///modules/tomcat/$index”,
} ->
exec{‘chown’:
command => ‘chown -R tomcat:tomcat /var/lib/tomcat/webapps/test/’,
path => ‘/bin:/sbin:/usr/bin:/usr/sbin’,
} ->
file{‘javolution-5.4.3.1.jar’:
path => ‘/usr/share/tomcat/lib/javolution-5.4.3.1.jar’,
source => ‘puppet:///modules/tomcat/javolution-5.4.3.1.jar’,
}
file{‘memcached-session-manager-tc7-2.1.1.jar’:
path => ‘/usr/share/tomcat/lib/memcached-session-manager-tc7-2.1.1.jar’,
source => ‘puppet:///modules/tomcat/memcached-session-manager-tc7-2.1.1.jar’,
}
file{‘spymemcached-2.11.1.jar’:
path => ‘/usr/share/tomcat/lib/spymemcached-2.11.1.jar’,
source => ‘puppet:///modules/tomcat/spymemcached-2.11.1.jar’,
}
file{‘memcached-session-manager-2.1.1.jar’:
path => ‘/usr/share/tomcat/lib/memcached-session-manager-2.1.1.jar’,
source => ‘puppet:///modules/tomcat/memcached-session-manager-2.1.1.jar’,
}
file{‘msm-javolution-serializer-2.1.1.jar’:
path => ‘/usr/share/tomcat/lib/msm-javolution-serializer-2.1.1.jar’,
source => ‘puppet:///modules/tomcat/msm-javolution-serializer-2.1.1.jar’,
}
service{‘tomcat’:
ensure => running,
enable => true,
restart => ‘systemctl restart tomcat.service’,
subscribe => File[‘server.xml’],
}
}
vim server.xml
加入一个contest,使得能够将session保存在memcached中

编辑测试页面
vim index-testA.jsp:
<%@ page language=”java” %>
<html>
<head><title>TomcatA</title></head>
<body>
<h1><font color=”red”>TomcatA.magedu.com</font></h1>
<table align=”centre” border=”1″>
<tr>
<td>Session ID</td>
<% session.setAttribute(“magedu.com”,”magedu.com”); %>
<td><%= session.getId() %></td>
</tr>
<tr>
<td>Created on</td>
<td><%= session.getCreationTime() %></td>
</tr>
</table>
</body>
</html>
~
vim index-testB.jsp:
<%@ page language=”java” %>
<html>
<head><title>TomcatB</title></head>
<body>
<h1><font color=”red”>TomcatB.magedu.com</font></h1>
<table align=”centre” border=”1″>
<tr>
<td>Session ID</td>
<% session.setAttribute(“magedu.com”,”magedu.com”); %>
<td><%= session.getId() %></td>
</tr>
<tr>
<td>Created on</td>
<td><%= session.getCreationTime() %></td>
</tr>
</table>
</body>
</html>
6、 memcached
│ ├── files
│ ├── lib
│ ├── manifests
│ │ └── init.pp
│ ├── spec
│ ├── templates
│ └── tests
init.pp
class memcached {
package{‘memcached’:
ensure => latest,
} ->
service{‘memcached’:
ensure => running,
enable => true,
}
}
编辑列表清单:
vim /etc/puppet/manifests/site.pp
node ‘ngx.zcylinux.io’ {
include chrony
include nginx
}
node /tomcat[0-1]\.zcylinux\.io/ {
include chrony
include jdk
include tomcat
include httpd
}
node /mem[1-2]\.zcylinux\.io/ {
include chrony
include memcached
}
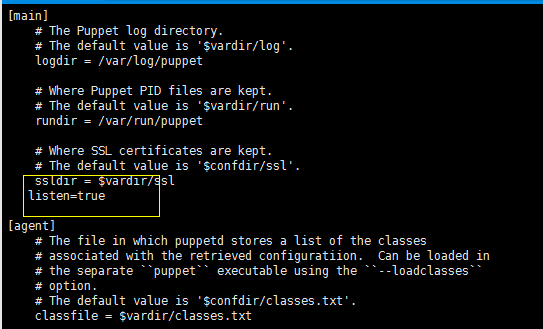
master中安装:
注意版本:
我这里用的是:

agent主机上:
facter, puppet
初始化(即生成CA签署agent主机过程);
puppet master –no-daemonize -v 可视化,观察过程
也可直接开启服务:systemctl start puppetmaster.service
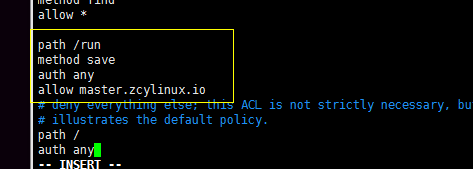
agnet端请求签证:puppet agent –server master.zcylinux.io –no-daemonize -v
请求后,master端需要签署:puppet cert sign Agent端主机
之后可开启服务:systemctl start puppetagent.service
开启后,agent端会每隔一段时间想master询问,是否有更改
也可以手动触发修改
测试;
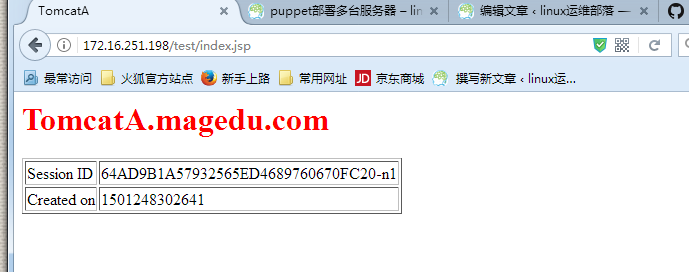
成功
原创文章,作者:Immortals、zcy,如若转载,请注明出处:http://www.178linux.com/82861
