

一、注册微信公众号
首先申请微信公众平台https://mp.weixin.qq.com/一个人最多申请5个公众号,所以还是可以的
申请完之后就可以根据腾讯的提示使用微信公众号了,然后用你自己的微信扫描关注微信号。


就可以看到用户数了,接下来的就要使用的用户的微信ID号了。点击用户查看用户的微信ID号。在浏览器查看用户的微信ID号。就是那个红色的ID了。
https://mp.weixin.qq.com/cgi-bin/singlesendpage?t=message/send&action=index&tofakeid=770373640&token=748989398&lang=zh_CN

二、下载并配置微信公众平台私有接口
git clone https
://github.com/lealife/WeiXin-Private-API
修改配置文件
[root@zabbix ~]# git clone https://github.com/lealife/WeiXin-Private-API
[root@zabbix ~]# cp -r WeiXin-Private-API/ /usr/local/zabbix/share/zabbix/alertscripts/
[root@zabbix ~]# cd /usr/local/zabbix/share/zabbix/alertscripts/WeiXin-Private-API
[root@zabbix WeiXin-Private-API]# chown zabbix.zabbix /usr/local/zabbix/share/zabbix/alertscripts/WeiXin-Private-API
修改config文件
[root@zabbix WeiXin-Private-API]# vi config.php <?php // 全局配置 $G_ROOT = dirname(__FILE__); $G_CONFIG["weiXin"] = array( 'account' => '微信公众登录号码', 'password' => '微信公众登录密码',
require "include/WeiXin.php";
'cookiePath' => $G_ROOT. '/cache/cookie', // cookie缓存文件路径 'webTokenPath' => $G_ROOT. '/cache/webToken', // webToken缓存文件路径 ); 修改test.php文件,只需要保存这几行即可 <?php require "config.php"; $weiXin = new WeiXin($G_CONFIG['weiXin']); $testFakeId = "$argv[1]";
print_r($weiXin->send($testFakeId, "$msg"));
$msg="$argv[3]";
注意这里$msg=”$argv[3]”表示zabbix传入的第三个参数,因为在zabbix报警时会传入三个参数:一是微信好友ID,二是报警信息的主题,三是报警信息的具体内容,这里跳过了报警信息主题,直接发送报警信息内容创建微信报警脚本weixin
[root@zabbix alertscripts]# vi weixin
/usr/bin/php /usr/local/zabbix/share/zabbix/alertscripts/WeiXin-Private-API/test.php "$1" "$2" "$3"
[root@zabbix alertscripts]# chown -R zabbix.zabbix weixin
[root@zabbix alertscripts]# chmod +x weixin
测试报警
[root@zabbix alertscripts]# /usr/local/zabbix/share/zabbix/alertscripts/weixin 770373640 "" "hello"
PHP Notice: Undefined index: HTTP_USER_AGENT in /usr/local/zabbix/share/zabbix/alertscripts/WeiXin-Private-API/include/LeaWeiXinClient.php on line 33
PHP Notice: Undefined index: HTTP_USER_AGENT in /usr/local/zabbix/share/zabbix/alertscripts/WeiXin-Private-API/include/LeaWeiXinClient.php on line 33
)
stdClass Object ( [base_resp] => stdClass Object ( [ret] => 0 [err_msg] => ok )
查看结果

三、配置zabbix
添加报警媒介

用户添加报警媒介,这里使用默认的administrator用户

添加报警动作

信息如下,使用默认的信息也可以

修改操作条件,使用默认的也是可以的
保存设置
四、验证结果
重启一台虚拟机进行测试。由于我也开启了邮件报警,所以看一下邮件先

看一下微信

到此为至zabbix的报警功能就实现了
五、mutt+msmtp发送邮件,实现报警功能
配置yum源如下
[root@localhost ~]# cat /etc/yum.repos.d/test.repo
[test] name=test
baseurl=https://mirrors.aliyun.com/centos/7/os/x86_64/
gpgcheck=0 enabled=1 [test2] name=test2
enabled=1
baseurl=https://mirrors.aliyun.com/epel/7Server/x86_64/ gpgcheck=0
[root@localhost ~]# yum -y install mutt msmtp
配置/root/.muttrc如下
[root@localhost ~]# cat .muttrc
set sendmail="/usr/bin/msmtp"
set from=1582209xxxx@139.com
set use_from=yes
set envelope_from=yes
配置/root/.msmtprc如下
[root@localhost ~]# cat .msmtprc
host smtp.139.com tls off
from 1582209xxxx@139.com
auth plain user 1582209xxxx@139.com
password 1922xxxxxxxx
[root@localhost ~]# !vim
vim /root/bin/mutt.sh
[root@localhost ~]# cat /root/bin/mutt.sh
#!/bin/bash
#Author Jin
#Time 20160203
while sleep 1; do
     if ss -tnl | grep --color=auto ":80" ; then
 continue
     else
 echo "web Server Down"
 echo "Web Server Down" | mutt -s "Nginx Server" 1922006891@qq.com 15822097176@139.com;
     fi
done
[root@localhost ~]# !chmod
chmod +x /root/bin/mutt.sh
[root@localhost ~]# systemctl start nginx
[root@localhost ~]# mutt.sh
LISTEN     0      128          *:80                       *:*
LISTEN     0      128         :::80                      :::*
LISTEN     0      128          *:80                       *:*
LISTEN     0      128         :::80                      :::*
LISTEN     0      128          *:80                       *:*
LISTEN     0      128         :::80                      :::*
LISTEN     0      128          *:80                       *:*
LISTEN     0      128         :::80                      :::*
LISTEN     0      128          *:80                       *:*
LISTEN     0      128         :::80                      :::*
LISTEN     0      128          *:80                       *:*
LISTEN     0      128         :::80                      :::*
LISTEN     0      128          *:80                       *:*
LISTEN     0      128         :::80                      :::*
LISTEN     0      128          *:80                       *:*
LISTEN     0      128         :::80                      :::*
LISTEN     0      128          *:80                       *:*
LISTEN     0      128         :::80                      :::*
LISTEN     0      128          *:80                       *:*
此时将nginx服务停掉
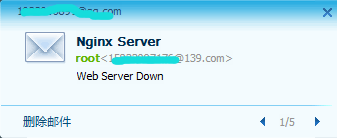
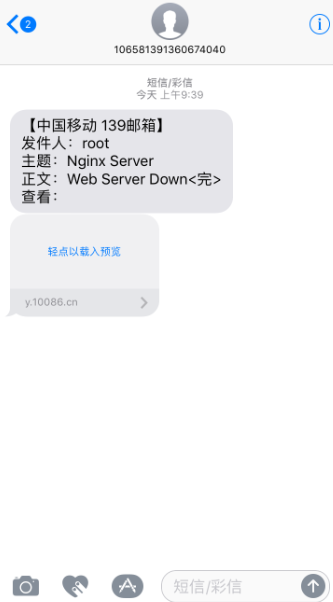
[root@localhost ~]# systemctl stop nginx
LISTEN 0 128 :::80 :::*
web Server Down web Server Down web Server Down web Server Down web Server Down
web Server Down
web Server Down
web Server Down
收到报警邮件及报警短信
同第三大步一样,配置zabbix的时候,将此脚本调入进去就可以了
原创文章,作者:kang,如若转载,请注明出处:http://www.178linux.com/79159
