


一:环境介绍:
OS:CentOS7.3
Ngninx:1.10.2
Tomcat:7
注:便于实验,此处关闭全部服务器的防火墙,selinux(iptables -F 于 setenforce 0)
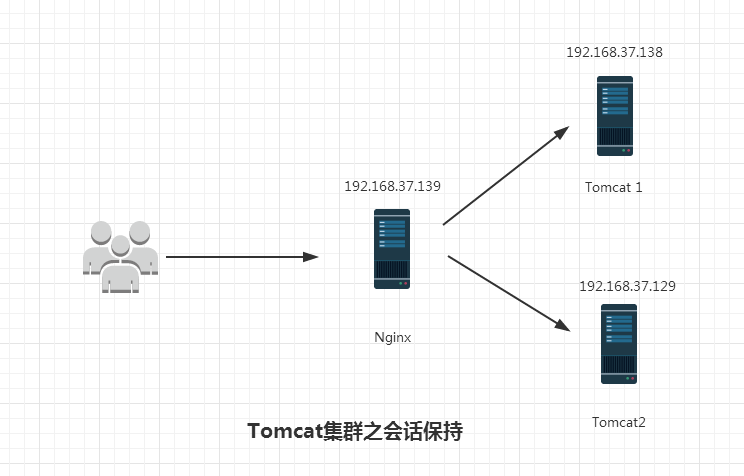
二:会话保持的重要性
在生成环境中,我们的Tomcat服务器肯定要做冗余或者高可用,如果没有做会话保持,那么用户访问页面时只要状态丢失,那么是会造成cookie丢失这种情况的,举个最简单的例子:结合上边的图大家可以想象下,你的Tomcat服务器做了冗余,但是没有做会话保持, 用户访问你的网站时登录了自己的账号(此时访问的Tomcat1),而Tomcat1服务器是会给用户生成cookie来记录账户信息。此时如果你长时间未操作,或者刷新由于Nginx调度用户会访问到Tomcat2上,而用户浏览器里保存的是Tomcat1的cookie,所以会重新请求!接下来可以想象了,用户需要进场去输入自己的账号信息,这样的用户体验是非常差的!而这里,我会演示,怎么做Tomcat集群的会话保持。
三:操作步骤
在Tomcat1服务器上
#安装Tomcat
[root@tomcat1] yum install -y tomcat-webapps tomcat-admin-webapps tomcat
#安装Tomcat测试应用
[root@tomcat1] mkdir -pv /usr/share/tomcat/webapps/test/{libclasses,lib,WEB-INF}
[root@tomcat1]nano /usr/share/tomcat/webapps/test/index.jsp
#贴入以下测试代码(请勿用vim)
<%@ page language="java" %>
<html>
<head><title>TomcatA</title></head>
<body>
<h1><font color="red">TomcatA.magedu.com</font></h1>
<table align="centre" border="1">
<tr>
<td>Session ID</td>
<% session.setAttribute("magedu.com","magedu.com"); %>
<td><%= session.getId() %></td>
</tr>
<tr>
<td>Created on</td>
<td><%= session.getCreationTime() %></td>
</tr>
</table>
</body>
</html>
#加入会话保持配置信息
[root@tomcat1]vim /etc/tomcat/server.xml
#在Engine配置段中贴入以下代码
<Cluster className="org.apache.catalina.ha.tcp.SimpleTcpCluster"
channelSendOptions="8">
<Manager className="org.apache.catalina.ha.session.DeltaManager"
expireSessionsOnShutdown="false"
notifyListenersOnReplication="true"/>
<Channel className="org.apache.catalina.tribes.group.GroupChannel">
<Membership className="org.apache.catalina.tribes.membership.McastService"
address="228.0.0.32"
port="45564"
frequency="500"
dropTime="3000"/>
<Receiver className="org.apache.catalina.tribes.transport.nio.NioReceiver"
address="192.168.37.138"
port="4000"
autoBind="100"
selectorTimeout="5000"
maxThreads="6"/>
<Sender className="org.apache.catalina.tribes.transport.ReplicationTransmitter">
<Transport className="org.apache.catalina.tribes.transport.nio.PooledParallelSender"/>
</Sender>
<Interceptor className="org.apache.catalina.tribes.group.interceptors.TcpFailureDetector"/>
<Interceptor className="org.apache.catalina.tribes.group.interceptors.MessageDispatch15Interceptor"/>
</Channel>
<Valve className="org.apache.catalina.ha.tcp.ReplicationValve"
filter=""/>
<Valve className="org.apache.catalina.ha.session.JvmRouteBinderValve"/>
<Deployer className="org.apache.catalina.ha.deploy.FarmWarDeployer"
tempDir="/tmp/war-temp/"
deployDir="/tmp/war-deploy/"
watchDir="/tmp/war-listen/"
watchEnabled="false"/>
<ClusterListener className="org.apache.catalina.ha.session.JvmRouteSessionIDBinderListener"/>
<ClusterListener className="org.apache.catalina.ha.session.ClusterSessionListener"/>
</Cluster>
#然后修改Engine 添加 jvmRoute="TcA"
<Engine name="Catalina" defaultHost="localhost" jvmRoute="TcA" >
#启动Tomcat
[root@tomcat1]systemctl start tomcat
[root@tomcat1]ss -tunl
#稍等几秒查看8080和45564端口是否启用
在Tomcat2服务器上
#安装Tomcat
[root@tomcat1] yum install -y tomcat-webapps tomcat-admin-webapps tomcat
#安装Tomcat测试应用
[root@tomcat1] mkdir -pv /usr/share/tomcat/webapps/test/{libclasses,lib,WEB-INF}
[root@tomcat1]nano /usr/share/tomcat/webapps/test/index.jsp
#贴入以下测试代码(请勿用vim)
<%@ page language="java" %>
<html>
<head><title>TomcatB</title></head>
<body>
<h1><font color="blue">TomcatB.magedu.com</font></h1>
<table align="centre" border="1">
<tr>
<td>Session ID</td>
<% session.setAttribute("magedu.com","magedu.com"); %>
<td><%= session.getId() %></td>
</tr>
<tr>
<td>Created on</td>
<td><%= session.getCreationTime() %></td>
</tr>
</table>
</body>
</html>
#加入会话保持配置信息
[root@tomcat1]vim /etc/tomcat/server.xml
#在Engine配置段中贴入以下代码
<Cluster className="org.apache.catalina.ha.tcp.SimpleTcpCluster"
channelSendOptions="8">
<Manager className="org.apache.catalina.ha.session.DeltaManager"
expireSessionsOnShutdown="false"
notifyListenersOnReplication="true"/>
<Channel className="org.apache.catalina.tribes.group.GroupChannel">
<Membership className="org.apache.catalina.tribes.membership.McastService"
address="228.0.0.32"
port="45564"
frequency="500"
dropTime="3000"/>
<Receiver className="org.apache.catalina.tribes.transport.nio.NioReceiver"
address="192.168.37.129"
port="4000"
autoBind="100"
selectorTimeout="5000"
maxThreads="6"/>
<Sender className="org.apache.catalina.tribes.transport.ReplicationTransmitter">
<Transport className="org.apache.catalina.tribes.transport.nio.PooledParallelSender"/>
</Sender>
<Interceptor className="org.apache.catalina.tribes.group.interceptors.TcpFailureDetector"/>
<Interceptor className="org.apache.catalina.tribes.group.interceptors.MessageDispatch15Interceptor"/>
</Channel>
<Valve className="org.apache.catalina.ha.tcp.ReplicationValve"
filter=""/>
<Valve className="org.apache.catalina.ha.session.JvmRouteBinderValve"/>
<Deployer className="org.apache.catalina.ha.deploy.FarmWarDeployer"
tempDir="/tmp/war-temp/"
deployDir="/tmp/war-deploy/"
watchDir="/tmp/war-listen/"
watchEnabled="false"/>
<ClusterListener className="org.apache.catalina.ha.session.JvmRouteSessionIDBinderListener"/>
<ClusterListener className="org.apache.catalina.ha.session.ClusterSessionListener"/>
</Cluster>
#然后修改Engine 添加 jvmRoute="TcA"
<Engine name="Catalina" defaultHost="localhost" jvmRoute="TcB" >
#启动Tomcat
[root@tomcat1]systemctl start tomcat
[root@tomcat1]ss -tunl
#稍等几秒查看8080和45564端口是否启用
在Nginx服务器上
[root@tomcat1]yum install -y nginx
[root@tomcat1]vim /etc/nginx/nginx.conf
#在http配置段中添加
upstream tomsrv {
server 192.168.37.138:8080;
server 192.168.37.129:8080;
}
#在server配置段的默认根location中
location / {
proxy_pass http://tomsrv;
}
[root@tomcat1]systemctl start nginx
四:测试访问
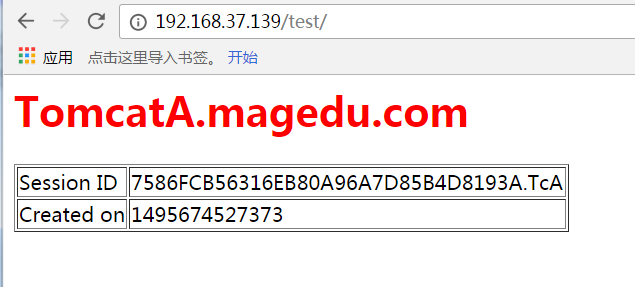
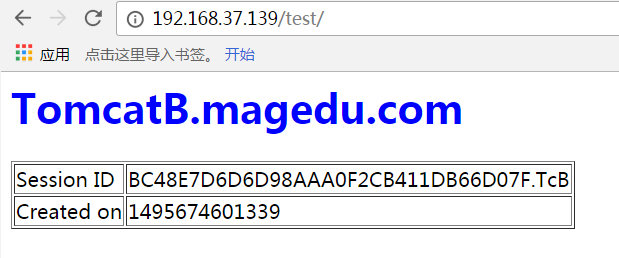
无论你访问到哪台服务器,重新访问session是被记录的,不需要重新请求。 如果各位有余力还可以把tomcat服务器中的server.xml文件中的<cluster>配置段删除,再测试访问,你会发现每次请求的session都不一样。
五:实验中遇到的问题
tomcat的8080 和45564端口起不来,首先确保配置文件正确,然后确保你的网卡支持MULTICAST,其他问题看日志解决。
ens33: flags=4163<UP,BROADCAST,RUNNING,MULTICAST> mtu 1500 inet 192.168.37.138 netmask 255.255.255.0 broadcast 192.168.37.255 inet6 fe80::6189:fb1b:4a6e:af04 prefixlen 64 scopeid 0x20<link> ether 00:0c:29:ea:d6:e8 txqueuelen 1000 (Ethernet) RX packets 63440 bytes 69237595 (66.0 MiB) RX errors 0 dropped 0 overruns 0 frame 0 TX packets 20513 bytes 2979675 (2.8 MiB) TX errors 0 dropped 0 overruns 0 carrier 0 collisions 0
原创文章,作者:cnc,如若转载,请注明出处:http://www.178linux.com/76852
