


环境:centos 6.8
注:此处省略对于各服务器的IP配置。
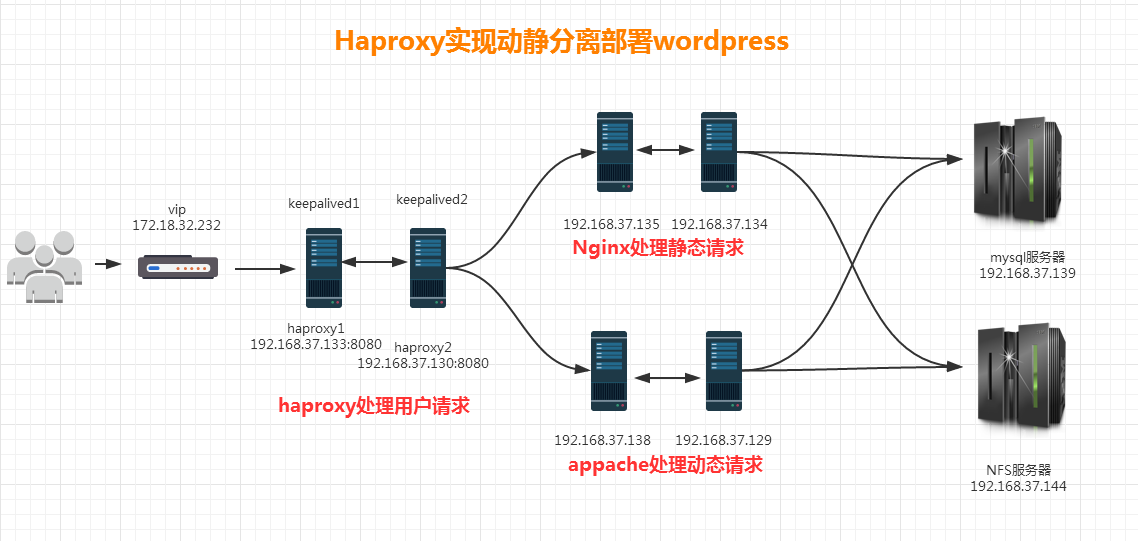
一:图示讲解
用户访问vip,通过haproxy代理得到服务器的资源。此架构下基于keepalived对haproxy做负载均衡(此种两种软件装在同一台服务器),基于haproxy对Nginx和apache做负载均衡,Nginx和Apache使用共享存储NFS和mysql。
二:配置讲解
第一步:配置mysql和nfs
# 配置Mysql服务
[root@mysql-nfs ~]$ yum -y install mariadb-server
[root@mysql-nfs ~]$ systemctl start mariadb
[root@mysql-nfs ~]$ mysql
MariaDB [(none)]> CREATE DATABASE wpdb;
MariaDB [(none)]> GRANT ALL ON wpdb.* TO wpuser@'192.168.%.%' IDENTIFIED BY 'wppass';
MariaDB [(none)]>

# 配置NFS服务
[root@mysql-nfs ~]$ useradd -r -u 88 apache
[root@mysql-nfs ~]$ mkdir -p -v /data/www
[root@mysql-nfs ~]$ chown apache.apache /data/www
[root@mysql-nfs ~]$ yum -y install nfs-utils
[root@mysql-nfs ~]$ cat > /etc/exports.d/web_data.exports << EOF
/data/www/ 192.168.37.0/16(rw,all_squash,anonuid=88,anongid=88)
EOF
[root@mysql-nfs ~]$ systemctl start rpcbind
[root@mysql-nfs ~]$ systemctl start rpcidmapd
[root@mysql-nfs ~]$ systemctl start nfs

# 测试NFS服务
[root@mysql-nfs ~]$ showmount  -e 127.0.0.1
Export list for 127.0.0.1:
/data/www 192.168.37.0/16
第二步:配置Nginx和apache
# 配置apache1服务器
[root@lap1 ~]$ useradd -r -u 88 apache
[root@lap1 ~]$ yum -y install nfs-utils httpd php php-mysql
[root@lap1 ~]$ mount -t nfs 192.168.37.144:/data/www /var/www/html/
[root@lap1 ~]$  wget https://cn.wordpress.org/wordpress-4.7.4-zh_CN.zip
[root@lap1 ~]$unzip  wordpress-4.7.4-zh_CN.zip
[root@lap1 ~]$cp wordpress/   /var/www/html
[root@lap1 ~]$ service httpd restart
[root@lap2 ~]$ ls /var/www/html/
wordpress

# 配置apache2服务器
[root@lap1 ~]$ useradd -r -u 88 apache
[root@lap1 ~]$ yum -y install nfs-utils httpd php php-mysql
[root@lap1 ~]$ mount -t nfs 192.168.37.144:/data/www /var/www/html/
[root@lap1 ~]$ service httpd restart
[root@lap1 ~]$  ls /var/www/html/
wordpress
# 配置Nginx1服务器
[root@nginx1 ~]$ yum -y install nfs-utils nginx
[root@nginx1 ~]$ mount -t nfs 192.168.37.144:/data/www /usr/share/nginx/html/
[root@nginx1 ~]$ service httpd restart
[root@nginx1 ~]$ ls /usr/share/nginx/html/
wordpress

# 配置Nginx2服务器
[root@nginx1 ~]$ yum -y install nfs-utils nginx
[root@nginx1 ~]$ mount -t nfs 192.168.37.144:/data/www /usr/share/nginx/html/
[root@nginx1 ~]$ service httpd restart
[root@nginx1 ~]$ ls /usr/share/nginx/html/
wordpress
第三步:配置Keepalived和Haproxy
# 配置HAproxy1服务器

## 安装相关程序包
[root@haproxy1 ~]$ yum -y  install haproxy keepalived psmisc
## 为haproxy提供配置文件
[root@haproxy1 ~]$ cp /etc/haproxy/haproxy.cfg{,.bak}
[root@haproxy1 ~]$ cat > /etc/haproxy/haproxy.cfg << EOF
global
    log         127.0.0.1 local2
    chroot      /var/lib/haproxy
    pidfile     /var/run/haproxy.pid
    maxconn     4000
    user        haproxy
    group       haproxy
    daemon
    stats socket /var/lib/haproxy/stats

defaults
    mode                    http
    log                     global
    option                  httplog
    option                  dontlognull
    option http-server-close
    option forwardfor       except 127.0.0.0/8
    option                  redispatch
    retries                 3
    timeout http-request    10s
    timeout queue           1m
    timeout connect         10s
    timeout client          1m
    timeout server          1m
    timeout http-keep-alive 10s
    timeout check           10s
    maxconn                 3000

frontend  Test *:80
    stats enable
    stats uri /stats
    acl url_static  path_end       -i .jpg .gif .png .css .js .svg
    rspidel Server.*
    rspadd  Server:\ CNC
    use_backend     web          if url_static
    default_backend php

backend php
    balance     roundrobin
    server      ap1 192.168.37.138:80 check
    server      ap1 192.168.37.129:80 check

backend web
    balance     roundrobin
    server      nginx1 192.168.37.135:80 check
    server      nginx2 192.168.37.134:80 check
EOF

## 为keepalived提供配置文件
[root@haproxy1 ~]$ cp /etc/keepalived/keepalived.conf{,.bak}
[root@haproxy1 ~]$ cat > /etc/keepalived/keepalived.conf << EOF
! Configuration File for keepalived

global_defs {
   router_id haproxy1
   vrrp_mcast_group4 224.0.128.100
}

vrrp_script check_haproxy {
    script "killall -0 haproxy && exit 0 || exit 1"
    interval 1
    weigth -5
}

vrrp_script check_down {
    script "[ -f /etc/keepalived/down ] && exit 1 || exit 0"
    interval 1
    weigth -5
}

vrrp_instance Haproxy_VIP {
    state MASTER
    interface eth1
    virtual_router_id 66
    priority 100
    advert_int 1
    authentication {
        auth_type PASS
        auth_pass  11111
    }
    virtual_ipaddress {
        172.18.32.232/16 dev eth1 label eth1:1
    }
    track_script {
        check_haproxy
        check_down
    }
}
EOF

## 启动haproxy、keepalived服务
[root@haproxy1 ~]$ systemctl start haproxy
[root@haproxy1 ~]$ systemctl start keepalived
# 配置HAproxy2服务器

## 安装相关程序包
[root@haproxy1 ~]$ yum -y  install haproxy keepalived psmisc
## 为haproxy提供配置文件
[root@haproxy1 ~]$ cp /etc/haproxy/haproxy.cfg{,.bak}
[root@haproxy1 ~]$ cat > /etc/haproxy/haproxy.cfg << EOF
global
    log         127.0.0.1 local2
    chroot      /var/lib/haproxy
    pidfile     /var/run/haproxy.pid
    maxconn     4000
    user        haproxy
    group       haproxy
    daemon
    stats socket /var/lib/haproxy/stats

defaults
    mode                    http
    log                     global
    option                  httplog
    option                  dontlognull
    option http-server-close
    option forwardfor       except 127.0.0.0/8
    option                  redispatch
    retries                 3
    timeout http-request    10s
    timeout queue           1m
    timeout connect         10s
    timeout client          1m
    timeout server          1m
    timeout http-keep-alive 10s
    timeout check           10s
    maxconn                 3000

frontend  Test *:80
    stats enable
    stats uri /stats
    acl url_static  path_end       -i .jpg .gif .png .css .js .svg
    rspidel Server.*
    rspadd  Server:\ CNC
    use_backend     web          if url_static
    default_backend php

backend php
    balance     roundrobin
    server      ap1 192.168.37.138:80 check
    server      ap1 192.168.37.129:80 check

backend web
    balance     roundrobin
    server      nginx1 192.168.37.135:80 check
    server      nginx2 192.168.37.134:80 check
EOF

## 为keepalived提供配置文件
[root@haproxy1 ~]$ cp /etc/keepalived/keepalived.conf{,.bak}
[root@haproxy1 ~]$ cat > /etc/keepalived/keepalived.conf << EOF
! Configuration File for keepalived

global_defs {
   router_id haproxy1
   vrrp_mcast_group4 224.0.128.100
}

vrrp_script check_haproxy {
    script "killall -0 haproxy && exit 0 || exit 1"
    interval 1
    weigth -5
}

vrrp_script check_down {
    script "[ -f /etc/keepalived/down ] && exit 1 || exit 0"
    interval 1
    weigth -5
}

vrrp_instance Haproxy_VIP {
    state BACKUP
    interface eth1
    virtual_router_id 66
    priority 95
    advert_int 1
    authentication {
        auth_type PASS
        auth_pass  11111
    }
    virtual_ipaddress {
        172.18.32.232/16 dev eth1 label eth1:1
    }
    track_script {
        check_haproxy
        check_down
    }
}
EOF

## 启动haproxy、keepalived服务
[root@haproxy1 ~]$ systemctl start haproxy
[root@haproxy1 ~]$ systemctl start keepalived
三.测试访问
在浏览器访问http://172.18.32.232/wordpress 正常
四.此实验需要注意的地方
1. 配置wordpress时,数据库地址要填mysql服务器地址192.168.37.139
2. 配置wordpress时,要在nfs服务器上切换到apache用户创建在/data/www/目录下创建wp-config.php文件。
ps: 如果大家在实验过程中有任何问题,欢迎随时联系我。VX:504498722
原创文章,作者:cnc,如若转载,请注明出处:http://www.178linux.com/76160
