

目录
一、试验部署
1、实验要求
2、实验准备
3、拓扑结构
4、网络规划
二、基础设置
1、LAMP配置
2、HAProxy配置
3、Keepalived配置
三、测试
四、总结
一、试验部署
1、实验要求
(1) 动静分离部署wordpress,动静都要能实现负载均衡,要注意会话的问题;
(2) 给出设计拓扑,写成博客;
(3)haproxy的设定要求:
(a)stats page,要求仅能通过本地访问使用管理接口;
(b) 动静分离;
(c) 分别考虑不同的服务器组的调度算法;
(4)haproxy高可用;
2、实验准备
(1)实验前关闭iptables和selinux;
(2)同步各个机器的时间;
3、拓扑结构
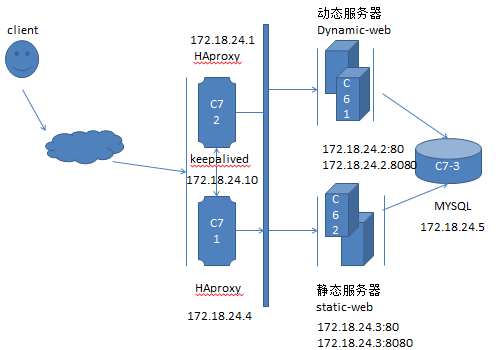

4、网络规划
由于电脑硬件问题,因此本实验dynamic-web组与static-web组分别用一台机器模拟;httpd虚拟主机实现;
客户端ip:172.18.254.160;
Haproxy1(centos7-2):172.18.24.1;
Haproxy1(centos7-1):172.18.24.4;
KeepalivedVIP1:172.18.24.10;
KeepalivedVIP2:172.18.24.11;
dynamic-web1(centos6-1):172.18.24.2:80; dynamic-web2:172.18.24.2:8080;
static-web1(centos6-2):172.18.24.3:80;static-web2:172.18.24.3:8080;
Mysql(centos7-3):172.18.24.5;
二、基础设置
1、LAMP配置
(a)配置centos7-3
yum install mariadb-server nfs-utils httpd
[root@localhost ~]#mysql –uroot –h127.0.0.1 #授权远程用户连接本机mysql
MariaDB [(none)]>create database wpdb;
MariaDB [(none)]> grant all privileges on wpdp.* to ‘shiyan’@’127.0.0.1’ identified by ‘shiyan’;
MariaDB [(none)]> grant all privileges on wpdp.* to ‘shiyan’@’localhost’ identified by ‘shiyan’;
MariaDB [(none)]> grant all privileges
on wpdp.* to ‘shiyan’@’172.18.24.2’ identified by ‘shiyan’;
MariaDB [(none)]> grant all privileges on wpdp.* to ‘shiyan’@’172.18.24.3’ identified by ‘shiyan’;
[root@localhost ~]#mkdir /data
[root@localhost ~]#cd /data
[root@localhost data]#
wget
ftp://172.18.0.1/pub/Sources/sources/httpd/wordpress-4.3.1-zh_CN.zip
[root@localhost data]#unzip
wordpress-4.3.1-zh_CN.zip
[root@localhost data]#chown -R mysql.mysql
/data/wordpress
[root@localhost data]#chmod -R o+w
wordpress
[root@localhost data]#vim /etc/exports #设置共享文件
/data/ 172.18.24.2 (rw)
/data/ 172.18.24.3 (rw)
[root@localhost data]#systemctl start nfs
[root@localhost data]#showmount -e
172.18.24.5
(b)配置centos6-1
[root@shiyan ~]#yum install httpd php php-mysql
[root@shiyan conf.d]#cd /etc/httpd/conf
[root@shiyan conf]#vim httpd.conf
#DocumentRoot “/var/www/html” #注销该行
Listen 80
Listen 8080 #添加监听端口
<VirtualHost *:8080> #创建虚拟主机
#
ServerAdmin webmaster@dummy-host.example.com
DocumentRoot /app/www/html/
ServerName www.staticweb2.com
ErrorLog logs/dummy-host.example.com-error_log
CustomLog logs/dummy-host.example.com-access_log common
</VirtualHost>
<VirtualHost *:80>
#
ServerAdmin webmaster@dummy-host.example.com
DocumentRoot /var/www/html/
ServerName www.staticweb1.com
ErrorLog logs/dummy-host.example.com-error_log
CustomLog logs/dummy-host.example.com-access_log common
</VirtualHost>
[root@shiyan conf]#service httpd restart
[root@shiyan conf]#mkdir /app/www/html -pv
[root@shiyan ~]#mount 172.18.24.5:/data/
/app/www/html #挂载共享文件
[root@shiyan ~]#mount 172.18.24.5:/data/
/var/www/html
(c)centos6-2配置如上相同
2、HAProxy配置
(a)配置centos7-1
yum install haproxy
[root@localhost haproxy]#vim
/etc/haproxy/haproxy.cfg
global
log 127.0.0.1 local2
chroot /var/lib/haproxy
pidfile
/var/run/haproxy.pid
maxconn 4000
user haproxy
group haproxy
daemon
stats socket
/var/lib/haproxy/stats
defaults
mode http
log global
option httplog
option dontlognull
option http-server-close
option forwardfor except
127.0.0.0/8
option redispatch
retries 3
timeout http-request 10s
timeout queue 1m
timeout connect 10s
timeout client 1m
timeout server 1m
timeout http-keep-alive 10s
timeout check 10s
maxconn 3000
frontend
eshop
bind *:80
acl phpapp path_end -i .php #动静分离
use_backend phpsrvs if phpapp
default_backend
websrvs
compression type text/html
compression algo gzip
listen stats
bind :10080
stats enable
stats uri /haadmin?admin
stats realm ‘Haproxy\ admin’
stats auth admin:admin
stats hide-version
stats admin if TRUE
acl client src 172.18.254.160 #只允许本地访问状态页面
block unless client
backend websrvs
balance source
server web1 172.18.24.2:80
check
server web2 172.18.24.3:80
check
hash-type consistent
backend phpsrvs
balance leastconn
server php1 172.18.24.2:8080
check
server php2 172.18.24.3:8080
check
hash-type consistent
[root@localhost ~]#systemctl haproxy start
3、Keepalived配置
(a)配置centos7-1
yum install keepalived
[root@localhost haproxy]#vim
/etc/keepalived/keepalived.conf
global_defs {
notification_email {
root@localhost
}
notification_email_from keeplived@localhost
smtp_server 127.0.0.1
smtp_connect_timeout 30
router_id tes1t #修改为centos7-2的路由ID
vrrp_mcast_group4 224.0.100.24
}
vrrp_script ‘ngxstatus’ {
script “killall -0 nginx && exit 0 || exit 1”
interval 1
weight -5
}
vrrp_instance myr1 {
state MASTER #centos7-2 改为BACKUP
interface eth0 #centos7-2的网络接口地址
virtual_router_id 67
priority 100 #centos7-2 优先级修改为98
advert_int 1
authentication {
auth_type PASS
auth_pass UIpYPPDI
}
track_script {
ngxstatus #执行脚本
}
virtual_ipaddress {
172.18.24.10/16 dev eth0 #虚拟IP,在centos7-2上要与之相对应的网卡
}
notify_master “/etc/keepalived/notify.sh master”
notify_backup “/etc/keepalived/notify.sh backup”
notify_fault
“/etc/keepalived/notify.sh fault”
——————————————————————————————————————————–
需要的脚本:
vim
/etc/keepalived/notify.sh
#!/bin/bash
#
contact=’root@localhost’
notify() {
mailsubject=”vrrp $(hostname) to
be $1″
mailbody=”$(hostname) to be
$1,vrrp transition, $(date).”
echo “$mailbody” | mail -s
“$mailsubject” $contact
}
case $1 in
master)
notify master
;;
backup)
notify backup
;;
fault)
notify fault
;;
*)
echo “Usage: $(basename $0)
master|backup|fault “
exit 1
;;
esac
———————————————————————————————————————-
[root@localhost keepalived]#systemctl restart keepalived
三、测试
通过网页登录172.18.24.10,装载WordPress,然后对其进行增删改查的操作。
四、总结
本实验完成实现以下功能:
1、Haporxy主从高可用
2、Haproxy负载均衡
3、Haproxy 监控页面访问控制
4、动静分离
5、会话保持
原创文章,作者:chenxu@magedu.com,如若转载,请注明出处:http://www.178linux.com/76117
