

1、 结合图形描述LVS的工作原理;
针对高可伸缩、高可用网络服务的需求,给出了基于IP层和基于内容请求分发的负载平衡调度解决方法,并在Linux内核中实现了这些方法,将一组服务器构成一个实现可伸缩的、高可用网络服务的虚拟服务器。
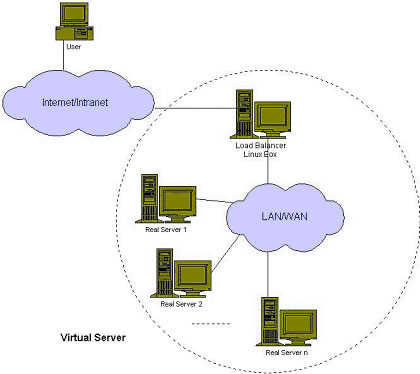
虚拟服务器的体系结构如图所示,一组服务器通过高速的局域网或者地理分布的广域网相互连接,在它们的前端有一个负载调度器(Load Balancer)。负载调度器能无缝地将网络请求调度到真实服务器上,从而使得服务器集群的结构对客户是透明的,客户访问集群系统提供的网络服务就像访 问一台高性能、高可用的服务器一样。客户程序不受服务器集群的影响不需作任何修改。系统的伸缩性通过在服务机群中透明地加入和删除一个节点来达到,通过检 测节点或服务进程故障和正确地重置系统达到高可用性。由于负载调度技术是在Linux内核中实现的,称之为Linux虚拟服务器(Linux Virtual Server)。

IP虚拟服务器软件IPVS
在调度器的实现技术中,IP负载均衡技术是效率最高的。在已有的IP负载均衡技术中有通过网络地址转换(Network
Address Translation)将一组服务器构成一个高性能的、高可用的虚拟服务器,称之为VS/NAT技术(Virtual
Server via Network Address Translation),大多数商品化的IP负载均衡调度器产品都是使用此方法,如Cisco的LocalDirector、F5的Big/IP和 Alteon的ACEDirector。在分析VS/NAT的缺点和网络服务的非对称性的基础上,提出通过IP隧道实现虚拟服务器的方法VS/TUN (Virtual
Server via IP Tunneling),和通过直接路由实现虚拟服务器的方法VS/DR(Virtual
Server via Direct Routing),它们可以极大地提高系统的伸缩性。所以,IPVS软件实现了这三种IP负载均衡技术,它们的大致原理如下
Virtual Server via Network Address Translation(VS/NAT)
通过网络地址转换,调度器重写请求报文的目标地址,根据预设的调度算法,将请求分派给后端的真实服务器;真实服务器的响应报文通过调度器时,报文的源地址被重写,再返回给客户,完成整个负载调度过程。
1. Virtual
Server via IP Tunneling(VS/TUN)
采用NAT技术时,由于请求和响应报文都必须经过调度器地址重写,当客户请求越来越多时,调度器的处理能力将成为瓶颈。为了解决这个问题,调度器把请求报 文通过IP隧道转发至真实服务器,而真实服务器将响应直接返回给客户,所以调度器只处理请求报文。由于一般网络服务应答比请求报文大许多,采用 VS/TUN技术后,集群系统的最大吞吐量可以提高10倍。
2. Virtual
Server via Direct Routing(VS/DR)
VS/DR通过改写请求报文的MAC地址,将请求发送到真实服务器,而真实服务器将响应直接返回给客户。同VS/TUN技术一样,VS/DR技术可极大地 提高集群系统的伸缩性。这种方法没有IP隧道的开销,对集群中的真实服务器也没有必须支持IP隧道协议的要求,但是要求调度器与真实服务器都有一块网卡连 在同一物理网段上。
针对不同的网络服务需求和服务器配置,IPVS调度器实现了如下八种负载调度算法:
1. 轮叫(Round Robin)
调度器通过”轮叫”调度算法将外部请求按顺序轮流分配到集群中的真实服务器上,它均等地对待每一台服务器,而不管服务器上实际的连接数和系统负载。
2. 加权轮叫(Weighted
Round Robin)
调度器通过”加权轮叫”调度算法根据真实服务器的不同处理能力来调度访问请求。这样可以保证处理能力强的服务器处理更多的访问流量。调度器可以自动问询真实服务器的负载情况,并动态地调整其权值。
3. 最少链接(Least
Connections)
调度器通过”最少连接”调度算法动态地将网络请求调度到已建立的链接数最少的服务器上。如果集群系统的真实服务器具有相近的系统性能,采用”最小连接”调度算法可以较好地均衡负载。
4. 加权最少链接(Weighted
Least Connections)
在集群系统中的服务器性能差异较大的情况下,调度器采用”加权最少链接”调度算法优化负载均衡性能,具有较高权值的服务器将承受较大比例的活动连接负载。调度器可以自动问询真实服务器的负载情况,并动态地调整其权值。
5. 基于局部性的最少链接(Locality-Based
Least Connections)
“基于局部性的最少链接” 调度算法是针对目标IP地址的负载均衡,目前主要用于Cache集群系统。该算法根据请求的目标IP地址找出该目标IP地址最近使用的服务器,若该服务器 是可用的且没有超载,将请求发送到该服务器;若服务器不存在,或者该服务器超载且有服务器处于一半的工作负载,则用”最少链接”的原则选出一个可用的服务 器,将请求发送到该服务器。
6. 带复制的基于局部性最少链接(Locality-Based
Least Connections with Replication)
“带复制的基于局部性最少链接”调度算法也是针对目标IP地址的负载均衡,目前主要用于Cache集群系统。它与LBLC算法的不同之处是它要维护从一个 目标IP地址到一组服务器的映射,而LBLC算法维护从一个目标IP地址到一台服务器的映射。该算法根据请求的目标IP地址找出该目标IP地址对应的服务 器组,按”最小连接”原则从服务器组中选出一台服务器,若服务器没有超载,将请求发送到该服务器,若服务器超载;则按”最小连接”原则从这个集群中选出一 台服务器,将该服务器加入到服务器组中,将请求发送到该服务器。同时,当该服务器组有一段时间没有被修改,将最忙的服务器从服务器组中删除,以降低复制的 程度。
7. 目标地址散列(Destination
Hashing)
“目标地址散列”调度算法根据请求的目标IP地址,作为散列键(Hash Key)从静态分配的散列表找出对应的服务器,若该服务器是可用的且未超载,将请求发送到该服务器,否则返回空。
8. 源地址散列(Source
Hashing)
“源地址散列”调度算法根据请求的源IP地址,作为散列键(Hash Key)从静态分配的散列表找出对应的服务器,若该服务器是可用的且未超载,将请求发送到该服务器,否则返回空。

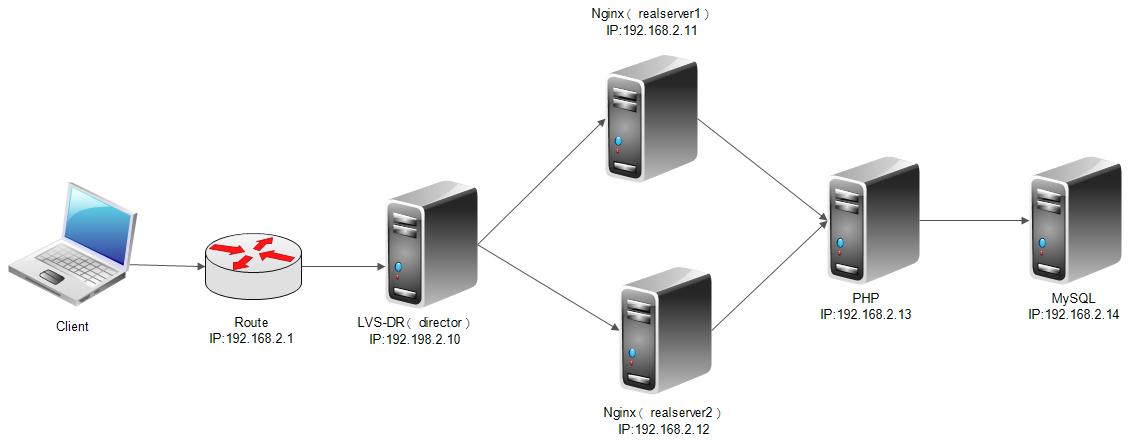
2、搭建一套LVS-DR模型的高性能集群,并实现以下功能:
(1)、wordpress程序通过nfs共享给各个realserver;
(2)、后端realserver中的nginx和php分离
网络结构图:
环境说明:
    OS:centos6.7 x64
    主机IP:
        LVS-DR(director): 192.168.2.10
        realsever1 web1 Nginx: 192.168.2.11
        realserver2 web2 Nginx: 192.168.2.12
        PHP server: 192.168.2.13
        MySQL server: 192.168.2.14
    主机名:
        lvs-dr: 192.168.2.10
        realserver1: 192.168.2.11
        realserver2: 192.168.2.12
        php-server: 192.168.2.13
        mysql-server: 192.168.2.14
    selinux: disabled
    内网iptables: off
一、安装nginx、MySQL
    1. Nginx 安装:
    需要安装的主机:
        Nginx:192.168.2.11、192.168.2.12
        MySQL:192.168.2.14
192.168.2.11:
(1) 搭建本地yum源:
[root@realserver1 yum.repos.d]# yum install gcc* -y     # 安装gcc开发环境,为了编译安装nginx使用
[root@realserver1 yum.repos.d]# yum install ntpdate wget -y     # ntpdate 时间同步,wget 下载nginx
[root@realserver1 yum.repos.d]# ntpdate -s tiger.sina.com.cn     # 同步时间
[root@realserver1 src]# wget http://mirrors.sohu.com/nginx/nginx-1.9.9.tar.gz     # 下载nginx-1.9.9包
[root@realserver1 src]# groupadd -g 800 www
[root@realserver1 src]# useradd -u 800 -g 800 -s /sbin/nologin www     # 创建nginx worker进程工作用户
[root@realserver1 nginx-1.9.9]# yum install zlib zlib-devel pcre pcre-devel openssl openssl-devel -y
# pcre 支持正则表达式
# zlib 支持数据压缩
# openssl支持HTTPS
[root@realserver1 src]# tar xf nginx-1.9.9.tar.gz
[root@realserver1 src]# cd nginx-1.9.9
[root@realserver1 nginx-1.9.9]# ./configure --prefix=/usr/local/nginx --user=nginx --group=nginx --with-http_ssl_module --with-http_stub_status_module --with-http_gzip_static_module --with-http_realip_module  --with-pcre
# --with-http_ssl_module 启用HTTPS加密
# --with-http_stub_status_module 启用nginx状态监控
# --with-http_gzip_static_module  启用静态压缩
# --with-http_realip_module 做代理时获取客户端真实IP
[root@realserver1 nginx-1.9.9]# make && make install

[root@realserver1 nginx-1.9.9]# vim /etc/init.d/nginx     # 创建nginx服务脚本
#!/bin/sh
#
# nginx - this script starts and stops the nginx daemon
#
# chkconfig: - 85 15
# description: Nginx is an HTTP(S) server, HTTP(S) reverse \
#   proxy and IMAP/POP3 proxy server
# processname: nginx
# config: /etc/nginx/nginx.conf
# config: /etc/sysconfig/nginx
# pidfile: /var/run/nginx.pid
# Source function library.
. /etc/rc.d/init.d/functions
# Source networking configuration.
. /etc/sysconfig/network
# Check that networking is up.
[ "$NETWORKING" = "no" ] && exit 0
    nginx="/usr/local/nginx/sbin/nginx"
    prog=$(basename $nginx)
    NGINX_CONF_FILE="/usr/local/nginx/conf/nginx.conf"
[ -f /etc/sysconfig/nginx ] && . /etc/sysconfig/nginx
    lockfile=/var/lock/subsys/nginx

start() {
    [ -x $nginx ] || exit 5
    [ -f $NGINX_CONF_FILE ] || exit 6
    echo -n $"Starting $prog: "
    daemon $nginx -c $NGINX_CONF_FILE
    retval=$?
    echo
[ $retval -eq 0 ] && touch $lockfile
    return $retval
}

stop() {
    echo -n $"Stopping $prog: "
    killproc $prog -QUIT
    retval=$?
    echo
[ $retval -eq 0 ] && rm -f $lockfile
    return $retval
    killall -9 nginx
}

restart() {
    configtest || return $?
    stop
    sleep 1
    start
}

reload() {
    configtest || return $?
    echo -n $"Reloading $prog: "
    killproc $nginx -HUP
    RETVAL=$?
    echo
}

force_reload() {
    restart
}

configtest() {
    $nginx -t -c $NGINX_CONF_FILE
}

rh_status() {
    status $prog
}

rh_status_q() {
    rh_status >/dev/null 2>&1
}

case "$1" in
    start)
        rh_status_q && exit 0
        $1
    ;;
    stop)
        rh_status_q || exit 0
        $1
    ;;
    restart|configtest)
        $1
    ;;
    reload)
        rh_status_q || exit 7
        $1
    ;;
    force-reload)
        force_reload
    ;;
    status)
        rh_status
    ;;
    condrestart|try-restart)
        rh_status_q || exit 0
    ;;
    *)
        echo $"Usage: $0 {start|stop|status|restart|condrestart|try-restart|reload|force-reload|configtest}"
        exit 2
esac

[root@realserver1 conf]# chmod +x /etc/init.d/nginx
[root@realserver1 nginx-1.9.9]# cd /usr/local/nginx/conf/
[root@realserver1 conf]# vim nginx.conf
  2 user  www www;
[root@realserver1 conf]# vim /etc/profile.d/nginx.sh
[root@realserver1 conf]# source /etc/profile.d/nginx.sh
[root@realserver1 conf]# nginx -t
nginx: the configuration file /usr/local/nginx/conf/nginx.conf syntax is ok
nginx: configuration file /usr/local/nginx/conf/nginx.conf test is successful
[root@realserver1 conf]# service nginx start
正在启动 nginx:                                           [确定]
[root@realserver1 conf]# chkconfig --add nginx
[root@realserver1 conf]# chkconfig nginx on
[root@realserver1 conf]# chkconfig --list nginx
nginx              0:关闭    1:关闭    2:启用    3:启用    4:启用    5:启用    6:关闭

[root@realserver1 conf]# curl -I http://192.168.2.11     # 测试本地访问nginx服务
HTTP/1.1 200 OK
Server: nginx/1.9.9
Date: Sun, 19 Jun 2016 06:15:11 GMT
Content-Type: text/html
Content-Length: 612
Last-Modified: Sun, 19 Jun 2016 06:03:48 GMT
Connection: keep-alive
ETag: "576635c4-264"
Accept-Ranges: bytes
测试客户端访问:

修改nginx配置文件如下:
行号
 43         location / {
 44             root   /webapp;
 45             index  index.html index.htm;
 46         }

 65         location ~ \.php$ {
 66             root           /webapp;
 67             fastcgi_pass   192.168.2.13:9000;
 68             fastcgi_index  index.php;
 69             include        fastcgi.conf;
 70         }
保存退出
[root@realserver1 conf]# mkdir /webapp
[root@realserver1 conf]# chown -R www:www /webapp/
[root@realserver1 conf]# nginx -t
nginx: the configuration file /usr/local/nginx/conf/nginx.conf syntax is ok
nginx: configuration file /usr/local/nginx/conf/nginx.conf test is successful
[root@realserver1 conf]# service nginx reload
nginx: the configuration file /usr/local/nginx/conf/nginx.conf syntax is ok
nginx: configuration file /usr/local/nginx/conf/nginx.conf test is successful
重新载入 nginx:                                           [确定]
realserver2 nginx配置如上同样进行配置,这里不在贴代码。
(2) MySQL: 192.168.2.14:
[root@mysql-server ~]# wget http://mirrors.sohu.com/mysql/MySQL-5.6/mysql-5.6.31-linux-glibc2.5-x86_64.tar.gz
[root@mysql-server ~]# tar xf mysql-5.6.31-linux-glibc2.5-x86_64.tar.gz -C /usr/local/
[root@mysql-server local]# groupadd -g 306 mysql
[root@mysql-server local]# useradd -u 306 -g 306 -s /sbin/nologin mysql
[root@mysql-server local]# mkdir -pv /mydata/data
mkdir: created directory `/mydata'
mkdir: created directory `/mydata/data'
[root@mysql-server local]# chown -R mysql:mysql /mydata/
[root@mysql-server local]# cd mysql
[root@mysql-server mysql]# chown -R root:mysql .
[root@mysql-server mysql]# yum install libaio -y
[root@mysql-server mysql]# ./scripts/mysql_install_db --user=mysql --datadir=/mydata/data/
[root@mysql-server mysql]# cp -a support-files/mysql.server /etc/init.d/mysqld
[root@mysql-server mysql]# chmod +x /etc/init.d/mysqld
[root@mysql-server mysql]# mv /etc/my.cnf /etc/my.cnf_old
[root@mysql-server mysql]# cp -a support-files/my-default.cnf /etc/my.cnf
[root@mysql-server mysql]# vim /etc/my.cnf
# 添加如下一条
datadir=/mydata/data
[root@mysql-server mysql]# ln -vs /usr/local/mysql/include /usr/include/mysql
`/usr/include/mysql' -> `/usr/local/mysql/include'
[root@mysql-server mysql]# vim /etc/ld.so.conf.d/mysql.conf
[root@mysql-server mysql]# ldconfig -v | less
[root@mysql-server mysql]# service mysqld start
Starting MySQL. SUCCESS!
[root@mysql-server mysql]# ss -ntl | grep 3306
LISTEN     0      80                       :::3306                    :::*
到此,nignx和mysql安装完毕。

(3) php 安装:
[root@php-server yum.repos.d]# yum install wget gcc* -y
# 添加epel源
[root@php-server ~]# vim /etc/yum.repos.d/epel-centos6.repo
[epel]
name=Extra Packages for Enterprise Linux 6 - $basearch
baseurl=http://download.fedoraproject.org/pub/epel/6/$basearch
#mirrorlist=https://mirrors.fedoraproject.org/metalink?repo=epel-6&arch=$basearch
failovermethod=priority
enabled=1
gpgcheck=0
gpgkey=file:///etc/pki/rpm-gpg/RPM-GPG-KEY-EPEL-6

[epel-debuginfo]
name=Extra Packages for Enterprise Linux 6 - $basearch - Debug
baseurl=http://download.fedoraproject.org/pub/epel/6/$basearch/debug
#mirrorlist=https://mirrors.fedoraproject.org/metalink?repo=epel-debug-6&arch=$basearch
failovermethod=priority
enabled=0
gpgkey=file:///etc/pki/rpm-gpg/RPM-GPG-KEY-EPEL-6
gpgcheck=0

[epel-source]
name=Extra Packages for Enterprise Linux 6 - $basearch - Source
baseurl=http://download.fedoraproject.org/pub/epel/6/SRPMS
#mirrorlist=https://mirrors.fedoraproject.org/metalink?repo=epel-source-6&arch=$basearch
failovermethod=priority
enabled=0
gpgkey=file:///etc/pki/rpm-gpg/RPM-GPG-KEY-EPEL-6
gpgcheck=0
保存退出

# 安装php源码包的依赖包
[root@php-server yum.repos.d]# yum install libmcrypt libmcrypt-devel mhash mhash-devel install libxml2-devel openssl openssl-devel bzip2-devel libcurl-devel gd -y
# gd-devel-2.0.35-11.el6.x86_64.rpm 从网上下载到的包安装,直接百度搜包名就有。
[root@php-server ~]# yum localinstall gd-devel-2.0.35-11.el6.x86_64.rpm -y
[root@php-server ~]# groupadd -g 800 www
[root@php-server ~]# useradd -u 800 -g 800 -s /sbin/nologin www     # 创建运行php worker进程用户
[root@php-server ~]# cd /usr/local/src/
[root@php-server src]# wget http://mirrors.sohu.com/php/php-5.6.7.tar.gz
[root@php-server php-5.6.7]# cd php-5.6.7
[root@php-server php-5.6.7]# ./configure --prefix=/usr/local/php --enable-fpm --enable-ftp --enable-zip \
--enable-xml --enable-sockets --enable-bcmath --enable-pcntl --enable-shmop --enable-soap --enable-sysvsem \
--enable-mbstring --enable-mbregex --enable-inline-optimization --enable-maintainer-zts --enable-gd-native-ttf \
--with-fpm-user=www --with-fpm-group=www --with-mysql --with-mysqli --with-pdo-mysql --with-openssl --with-freetype-dir \
--with-iconv-dir --with-jpeg-dir --with-png-dir --with-libxml-dir=/usr --with-curl  --with-zlib --with-bz2 --with-xmlrpc \
--with-gd --with-config-file-path=/usr/local/php/etc --with-config-file-scan-dir=/usr/local/php/etc/php.d
[root@php-server php-5.6.7]# make && make install
# 编译时间比较长
[root@php-server php-5.6.7]# cp -a sapi/fpm/init.d.php-fpm /etc/init.d/php-fpm
[root@php-server php-5.6.7]# chmod +x /etc/init.d/php-fpm
[root@php-server php-5.6.7]# cp -a php.ini-production /usr/local/php/etc/php.ini
[root@php-server php-5.6.7]# cd /usr/local/php/etc/
[root@php-server etc]# cp -a php-fpm.conf.default php-fpm.conf
[root@php-server etc]# vim php-fpm.conf     # 修改监听地址
164 listen = 192.168.2.13:9000
[root@php-server etc]# service php-fpm start
Starting php-fpm  done
[root@php-server etc]# ss -ntl | grep 9000
LISTEN     0      128            192.168.2.13:9000                     *:*
[root@php-server etc]# chkconfig --add php-fpm
[root@php-server etc]# chkconfig php-fpm on
[root@php-server etc]# iptables -F
[root@php-server etc]# iptables -X
[root@php-server etc]# iptables -A INPUT -m state --state RELATED,ESTABLISHED -j ACCEPT
[root@php-server etc]# iptables -A INPUT -p tcp -m multiport --sport 22,9000 -m state --state NEW -j ACCEPT
[root@php-server etc]# iptables -P INPUT DROP
[root@php-server etc]# service iptables save
iptables: Saving firewall rules to /etc/sysconfig/iptables:[  OK  ]
[root@php-server etc]# service iptables restart
iptables: Setting chains to policy ACCEPT: filter          [  OK  ]
iptables: Flushing firewall rules:                         [  OK  ]
iptables: Unloading modules:                               [  OK  ]
iptables: Applying firewall rules:                         [  OK  ]
php 安装完毕。

(3) nginx 连接 php
nginx对于php的配置上面已经写过了:
修改nginx配置文件如下:
行号
 43         location / {
 44             root   /webapp;
 45             index  index.html index.htm index.php;
 46         }

 65         location ~ \.php$ {
 66             root           /webapp;
 67             fastcgi_pass   192.168.2.13:9000;
 68             fastcgi_index  index.php;
 69             include        fastcgi.conf;
 70         }
保存退出
连接nfs共享web程序
php-sever 192.168.2.13 设置如下:
[root@php-server etc]# yum install nfs-utils -y     # 使用桌面虚拟机可能会碰到nfs需要重启下机器的情况

[root@php-server ~]# service nfs start
Starting NFS services:                                     [  OK  ]
Starting NFS mountd:                                       [  OK  ]
Starting NFS daemon:                                       [  OK  ]
Starting RPC idmapd:                                       [  OK  ]


vim /etc/exports
/webapp 192.168.2.0/24(rw,sync)


[root@php-server ~]# showmount -e 192.168.2.13
Export list for 192.168.2.13:
/webapp 192.168.2.0/24

# 让两台nginx服务器挂载 192.168.2.11、192.168.2.12
yum install -y rpcbind nfs-utils
yum install mysql


[root@realserver1 ~]# mount -t nfs 192.168.2.13:/webapp/ /webapp/
[root@realserver2 ~]# mount -t nfs 192.168.2.13:/webapp/ /webapp/

# 下载wordpress并上传到服务器
[root@php-server ~]# unzip wordpress-4.5.2-zh_CN.zip
[root@php-server ~]# cp -a wordpress/* /webapp/
[root@php-server ~]# chown -R www:www /webapp/
在数据库服务器(192.168.2.14)上建立wordpress数据库并赋予权限
[root@mysql-server mysql]# /usr/local/mysql/bin/mysql
Welcome to the MySQL monitor.  Commands end with ; or \g.
Your MySQL connection id is 2
Server version: 5.6.31 MySQL Community Server (GPL)

Copyright (c) 2000, 2016, Oracle and/or its affiliates. All rights reserved.

Oracle is a registered trademark of Oracle Corporation and/or its
affiliates. Other names may be trademarks of their respective
owners.

Type 'help;' or '\h' for help. Type '\c' to clear the current input statement.

mysql> CREATE DATABASE wordpress;
Query OK, 1 row affected (0.02 sec)

mysql> GRANT ALL ON wordpress.* TO 'wordpress'@'192.168.2.13' IDENTIFIED BY '123456';
Query OK, 0 rows affected (0.02 sec)

mysql> FLUSH PRIVILEGES;
Query OK, 0 rows affected (0.00 sec)
mysql> Bye
通过页面访问安装wordpress
填写数据库信息


安装完毕。
realserver1 和 realserver2 都指向了一个站点,并能正常访问。
(4) lvs-dr搭建
    vip: 192.168.2.200
director配置如下:
[root@lvs-dr ~]# yum install ipvsadm
[root@lvs-dr ~]# ifconfig eth0:0 192.168.2.200/32 broadcast 192.168.2.200 up
[root@lvs-dr ~]# route add -host 192.168.2.200 dev eth0:0
[root@lvs-dr ~]# ip a
1: lo: <LOOPBACK,UP,LOWER_UP> mtu 16436 qdisc noqueue state UNKNOWN
    link/loopback 00:00:00:00:00:00 brd 00:00:00:00:00:00
    inet 127.0.0.1/8 scope host lo
    inet6 ::1/128 scope host
       valid_lft forever preferred_lft forever
2: eth0: <BROADCAST,MULTICAST,UP,LOWER_UP> mtu 1500 qdisc pfifo_fast state UP qlen 1000
    link/ether 00:0c:29:39:92:4f brd ff:ff:ff:ff:ff:ff
    inet 192.168.2.10/24 brd 192.168.2.255 scope global eth0
    inet 192.168.2.200/0 brd 192.168.2.200 scope global eth0:0
    inet6 fe80::20c:29ff:fe39:924f/64 scope link
       valid_lft forever preferred_lft forever
接下来给realserver 添加vip
net.ipv4.conf.all.arp_ignore = 1
net.ipv4.conf.all.arp_announce = 2
net.ipv4.conf.lo.arp_ignore = 1
net.ipv4.conf.lo.arp_announce = 2
[root@realserver1 ~]# sysctl -p
[root@realserver1 ~]# ifconfig lo:0 192.168.2.200/32 broadcast 192.168.2.200 up
[root@realserver1 ~]# route add -host 192.168.2.200 dev lo:0
另一台realserver2 一样的操作

在lvs-dr主机添加规则如下:
[root@lvs-dr ~]# ipvsadm -A -t 192.168.2.200:80 -s rr
[root@lvs-dr ~]# ipvsadm -a -t 192.168.2.200:80 -r 192.168.2.11 -g -w 1
[root@lvs-dr ~]# ipvsadm -a -t 192.168.2.200:80 -r 192.168.2.12 -g -w 1
[root@lvs-dr ~]# ipvsadm -L -n
IP Virtual Server version 1.2.1 (size=4096)
Prot LocalAddress:Port Scheduler Flags
  -> RemoteAddress:Port           Forward Weight ActiveConn InActConn
TCP  192.168.2.200:80 rr
  -> 192.168.2.11:80              Route   1      0          0
  -> 192.168.2.12:80              Route   1      0          0

浏览器访问http://192.168.2.200
3、基于heartbeat v2 crm实现HA LAMP组合;要求,部署wordpress,用于编辑的文章中的任何数据在节点切换后都能正常访问;“
原创文章,作者:victorli88,如若转载,请注明出处:http://www.178linux.com/73120

评论列表(1条)
原理图在哪里找的啊