

1、请描述一次完整的http请求处理过程;
1、建立或处理链接:接收请求或拒绝请求
2、接收请求:接收来自于网络的请求报文中对某资源的一次请求的过程;接收请求的方式通常是并发访问响应模型
3、处理请求:对请求报文进行解析,获取客户端请求的资源及请求方法等相关信息
4、访问资源;获取请求报文中请求的资源
5、构建响应报文
6、发送响应报文
7、记录日志
2、httpd所支持的处理模型有哪些,他们的分别使用于哪些环境。
prefork:多进程模型,每个进程响应一个请求
一个主进程:负责生成和回收子进程以处理用户请求;创建套接字;将请求派发给子进程处理
n个子进程(工作进程):每个子进程处理一个请求
工作模型:预先生成几个空闲进程,随时等待用于响应用户请求,最大空闲和最小空闲
worker:多进程多线程模型,每个线程处理用户请求
一个主进程:负责生成子进程;创建套接字,负责接收请求并将其派发给子进程处理
多个子进程:每个子进程负责生成多个线程
每个线程:负责响应用户请求
并发响应数量:子进程 * 每个子进程创建最大线程数量
event:事件驱动模型,多进程模型,每个进程响应多个请求
一个主进程:生成子进程,创建套接字,负责接收请求并将其派发给子进程处理
子进程:基于事件驱动机制直接响应多个请求
httpd 2.2:仍为测试使用模型
httpd 2.4:event 可于生产环境使用
3、源码编译安装LAMP环境(基于wordpress程序),并写出详细的安装、配置、测试过程。
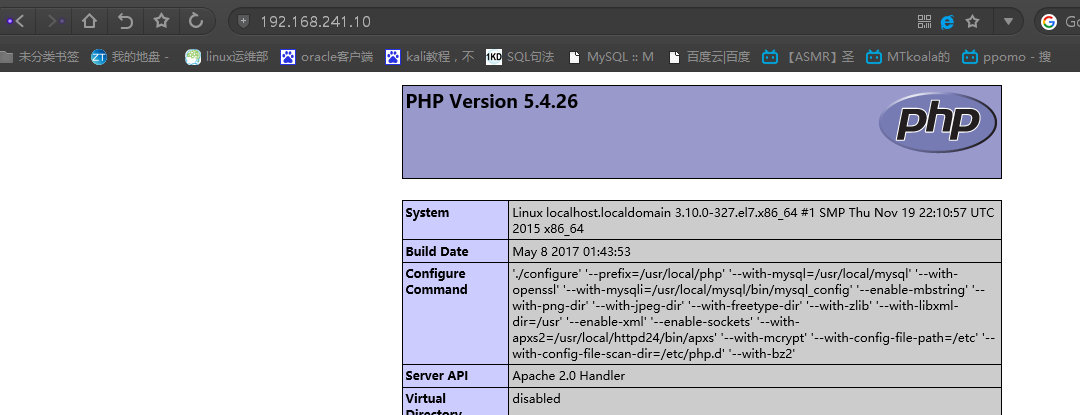
1、上传或在网上下载安装所需要的包 [root@localhost src]# ll 总用量 508592 -rw-r--r--. 1 root root 1031613 12月 6 20:24 apr-1.5.2.tar.gz -rw-r--r--. 1 root root 874044 12月 6 20:24 apr-util-1.5.4.tar.gz -rw-r--r--. 1 root root 6398218 12月 6 20:24 httpd-2.4.25.tar.bz2 -rw-r--r--. 1 root root 523321 12月 6 20:24 libmcrypt-2.5.7.tar.gz -rw-r--r--. 1 root root 478636602 12月 6 20:24 mariadb-10.1.22-linux-glibc_214-x86_64.tar.gz -rw-r--r--. 1 root root 12270535 12月 6 20:26 php-5.4.26.tar.bz2 -rw-r--r--. 1 root root 9210722 12月 6 20:24 wordpress-4.7.3-zh_CN.zip -rw-r--r--. 1 root root 146444 12月 6 20:26 xcache-3.1.0.tar.bz2 2、编译安装apr和apr-util(httpd2.4依赖1.4版本以上的apr和apr-util) [root@localhost src]# tar xf apr-1.5.2.tar.gz [root@localhost src]# cd apr-1.5.2 [root@localhost apr-1.5.2]# ./configure --prefix=/usr/local/apr [root@localhost apr-1.5.2]# make && make install [root@localhost apr-1.5.2]# cd .. [root@localhost src]# tar xf apr-util-1.5.4.tar.gz [root@localhost src]# cd apr-util-1.5.4 [root@localhost apr-util-1.5.4]# ./configure --prefix=/usr/local/apr-util --with-apr=/usr/local/apr/ [root@localhost apr-util-1.5.4]# make && make install 3、编译安装httpd软件 [root@localhost apr-util-1.5.4]# cd .. [root@localhost src]# tar xf httpd-2.4.25.tar.bz2 [root@localhost src]# cd httpd-2.4.25 [root@localhost httpd-2.4.25]# ./configure --prefix=/usr/local/httpd24 --with-apr=/usr/local/apr --with-apr-util=/usr/local/apr-util --sysconfdir=/etc/httpd24 --enable-so --enable-ssl --enable-cgi --enable-rewrite --with-pcre --with-zlib --enable-modules=most --enable-mpms-shared=all --with-mpm-prefork [root@localhost httpd-2.4.25]# make && make install [root@localhost httpd-2.4.25]# cd /usr/local/httpd24/ [root@localhost httpd24]# ln -sv /usr/local/httpd24/include/ /usr/include/httpd24 --导入编译安装的httpd头文件 [root@localhost httpd24]# vim /etc/profile.d/http24.sh --设置httpd的命令PATH变量 export PATH=/usr/local/httpd24/bin:$PATH [root@localhost httpd24]# . /etc/profile.d/http24.sh [root@localhost httpd24]# apachectl start 4、解压通用二进制的mariadb包并初始化安装 [root@localhost src]# tar xf mariadb-10.1.22-linux-glibc_214-x86_64.tar.gz -C /usr/local/ [root@localhost src]# useradd mysql [root@localhost src]# cd /usr/local/ [root@localhost local]# ln -sv mariadb-10.1.22-linux-glibc_214-x86_64 mysql [root@localhost local]# mkdir -p /data/mysqldata [root@localhost local]# chown mysql:mysql /data/mysqldata [root@localhost local]# chown root:mysql -R mysql [root@localhost mysql]# scripts/mysql_install_db --user=mysql --datadir=/data/mysqldata [root@localhost mysql]# cp support-files/my-large.cnf /etc/my.cnf [root@localhost mysql]# vim /etc/my.cnf --在[mysql]段中增加以下三项 datadir=/data/mysqldata innodb_file_per_table = ON skip_name_resolve = ON [root@localhost mysql]# vim /etc/profile.d/mysql.sh --增加mysql二进制环境变量 export PATH=/usr/local/mysql/bin:$PATH [root@localhost mysql]# ln -sv /usr/local/mysql/include /usr/include/ [root@localhost mysql]# . /etc/profile.d/mysql.sh [root@localhost mysql]# cp support-files/mysql.server /etc/init.d/mysqld [root@localhost mysql]# service mysql start [root@localhost mysql]# mysql Welcome to the MariaDB monitor. Commands end with ; or \g. Your MariaDB connection id is 5 Server version: 10.1.22-MariaDB MariaDB Server Copyright (c) 2000, 2016, Oracle, MariaDB Corporation Ab and others. Type 'help;' or '\h' for help. Type '\c' to clear the current input statement. MariaDB [(none)]> 5、解压并编译安装php-5.4.26 [root@localhost src]# tar xf php-5.4.26.tar.bz2 [root@localhost src]# cd php-5.4.26 [root@localhost php-7.1.3]# ./configure --prefix=/usr/local/php --with-mysql=/usr/local/mysql --with-openssl --with-mysqli=/usr/local/mysql/bin/mysql_config --enable-mbstring --with-png-dir --with-jpeg-dir --with-freetype-dir --with-zlib --with-libxml-dir=/usr --enable-xml --enable-sockets --with-apxs2=/usr/local/httpd24/bin/apxs --with-mcrypt --with-config-file-path=/etc --with-config-file-scan-dir=/etc/php.d --with-bz2 [root@localhost src]# make && make install [root@localhost php-7.1.3]# cp php.ini-production /etc/php.ini [root@localhost php-7.1.3]# vim /etc/httpd24/httpd.conf AddType application/x-httpd-php .php --增加两项使httpd识别支持php AddType application/x-httpd-php-source .php ... DirectoryIndex index.html index.php --添加index.php 安装完成后重新启动httpd测试 php模块 [root@localhost httpd24]# vim /usr/local/httpd24/htdocs/index.php <?php phpinfo(); ?> 访问页面httpd页面mysql数据库的连通性 [root@localhost httpd24]# vim /usr/local/httpd24/htdocs/mysql.php <?php $conn = mysql_connect('127.0.0.1','root',''); if ($conn) echo "OK"; else echo "Failure"; ?>
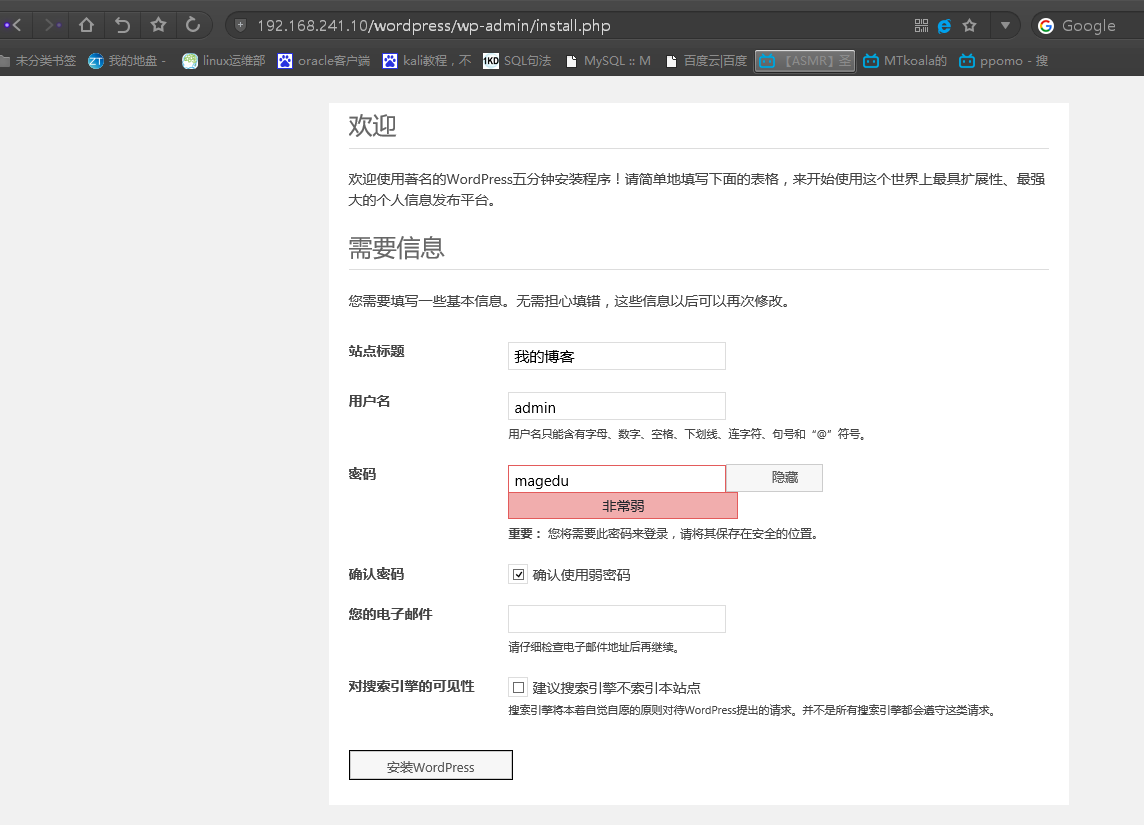
[root@localhost wordpress]# vim wp-config.php/** MySQL数据库密码 */ define('DB_PASSWORD', 'magedu'); /** MySQL主机 */ define('DB_HOST', '192.168.241.10'); /** 创建数据表时默认的文字编码 */ define('DB_CHARSET', 'utf8'); /** 数据库整理类型。如不确定请勿更改 */ define('DB_COLLATE', '');--通过页面进行安装wordpress
4、建立httpd服务器(基于编译的方式进行),要求:
提供两个基于名称的虚拟主机:
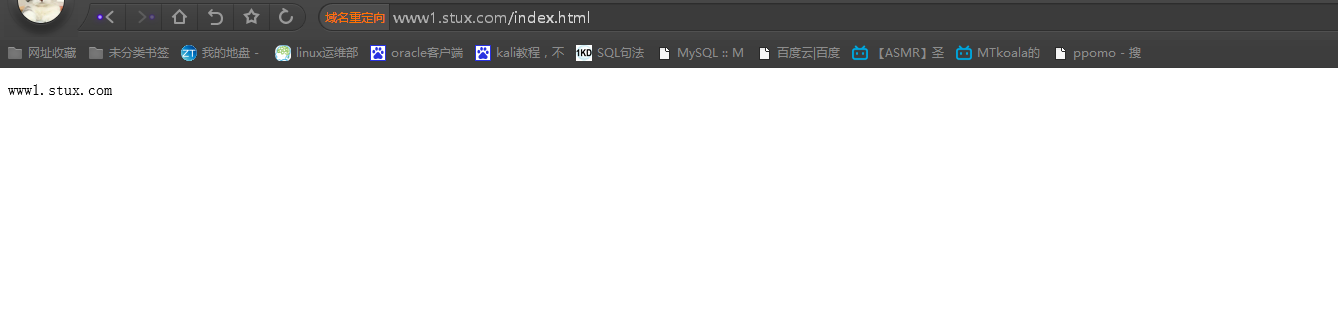
(a)www1.stuX.com,页面文件目录为/web/vhosts/www1;错误日志为/var/log/httpd/www1.err,访问日志为/var/log/httpd/www1.access;
(b)www2.stuX.com,页面文件目录为/web/vhosts/www2;错误日志为/var/log/httpd/www2.err,访问日志为/var/log/httpd/www2.access;
(c)为两个虚拟主机建立各自的主页文件index.html,内容分别为其对应的主机名;
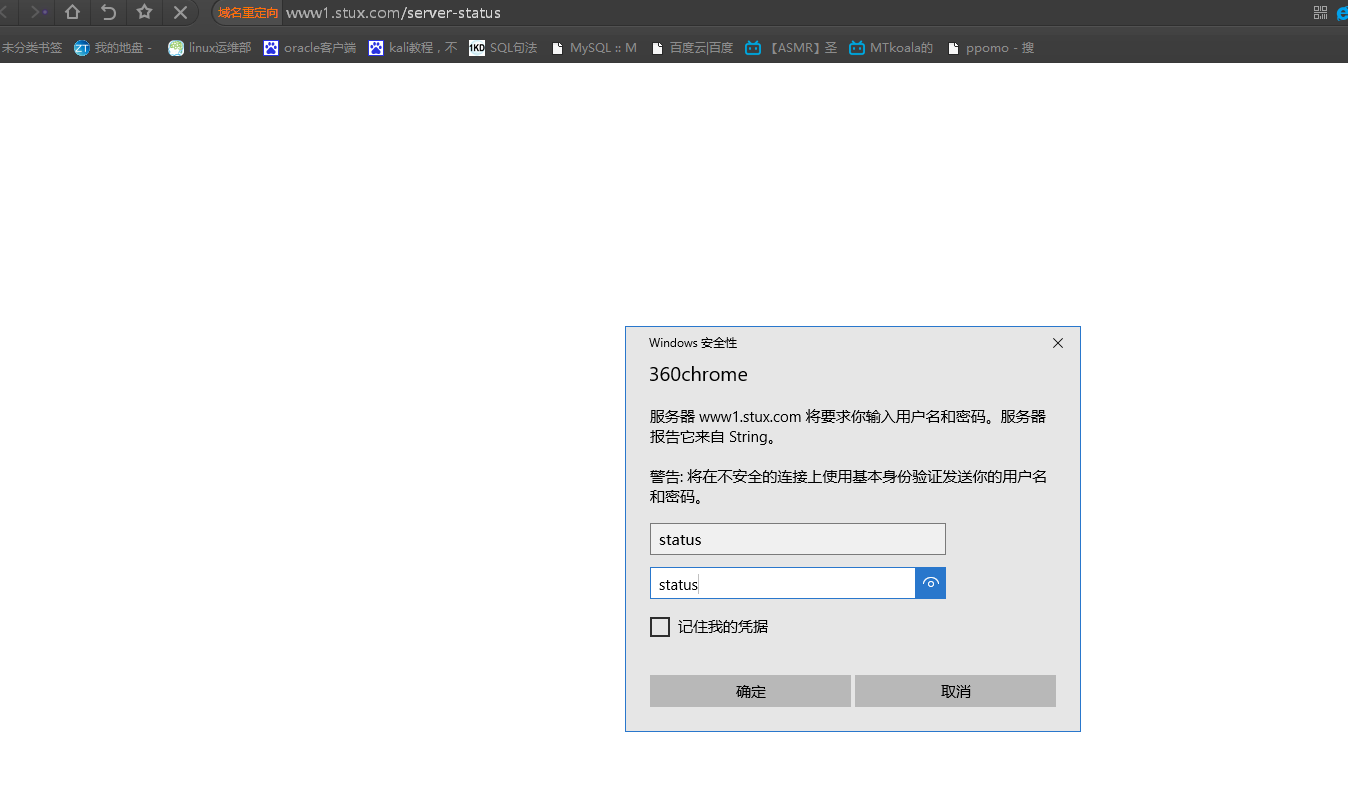
(d)通过www1.stuX.com/server-status输出httpd工作状态相关信息,且只允许提供帐号密码才能访问(status:status);
5、为第4题中的第2个虚拟主机提供https服务,使得用户可以通过https安全的访问此web站点;
(1)要求使用证书认证,证书中要求使用的国家(CN)、州(HA)、城市(ZZ)和组织(MageEdu);
(2)设置部门为Ops,主机名为www2.stuX.com,邮件为admin@stuX.com;
6、在LAMP架构中,请分别以php编译成httpd模块形式和php以fpm工作为独立守护进程的方式来支持httpd,列出详细的过程。
1、安装httpd2.4需要先安装apr apr-util
[root@localhost src]# ls
httpd-2.4.25.tar.bz2 wordpress-4.7.3-zh_CN.zip
apr-1.5.2.tar.gz mariadb-10.1.22-linux-glibc_214-x86_64.tar.gz
apr-util-1.5.4.tar.gz php-7.1.3.tar.bz2
[root@localhost src]# tar xf apr-1.5.2.tar.gz
[root@localhost src]# cd apr-1.5.2
[root@localhost apr-1.5.2]# ./configure –prefix=/usr/local/apr
[root@localhost apr-1.5.2]# make && make install
[root@localhost apr-1.5.2]# cd ..
[root@localhost src]# tar xf apr-util-1.5.4.tar.gz
[root@localhost src]# cd apr-util-1.5.4
[root@localhost apr-util-1.5.4]# ./configure –prefix=/usr/local/apr-util –with-apr=/usr/local/apr
[root@localhost apr-util-1.5.4]# make && make install
2、编译安装httpd2.4
[root@localhost src]# tar xf httpd-2.4.25.tar.bz2
[root@localhost src]# cd httpd-2.4.25
[root@localhost httpd-2.4.25]# ./configure –prefix=/usr/local/httpd24 –sysconfdir=/etc/httpd24 –enable-so –enable-ssl –enable-cgi –enable-rewrite –with-zlib –with-pcre –with-apr=/usr/local/apr –with-apr-util=/usr/local/apr-util –with-enable-modules=most –enable-mpms-shared=all –with-mpm=prefork
[root@localhost httpd-2.4.25]# make && make install
3、导出httpd24的头文件
[root@localhost httpd-2.4.25]# cd /usr/local/httpd24/
[root@localhost httpd24]# ln -sv /usr/local/httpd24/include /usr/include/httpd24
‘/usr/include/httpd24’ -> ‘/usr/local/httpd24/include’
4、添加httpd24命令路径到PATH变量
[root@localhost httpd24]# echo “export PATH=/usr/local/httpd24/bin:$PATH” > /etc/profile.d/httpd24.sh
[root@localhost httpd24]# . /etc/profile.d/httpd24.sh
5、解压并初始化maridb数据库
[root@localhost src]# cd /usr/local/src/
[root@localhost src]# tar xf mariadb-10.1.22-linux-glibc_214-x86_64.tar.gz -C /usr/local/
[root@localhost src]# cd /usr/local/
[root@localhost local]# ln -sv mariadb-10.1.22-linux-glibc_214-x86_64 mysql
[root@localhost local]# useradd -g 3306 -s /sbin/nologin mysql
[root@localhost local]# chown root:mysql -R mysql
[root@localhost local]# cd mysql
[root@localhost mysql]# scripts/mysql_install_db –user=mysql –datadir=/data/mysqldata
[root@localhost mysql]# cp support-files/my-large.cnf /etc/my.cnf
6、编辑/etc/my.cnf添加一下内容
[root@localhost mysql]# vim /etc/my.cnf
datadir = /data/mysqldata
innodb_file_per_table = ON
skip_name_resolve = ON
7、导出maridb的头文件,添加maridb命令到PATH变量
[root@localhost mysql]# echo “export PATH=/usr/local/mysql/bin:$PATH” > /etc/profile.d/mysql.sh
[root@localhost mysql]# . /etc/profile.d/mysql.sh
8、添加maridb的启动脚本并启动maridb
[root@localhost mysql]# cp support-files/mysql.server /etc/init.d/mysql
[root@localhost mysql]# service mysql start
Reloading systemd: [ OK ]
Starting mysql (via systemctl): [ OK ]
9、编译安装php以php-fpm形式
[root@localhost local]# cd /usr/local/src/
[root@localhost src]# tar xf php-7.1.3.tar.bz2
[root@localhost src]# cd php-7.1.3
[root@localhost php-7.1.3]# ./configure –prefix=/usr/local/php7 –with-pdo-mysql=/usr/local/mysql/ –with-mysqli=/usr/local/mysql/bin/mysql_config –with-openssl –enable-mbstring –with-freetype-dir –with-jpeg-dir –with-png-dir –with-zlib –with-libxml-dir=/usr –enable-xml –enable-sockets –enable-fpm –with-mcrypt –with-config-file-path=/etc –with-config-file-scan-dir=/etc/php.d –with-bz2
[root@localhost php-7.1.3]# make && make install
10、为php提供配置文件
[root@localhost php-7.1.3]# cp php.ini-production /etc/php.ini
11、添加php-fpm的启动脚本
[root@localhost php-7.1.3]# cp sapi/fpm/init.d.php-fpm /etc/init.d/php-fpm
[root@localhost php-7.1.3]# chmod +x /etc/init.d/php-fpm
12、为php-fpm提供配置文件并启动
[root@localhost php-7.1.3]# cp /usr/local/php7/etc/php-fpm.conf.default /usr/local/php7/etc/php-fpm.conf
[root@localhost php-7.1.3]# cp /usr/local/php7/etc/php-fpm.d/www.conf.default /usr/local/php7/etc/php-fpm.d/www.conf
[root@localhost php-7.1.3]# service php-fpm start
13、编辑httpd的配置文件启用fcgi模块、添加AddType让httpd能够识别php页面并支持php主页
[root@localhost php-7.1.3]# vim /etc/httpd24/httpd.conf
LoadModule proxy_module modules/mod_proxy.so
LoadModule proxy_fcgi_module modules/mod_proxy_fcgi.so
AddType application/x-httpd-php php
AddType application/x-httpd-php-source php
DirectoryIndex index.php index.html
14、编辑httpd虚拟机配置文件启用php页面转发到php-fpm
[root@localhost httpd24]# vim extra/httpd-vhosts.conf
<VirtualHost *:80>
ServerName www1.stux.com
DocumentRoot “/web/vhost/www1”
ErrorLog “/var/log/httpd/www1.err”
CustomLog “/var/log/httpd/www1.access” common
ProxyRequests Off
ProxyPassMatch ^/(.*\.php)$ fcgi://127.0.0.1:9000/web/vhost/www1/$1
<Directory /web/vhost/www1>
Options None
AllowOverride None
Require all granted
</Directory>
</VirtualHost>
<VirtualHost *:80>
ServerName www2.stux.com
DocumentRoot “/web/vhost/www2”
ErrorLog “/var/log/httpd/www2.err”
CustomLog “/var/log/httpd/www2.access” common
<Directory /web/vhost/www2>
Options None
AllowOverride None
Require all granted
</Directory>
</VirtualHost>
测试
15、www1.stux.com虚拟主机启用status页面并只开放给指定用户status:status
–确保httpd中的 status_module modules/mod_status.so 模块处于启用状态
[root@localhost httpd24]# vim httpd.conf
status_module modules/mod_status.so
–编辑www1.stux.com的配置文件增加status页面的location
[root@localhost httpd24]# vim extra/httpd-vhosts.conf
<VirtualHost *:80>
ServerName www1.stux.com
DocumentRoot “/web/vhost/www1”
ErrorLog “/var/log/httpd/www1.err”
CustomLog “/var/log/httpd/www1.access” common
ProxyRequests Off
ProxyPassMatch ^/(.*\.php)$ fcgi://127.0.0.1:9000/web/vhost/www1/$1
<Directory /web/vhost/www1>
Options None
AllowOverride None
Require all granted
</Directory>
<location /server-status>
SetHandler server-status
AuthType Basic
AuthNAMe “String”
AuthUserFile “/etc/httpd24/passwd”
Require user status
</location>
</VirtualHost>
–创建Basic认证模式的用户文件以及认证用户
[root@localhost httpd24]# htpasswd -c /etc/httpd24/passwd status
New password: –键入密码
Re-type new password: –键入密码
Adding password for user status
–创建成功
[root@localhost httpd24]# cat /etc/httpd24/passwd
status:$apr1$MaeXXvGN$LAZEvbxr351VlaKamzwsB0
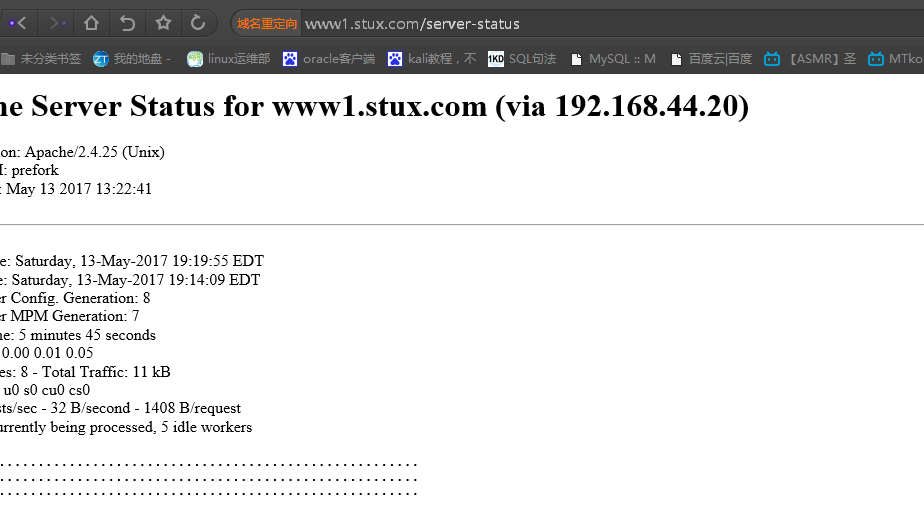
测试结果如下
16、为www2.stux.com提供https服务,https服务需要有证书,此处使用私有CA服务器进行签发证书
–构建私有CA
–生成私钥
[root@CA ~]# (umask 077;openssl genrsa -out /etc/pki/CA/private/cakey.pem 4096)
Generating RSA private key, 4096 bit long modulus
.++
……………….++
e is 65537 (0x10001)
–生成自签证书
[root@CA ~]# openssl req -new -x509 -key /etc/pki/CA/private/cakey.pem -out /etc/pki/CA/certs/cacert.pem -days 3655
You are about to be asked to enter information that will be incorporated
into your certificate request.
What you are about to enter is what is called a Distinguished Name or a DN.
There are quite a few fields but you can leave some blank
For some fields there will be a default value,
If you enter ‘.’, the field will be left blank.
—–
string is too long, it needs to be less than 2 bytes long
Country Name (2 letter code) [XX]:CN
State or Province Name (full name) []:HA
Locality Name (eg, city) [Default City]:ZZ
Organization Name (eg, company) [Default Company Ltd]:mage
Organizational Unit Name (eg, section) []:mage
Common Name (eg, your name or your server’s hostname) []:CA
Email Address []:admin.123@.com
–httpd主机生成私钥
[root@localhost httpd24]# mkdir ssl
[root@localhost httpd24]# cd ssl
[root@localhost ssl]# (umask 077;openssl genrsa -out /etc/httpd24/ssl/httpd.key 2048)
Generating RSA private key, 2048 bit long modulus
…………….+++
……….+++
e is 65537 (0x10001)
–httpd主机生成证书签署请求
[root@localhost ssl]# openssl req -new -key /etc/httpd24/ssl/httpd.key -out /etc/httpd24/ssl/httpd.csr -days 365
You are about to be asked to enter information that will be incorporated
into your certificate request.
What you are about to enter is what is called a Distinguished Name or a DN.
There are quite a few fields but you can leave some blank
For some fields there will be a default value,
If you enter ‘.’, the field will be left blank.
—–
Country Name (2 letter code) [XX]:CN
State or Province Name (full name) []:HA
Locality Name (eg, city) [Default City]:ZZ
Organization Name (eg, company) [Default Company Ltd]:MageEdu
Organizational Unit Name (eg, section) []:Ops
Common Name (eg, your name or your server’s hostname) []:www2.stux.com
Email Address []:admin@stux.com
Please enter the following ‘extra’ attributes
to be sent with your certificate request
A challenge password []:
An optional company name []:
–复制签署请求到CA主机
[root@localhost ssl]# scp httpd.csr root@192.168.44.22:/tmp
–CA主机签署请求
[root@CA ~]# openssl ca -in /tmp/httpd.csr -out /etc/pki/CA/certs/httpd.crt -days 365
Using configuration from /etc/pki/tls/openssl.cnf
Check that the request matches the signature
Signature ok
Certificate Details:
Serial Number: 1 (0x1)
Validity
Not Before: May 14 19:52:19 2017 GMT
Not After : May 14 19:52:19 2018 GMT
Subject:
countryName = CN
stateOrProvinceName = HA
organizationName = MageEdu
organizationalUnitName = Ops
commonName = www2.stux.com
emailAddress = admin@stux.com
X509v3 extensions:
X509v3 Basic Constraints:
CA:FALSE
Netscape Comment:
OpenSSL Generated Certificate
X509v3 Subject Key Identifier:
93:53:1D:0B:D0:BB:28:91:E1:5C:3C:32:1D:A9:BE:12:2B:6A:2C:FD
X509v3 Authority Key Identifier:
keyid:0F:DD:02:54:8D:ED:6D:0B:A2:00:4A:BF:B9:51:CD:5B:05:B3:F5:70
Certificate is to be certified until May 14 19:52:19 2018 GMT (365 days)
Sign the certificate? [y/n]:y
1 out of 1 certificate requests certified, commit? [y/n]y
Write out database with 1 new entries
Data Base Updated
–复制签署过的证书到httpd主机上
[root@CA ~]# scp /etc/pki/CA/certs/httpd.crt root@192.168.44.20:/etc/httpd24/ssl/
–确保mod_ssl.so启用
[root@localhost httpd24]# vim httpd.conf
LoadModule ssl_module modules/mod_ssl.so
–编辑httpd-ssl.conf配置文件后重启httpd服务
[root@localhost httpd24]# vim extra/httpd-ssl.conf
DocumentRoot “/web/vhost/www2”
ServerName www2.stux.com
SSLCertificateKeyFile “/etc/httpd24/ssl/httpd.key”
SSLCertificateFile “/etc/httpd24/ssl/httpd.crt”
–使用opessl s_client命令进行测试
–因使用的是私有ca故为避免麻烦直接使用CA主机进行测试
[root@CA ~]# openssl s_client -connect www2.stux.com:443 -CAfile /etc/pki/CA/cacert.pem
….
Verify return code: 0 (ok)
在最后一行可以看到返回值OK
原创文章,作者:胡安慧,如若转载,请注明出处:http://www.178linux.com/72956
