

实验:配置静态路由1
IP地址规划如下: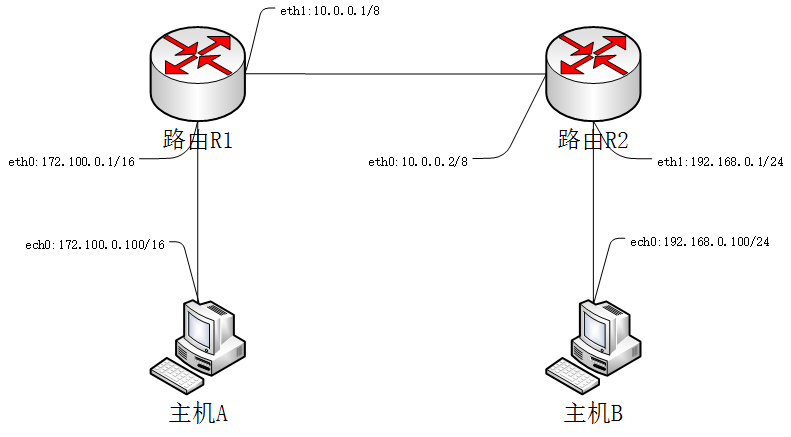

注意,环境准备:
1、MAC地址不要有冲突,如果是复制的虚拟机,对于centos6需删除网卡定义文件rm -f /etc/udev/rules.d/70-persistent-net.rules
2、清空防火墙iptables -F(查看:iptables -vnL)
3、启用IP转发功能:echo 1 > /proc/sys/net/ipv4/ip_forward
4、关闭服务:service NetworkManager stop
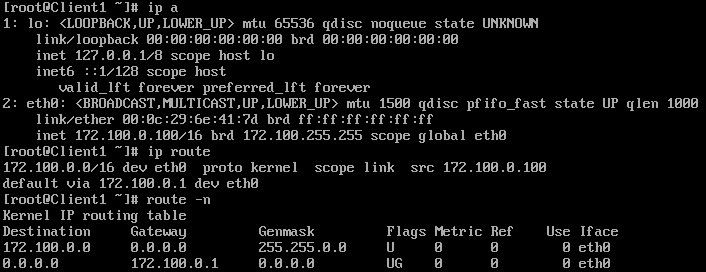
主机A:
ifconfig eth0 172.100.0.100/16 up #配置接口IP
route add default gw 172.100.0.1 #配置默认网关
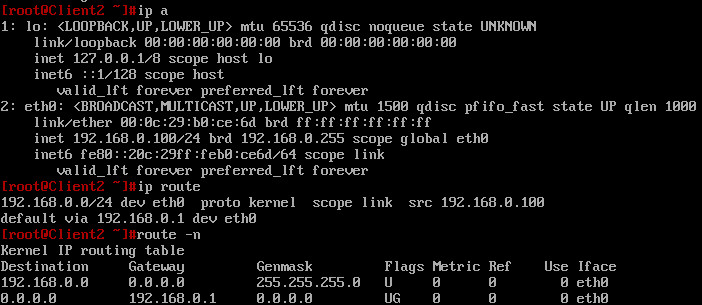
主机B:
ifconfig ens33 192.168.0.100/24 up #配置接口IP
route add default gw 192.168.0.1 #配置默认网关
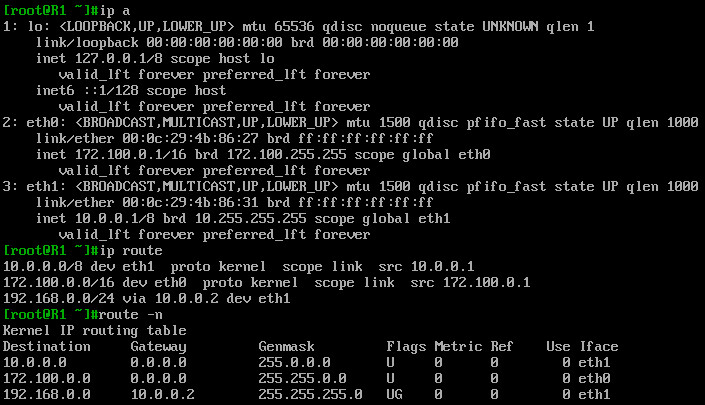
路由R1:
#配置接口IP
ifconfig eth0 172.100.0.1/16
ifconfig eth1 10.0.0.1/8
#配置路由表
route add -net 192.168.0.0/24 gw 10.0.0.2
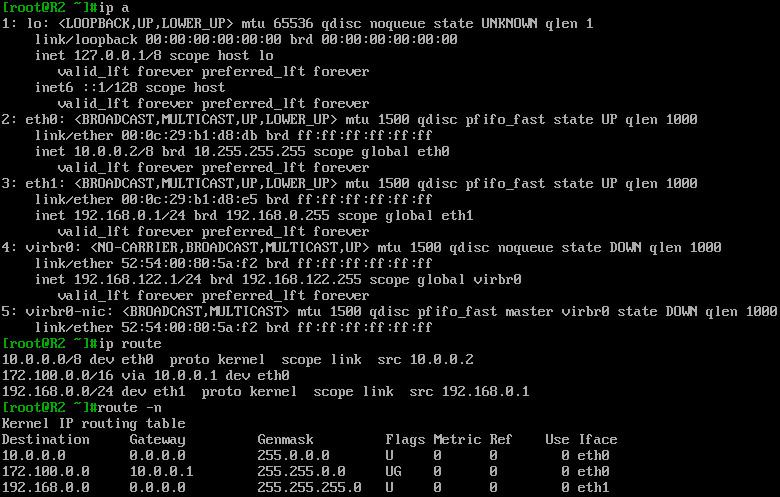
路由R2:
#配置接口IP
ifconfig eth0 192.168.0.1/24
ifconfig eth1 10.0.0.2/8
#配置路由表
route add -net 172.100.0.0/16 gw 10.0.0.1
验证:
mtr traceroute
附录:
ifconfig命令:
【ifconfig -h】
Usage:
ifconfig [-a] [-v] [-s] <interface> [[<AF>] <address>]
[add <address>[/<prefixlen>]]
[del <address>[/<prefixlen>]]
[[-]broadcast [<address>]] [[-]pointopoint [<address>]]
[netmask <address>] [dstaddr <address>] [tunnel <address>]
[outfill <NN>] [keepalive <NN>]
[hw <HW> <address>] [mtu <NN>]
[[-]trailers] [[-]arp] [[-]allmulti]
[multicast] [[-]promisc]
[mem_start <NN>] [io_addr <NN>] [irq <NN>] [media <type>]
[txqueuelen <NN>]
[[-]dynamic]
[up|down] …
<HW>=Hardware Type.
List of possible hardware types:
loop (Local Loopback) slip (Serial Line IP) cslip (VJ Serial Line IP)
slip6 (6-bit Serial Line IP) cslip6 (VJ 6-bit Serial Line IP) adaptive (Adaptive Serial Line IP)
ash (Ash) ether (Ethernet) ax25 (AMPR AX.25)
netrom (AMPR NET/ROM) rose (AMPR ROSE) tunnel (IPIP Tunnel)
ppp (Point-to-Point Protocol) hdlc ((Cisco)-HDLC) lapb (LAPB)
arcnet (ARCnet) dlci (Frame Relay DLCI) frad (Frame Relay Access Device)
sit (IPv6-in-IPv4) fddi (Fiber Distributed Data Interface) hippi (HIPPI)
irda (IrLAP) ec (Econet) x25 (generic X.25)
infiniband (InfiniBand) eui64 (Generic EUI-64)
<AF>=Address family. Default: inet
List of possible address families:
unix (UNIX Domain) inet (DARPA Internet) inet6 (IPv6)
ax25 (AMPR AX.25) netrom (AMPR NET/ROM) rose (AMPR ROSE)
ipx (Novell IPX) ddp (Appletalk DDP) ec (Econet)
ash (Ash) x25 (CCITT X.25)
示例:
# ifconfig -a
# ifconfig <interface> [up|down] 启用|禁用网卡接口,激活|停用,activate|deactivate
ifdown|ifup <interface> 启用|禁用网卡接口,其实是删除了IP,需要有ifcfg-<interface>配置文件
ifconfig <interface> [aftype] options | <address> …
# ifconfig <interface> <address>[/<prefixlen>] [up|down]
# ifconfig <interface> <address> [netmask <address>] [up|down]
注意:立即生效;
启用混杂模式:[-]promisc
查看路由命令:
route -n
netstat -nr
ip route
route命令:路由管理
【route –help】
Usage: route [-nNvee] [-FC] [<AF>] List kernel routing tables
route [-v] [-FC] {add|del|flush} … Modify routing table for AF.
route {-h|–help} [<AF>] Detailed usage syntax for specified AF.
route {-V|–version} Display version/author and exit.
-v, –verbose be verbose
-n, –numeric don’t resolve names
-e, –extend display other/more information
-F, –fib display Forwarding Information Base (default)
-C, –cache display routing cache instead of FIB
添加:route add
route [-vF] add {-host|-net} Target[/prefix] [gw Gw] [metric M]
[netmask N] [mss Mss] [window W] [irtt I]
[mod] [dyn] [reinstate] [[dev] If]
route [-vF] add {-host|-net} Target[/prefix] [metric M] reject
示例:
目标:192.168.1.3 网关:172.16.0.1
# route add -host 192.168.1.3 gw 172.16.0.1 dev eth0
目标:192.168.0.0 网关:172.16.0.1
# route add -net 192.168.0.0 netmask 255.255.255.0 gw 172.16.0.1 dev eth0
# route add -net 192.168.0.0/24 gw 172.16.0.1 dev eth0
默认路由,网关:172.16.0.1
# route add -net 0.0.0.0 netmask 0.0.0.0 gw 172.16.0.1
# route add default gw 172.16.0.1
删除:route del
route [-vF] del {-host|-net} Target[/prefix] [gw Gw] [metric M] [[dev] If]
示例:
目标:192.168.1.3 网关:172.16.0.1
# route del -host 192.168.1.3
目标:192.168.0.0 网关:172.16.0.1
# route del -net 192.168.0.0 netmask 255.255.255.0
原创文章,作者:Leion,如若转载,请注明出处:http://www.178linux.com/71834
