

一、简介
ansible是新出现的自动化运维工具,基于Python开发,集合了众多运维工具(puppet、cfengine、chef、func、fabric)的优点,实现了批量系统配置、批量程序部署、批量运行命令等功能。
ansible是基于模块工作的,本身没有批量部署的能力。真正具有批量部署的是ansible所运行的模块,ansible只是提供一种框架。
主要特点:
-
模块化,调用特定的模块,完成特定的任务,基于Python语言实现,易于扩展;
-
部署简单,agentless,无需客户端安装软件,服务端通过连接插件connection plugins和被监控端实现通信;
-
playbook:可以让节点调用角色模板一次性运行多个任务快速部署基础环境。
-
ansible所执行的操作主要是定义管理者所期望的对象状态,多次执行命令的结果具有幂等性
幂等性原本是数学上的概念,即使公式:f(x)=f(f(x)) 能够成立的数学性质。用在编程领域,则意为
对同一个系统,使用同样的条件,一次请求和重复的多次请求对系统资源的影响是一致的。
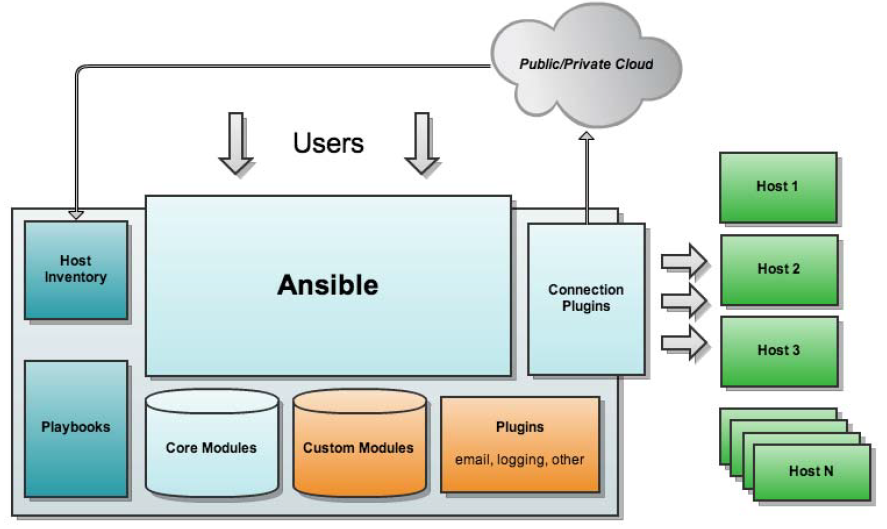
ansible架构图

二、常用模块介绍
ansible-doc 命令用于获取ansible相关帮助页面,-l是查看可用模块,-s可显示指定模块说明。
ansible的命令行执行格式如下:
ansible <host-pattern> [-f forks] (host分批) -m module_name -a args
-
command:执行命令无须为key=value格式,而是直接给出要执行的命令即可。
注意,command为默认调用模块可以不使用-m指定。
-
示例1:
[root@ansible-manager ~]# ansible directors -a “ifconfig”192.168.7.151 | SUCCESS | rc=0 >>ens33: flags=4163<UP,BROADCAST,RUNNING,MULTICAST> mtu 1500 inet 192.168.7.151 netmask 255.255.255.0 broadcast 192.168.7.255 ………
-
示例2:chdir选项可指定命令运行的目录
[root@ansible-manager ~]# ansible directors -a “chdir=/var ls”192.168.7.151 | SUCCESS | rc=0 >>
……….
-
示例3:command模块并不能理解执行 花括号命令行展开,管道符传递等特殊命令形式
[root@ansible-manager ~]# ansible directors -a “ifconfig |grep ens33”192.168.7.152 | FAILED | rc=255 >>SIOCSIFADDR: No such device
……….
-
示例4: 上例的问题可用shell模块解决
[root@ansible-manager ~]# ansible directors -m shell -a “ifconfig |grep ens33” 192.168.7.151 | SUCCESS | rc=0 >>ens33: flags=4163<UP,BROADCAST,RUNNING,MULTICAST> mtu 1500
………
-
-
user -a ‘name= state={present|absent} system= uid=’
-
示例:
[root@ansible-manager ~]# ansible directors -m user -a “name=wind state=present password=abc321”192.168.7.152 | SUCCESS => { “changed”: true, “comment”: “”, #用户的描述信息 “createhome”: true, “group”: 1000, “home”: “/home/wind”, “name”: “wind”, “password”: “NOT_LOGGING_PASSWORD”, “shell”: “/bin/bash”, “state”: “present”, “system”: false, #非系统用户 “uid”: 1000}
到客户机上验证结果:
[root@client2 ~]# id winduid=1000(wind) gid=1000(wind) groups=1000(wind)
-
-
cron -a ‘name= minute= hour= day= month= weekday= job= user= state=’
-
示例:
[root@ansible-manager ~]# ansible all -m cron -a “name=ntptime minute=*/3 job=’/usr/sbin/ntpdate 192.168.7.138 &>/dev/null ‘”192.168.7.152 | SUCCESS => { “changed”: true, “envs”: [], “jobs”: [ “ntptime” ]}
注意:
-
默认的state就是present,删除的时候可以仅指定name和state=absent.
-
job=’character string’ job的内容必须加单引号,否则报错.
-
任务计划能否成功创建并不受客户机是否有相关命令影响,没有安装ntpdate命令也可以成功创建.
-
-
-
copy -a ‘dest= src= mode= owner= group=’
-
示例: src参数不带绝对路径的话默认是复制当前目录下的指定文件,支持相对路径。
-
[root@ansible-manager ~]# ansible directors -m copy -a “src=repo.tar dest=/root”
192.168.7.151 | SUCCESS => {
-
[root@ansible-manager ~]# ansible directors -m copy -a “src=../home/wind/1.txt dest=/root/2.txt”192.168.7.151 | SUCCESS => {
-
-
注意:如果src以“/”结尾则仅复制目录中的内容,不以此结尾就是复制目录及其中内容src不是必选项因为可以用content直接生成目标文件的内容(可生成空文件)。
-
-
yum -a ‘name= state={present|latest|absent}’
-
示例:
ansible directors -m yum -a “name=ntpdate”
192.168.7.151 | SUCCESS => {
“changed”: true,
-
-
fetch 从远程主机取回文件到本地,
-
示例:
[root@ansible-manager ~]# ansible 192.168.7.151 -m fetch -a “src=/root/2.txt dest=remotefile”
命令运行后在本地直接生成了remotefile目录,而且将远程主机上的绝对路径也复制到了本地指定目录的远程主机名目录之下。即./remotefile/REMOTE_HOST/REMOTE_PATH
-
如果不需要此种多级目录结构,可使用flat选项,其帮助文件说明如下:
flat: # If dest ends with ‘/’, it will use the basename of the source file, similar to the copy module. Obviously this is only handy if the filenames are unique.
-
ansible 192.168.7.152 -m fetch -a “src=/root/2.txt src=/root/3.txt flat=yes dest=test/”
[root@ansible-manager ~]# ls test/2.txt 3.txt
使用此选项并不会生成多级目录,但是显然这个选项不适合从多主机上拉取文件的情况。
会造成多主机重复写入同一文件。
如果在多个远程主机的拉取文件时使用了flat选项,执行命令后,则会轮流覆盖写入拉回本地的文件,执行结果多个主机依次变为黄色changed。
原因是,依照hosts文件中定义的主机上下顺序,依次对比远程主机文件与ansiblemanager本地文件的校验值,如果发生改变则覆盖,执行结果黄色;校验值同的主机显示为绿色状态未变更。
此种执行方式仅为兴趣探究,实际中并无意义,从多个主机取回文件必然是不希望互相覆盖的。
-
-
注意:
-
src必须指向远程主机上的文件,不可以是目录。可以指定多个src
-
使用flat=yes选项时,适合拉取单台主机文件的情况,降低目录复杂性。
-
-
-
file -a ‘path= mode= owner= group= state={directory|link|present|absent} src=’
-
示例:
[root@ansible-manager ~]# ansible directors -m file -a “path=/root/a.txt src=/root/2.txt state=link”192.168.7.152 | SUCCESS => { “changed”: true, “dest”: “/root/a.txt”, “gid”: 0, “group”: “root”, “mode”: “0777”, “owner”: “root”, “size”: 11, “src”: “/root/2.txt”, “state”: “link”, “uid”: 0}
-
state选项说明:
If ‘directory’, all immediate subdirectories will be created if they do not exist, since 1.7 they will be created with the supplied permissions.
If ‘file’, the file will NOT be created if it does not exist, see the [copy] or [template] module if you want that behavior.
If ‘link’, the symbolic link will be created or changed. Use ‘hard’ for hardlinks.
If ‘absent’, directories will be recursively deleted, and files or symlinks will be unlinked. Note that ‘absent’ will not cause ‘file’ to fail if the ‘path’ does not exist as the state did not change.
If ‘touch’ (new in 1.4), an empty file will be created if the ‘path’ does not exist, while an existing file or directory will receive updated file access and modification times (similar to the way ‘touch’ works from the command line).
-
如果是directionary,1.7版本后, path指定的目录都将依据提供的权限设置递归创建。
-
如果是file,path指定的文件如果原来不存在, 那么也不会被创建。如果需要新建一个文件请使用copy或template模块,或者使用touch参数(创建空文件)。
-
如果是link,符号链接将被创建或更改。使用hard选项创建 hardlinks(也就是说默认软连接)。
-
如果是absent, 目录将被递归地删除, 文件或符号链接将被取消链接。请注意, path不存在时不会导致file执行失败,因为命令会返回状态未改变的结果。
-
如果是touch, (1.4新增参数), 如果path不存在, 则会创建一个空文件, 而如果path是现有或目录时将更新文件access和modifycation时间 (类似命令行下执行touch命令)。
-
-
-
ping 没有参数,仅测试是否可以ping通
-
示例:
[root@ansible-manager ~]# ansible directors -m ping 192.168.7.151 | SUCCESS => { “changed”: false, “ping”: “pong”}192.168.7.152 | UNREACHABLE! => { “changed”: false, “msg”: “Failed to connect to the host via ssh: ssh: connect to host 192.168.7.152 port 22: Connection timed out\r\n”, “unreachable”: true}
-
-
service -a ‘name= state={started|stopped|restarted} enabled=’
-
示例:
[root@ansible-manager ~]# ansible directors -m service -a “name=httpd state=restarted”192.168.7.151 | SUCCESS => {
…….会显示很长的详细状态信息
-
三、playbook
Playbooks 是 Ansible的配置,部署,编排语言。是一种希望远程主机执行所需命令的方案,或者一组IT程序运行的命令集合.
(一)Playbook的核心元素:
-
tasks: 任务
任务列表
-
variables: 变量
ansible有内置变量与自定义变量,变量定义可以在命令行,主机清单,角色目录下的变量目录等多处进行。
-
templates: 模板
主要用于服务的配置文件的参数传递至被控主机
-
handlers: 触发调用任务
适用于如配置文件变更时触发重启/重载等任务。需要tasks任务列表中使用notify调用。
-
roles: 角色
通过对以上元素的整合,达成一整套的服务自动配置的目的。有固定的目录组织形式,各元素分别定义。在playbook中通过对host安排角色进行调用。
具体的每个元素不再详述,可以参考ansible中文手册,下面以实例来演示。
(二)使用roles部署keepalived一主一备实例
-
创建目录
[root@ansible-manager ansible]# mkdir -p roles/keepalived/{tasks,handlers,meta,templates,vars,files}
[root@ansible-manager ansible]# tree roles/
roles/
└── keepalived
├── files
├── handlers
├── meta
├── tasks
├── templates
└── vars
7 directories, 0 files
tasks⽬录:存放task列表。若role要⽣效,此⽬录必须要有⼀个主task⽂件main.yml,在main.yml中可以使⽤include包含同⽬录(即tasks)中的其他⽂件。handlers⽬录:存放handlers的⽬录,若要⽣效,则⽂件必须名为main.yml⽂件。files⽬录:在task中执⾏copy或script模块时,如果使⽤的是相对路径,则会到此⽬录中寻找对应的⽂件。templates⽬录:在task中执⾏template模块时,如果使⽤的是相对路径,则会到此⽬录中寻找对应的模块⽂件。vars⽬录:定义专属于该role的变量,如果要有var⽂件,则必须为main.yml⽂件。defaults⽬录:定义⾓⾊默认变量,⾓⾊默认变量的优先级最低,会被任意其他层次的同名变量覆盖。如果要有var⽂件,则必须为main.yml⽂件。meta⽬录:⽤于定义⾓⾊依赖(dependencies),如果要有⾓⾊依赖关系,则⽂件必须为main.yml。
以上引自博客园——骏马金龙的ansible教程。
-
各目录具体配置
-
tasks
-
main.yml
- name: yum install keepalived
  yum: name=keepalived state=present
  when: ansible_distribution_major_version == '7' #无实际意义的条件判断仅测试下when语句
- name: copy script
  copy: src=notify.sh dest=/etc/keepalived
- name: copy conf
  template: src=keepalived.conf.j2 dest=/etc/keepalived/keepalived.conf
  notify: restart keepalived
- name: start keepalived
  systemd: name=keepalived state=started
- name: show vip
  shell: /usr/sbin/ip addr show |grep {{ vip  }}
-
-
handlers
-
main.yml
- name: restart keepalived
  systemd: name=keepalived state=restarted
-
-
templates
-
keepalived.conf.j2
! Configuration File for keepalived global_defs { notification_email { root@localhost } notification_email_from keepalived@localhost smtp_server 127.0.0.1 smtp_connect_timeout 30 router_id {{ ansible_hostname }} #引用内置变量 vrrp_mcast_group1 224.0.0.33 vrrp_skip_check_adv_addr vrrp_strict vrrp_garp_interval 0 vrrp_gna_interval 0 } vrrp_instance vip1 { state {{ keepalived_state }} #主机清单定义变量 interface {{ ansible_default_ipv4.interface }} #引用内置变量的子参数需以VAR.XX的形式 virtual_router_id 51 priority {{ pri }} #主机清单定义变量 advert_int 1 authentication { auth_type PASS auth_pass 1111 } virtual_ipaddress { {{ vip }} #自定义变量 } notify_master "/etc/keepalived/notify.sh master" notify_backup "/etc/keepalived/notify.sh backup" notify_fault "/etc/keepalived/notify.sh fault" }
-
-
files
-
notify.sh
#仅通知本机root用户做测试 contact='root@localhost' notify() { local mailsubject="$(hostname) to be $1, vip floating" local mailbody="$(date +'%F %T'): vrrp transition, $(hostname) changed to be $1" echo "$mailbody" | mail -s "$mailsubject" $contact } case $1 in master) notify master ;; backup) notify backup ;; fault) notify fault ;; *) echo "Usage: $(basename $0) {master|backup|fault}" exit 1 ;; esac
-
-
vars
-
main.yml
vip: 192.168.7.120 #必须是字典形式
-
-
roles所在目录定义hosts以及playbook
-
hosts
[directors]
192.168.7.151 keepalived_state=MASTER pri=99
192.168.7.152 keepalived_state=SLAVE pri=90
-
keepalived.yml
- hosts: directors
  roles:
    - keepalived
-
-
本文来自投稿,不代表Linux运维部落立场,如若转载,请注明出处:http://www.178linux.com/104663
