

本节索引
一、缓存基本概念
二、Varnish缓存服务介绍
实验:实现varinish缓存
三、Varnish状态引擎
示例:判定curl类型的请求拒绝访问
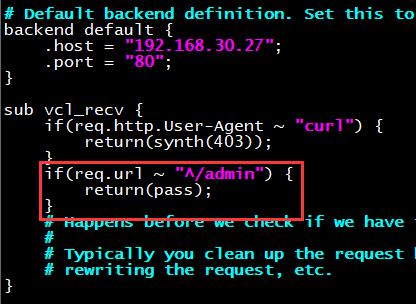
示例:判定admin相关的请求拒绝访问
示例:强制对某类资源请求不检查缓存
四、Varnish缓存修剪
五、Varnish负载均衡
六、后端服务器健康性状态检查
一、缓存基本概念
缓存是指把对某些请求的结果缓存下来,下次请求直接使用数据响应,这样极大的节省了系统获取源数据
资源的时间,若我们把大量的请求结果都使用缓存服务器来响应,那么我们可以大大减少计算机数量减少
成本。
数据缓存:从后端关系系数据库加载到应用服务器进行缓存,存在于数据库与服务器之间,一般是缓存
SELECT语句。常用有:redis,memcached
页面缓存:对静态内容进行缓存,存在于调度器与WEB服务器之间,通常只是缓存GET,HEAD方法的请
求。常用有:squid-cache,varinish-cache
缓存命中:hit,多次查询能够在缓存中找到对应项
衡量缓存命中率有两种标准:
字节命中率
请求命中率
一般来说,当缓存命中率30%以上能够带来正向作用
代理式缓存:页面缓存一般都是代理式缓存,要成为代理式缓存,首先它是台代理服务器
旁挂式缓存:数据缓存一般都是旁挂式缓存
页面缓存
squid-cache:历史悠久页面缓存系统,类似于Apache与Nginx的关系
varinish-cache:轻量级页面缓存系统,但稳定性不如squid-cache
基于页面过期时间的缓存机制(早期):
当客户端发起请求时,先到缓存服务器中查找有无对应的缓存,如果没有则将请求发送到后端服务器,后‘’
端服务器发送响应报文并附带过期时间(expires)
存在问题:
(1)当后端数据发送变化时,缓存变为旧内容
(2)当缓存服务器中数据过期时,有可能还会收到相同的客户端请求
根据条件式验证的缓存机制:
存在问题:
粒度大,1秒,可能会出现缓存查询一致,其实内容已发生变化,得到过期内容
解决方法:
添加一个标签Etag,将标签与查询结果一起返回
http 1.1时代:过期时间+条件式验证组合使用
缓存预热:通过自己下载一些网络请求来访问缓存服务器以达到最佳状态
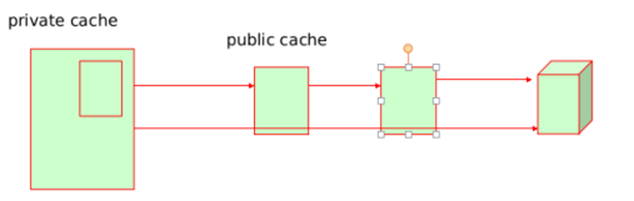
private cache:私有缓存,如浏览器缓存
public cache:公共缓存,可能不止一级,如CDN,页面缓存系统
一般公有缓存+私有缓存应该能到达90%的缓存命中率

CDN:Ccontent Delivery Network内容分发系统
距离判定
链路状态;判定
二、Varnish缓存服务介绍
epel源提供,支持三类缓存:
内存缓存:malloc,重启后所有缓存项失效;
磁盘缓存:file,黑盒,重启后所有缓存项失效;
持久缓存:persistent(实验阶段),黑盒,重启后所有缓存项有效
默认监听端口:6081,6082(管理端口)
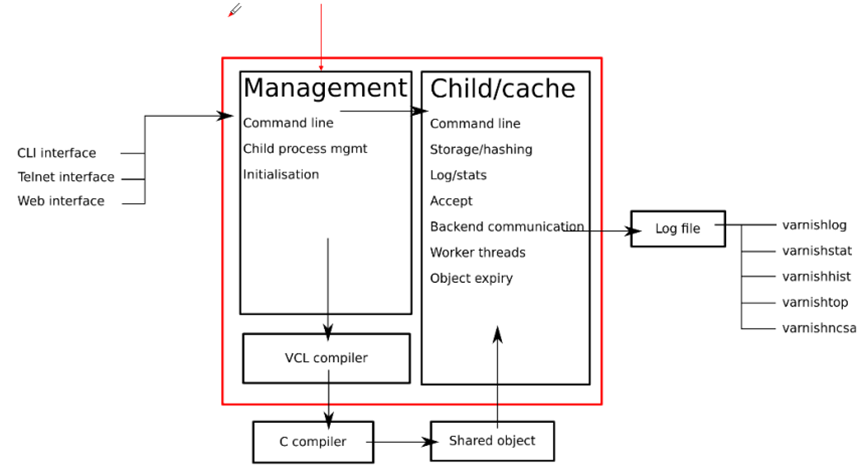
Varinish官方架构图
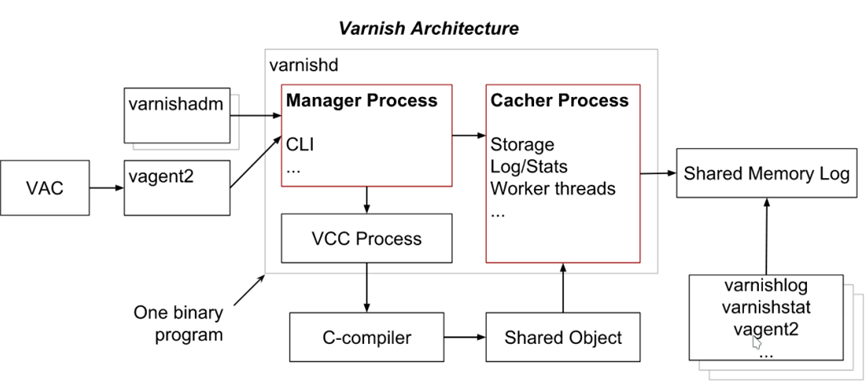
varnish主要包含三个部分:
management:提供管理接口,并控制缓存进程的特性
child/cache:提供缓存功能,记录日志,访问控制,后端服务器管理
vcl:给child/cache提供配置文件的编译
Varinishd服务配置:
/etc/varnish/varnish.params: 配置varnish服务进程的工作特性,例如监听的地址和端口,缓存机制;
/etc/varnish/default.vcl:配置各Child/Cache线程的工作属性;
主程序:
/usr/sbin/varnishd
CLI interface:
/usr/bin/varnishadm
Shared Memory Log交互工具:
/usr/bin/varnishhist
/usr/bin/varnishlog
/usr/bin/varnishncsa
/usr/bin/varnishstat
/usr/bin/varnishtop
测试工具程序:
/usr/bin/varnishtest
VCL配置文件重载程序:
/usr/sbin/varnish_reload_vcl
Systemd Unit File:
/usr/lib/systemd/system/varnish.service #varnish服务
/usr/lib/systemd/system/varnishlog.service #logger daemon
/usr/lib/systemd/system/varnishncsa.service #lgger daemon in apache format
实验:实现varnishd缓存基本功能
前期准备:
虚拟机2台
varinishd服务器:192.168.30.10 系统版本:CentOS 7.4
node1:192.168.30.27 系统版本:CentOS 7.4
varinish:
yum install varnish
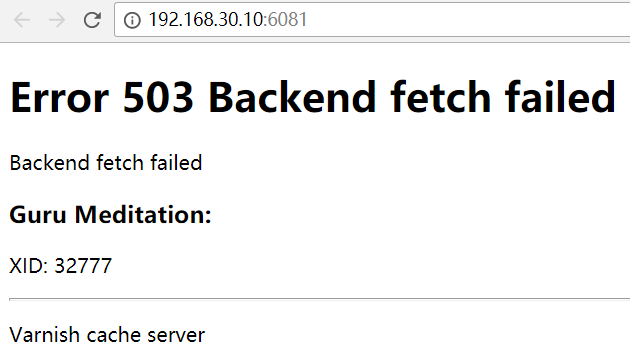
systemctl start varnishd
此时访问varnish的6081端口,显示连接后端失败
配置varnish:
vim /etc/varnish/default.vcl

varnish_reload acl
node1:
开启WEB服务
echo backend Server node1 > /var/www/html/index.html
此时再次访问192.168.30.10:6081,基本的varnish缓存功能就实现了

三、VCL语言与状态引擎
相关概念:
”域“专有类型的配置语言;
state engine:状态引擎;
VCL有多个状态引擎,状态之间存在相关性,但状态引擎彼此间互相隔离;每个状态引擎可使用return(x)
指明关联至哪个下一级引擎;每个状态引擎对应于vcl文件中的一个配置段,即为subroutine
vcl_hash –> return(hit) –> vcl_hit
varnish状态引擎类型:
varnish 4.0:
vcl_init
vcl_recv
vcl_hash
vcl_hit
vcl_pass
vcl_miss
vcl_pipe
vcl_waiting
vcl_purge
vcl_deliver
vcl_synth
vcl_fini
vcl_backend_fetch
vcl_backend_response
vcl_backend_error

vcl_recv的默认配置:
sub vcl_recv {
if (req.method == “PRI”) {
/* We do not support SPDY or HTTP/2.0 */
return (synth(405));
}
if (req.method != “GET” &&
req.method != “HEAD” &&
req.method != “PUT” &&
req.method != “POST” &&
req.method != “TRACE” &&
req.method != “OPTIONS” &&
req.method != “DELETE”) {
/* Non-RFC2616 or CONNECT which is weird. */
return (pipe);
}
if (req.method != “GET” && req.method != “HEAD”) {
/* We only deal with GET and HEAD by default */
return (pass);
}
if (req.http.Authorization || req.http.Cookie) {
/* Not cacheable by default */
return (pass);
}
return (hash);
}
}
Client Side:
vcl_recv, vcl_pass, vcl_hit, vcl_miss, vcl_pipe, vcl_purge, vcl_synth, vcl_deliver
vcl_recv:
hash:vcl_hash
pass: vcl_pass
pipe: vcl_pipe
synth: vcl_synth
purge: vcl_hash –> vcl_purge
vcl_hash:
lookup:
hit: vcl_hit
miss: vcl_miss
pass, hit_for_pass: vcl_pass
purge: vcl_purge
Backend Side:
vcl_backend_fetch, vcl_backend_response, vcl_backend_error
两个特殊的引擎:
vcl_init:在处理任何请求之前要执行的vcl代码:主要用于初始化VMODs;
vcl_fini:所有的请求都已经结束,在vcl配置被丢弃时调用;主要用于清理VMODs;
格式:
(1) VCL files start with vcl 4.0;
(2) //, # and /* foo */ for comments;
(3) Subroutines are declared with the sub keyword; 例如sub vcl_recv { …};
(4) No loops, state-limited variables(受限于引擎的内建变量);
(5) Terminating statements with a keyword for next action as argument of the return() function, i.e.: return(action);用于实现状态引擎转换;
(6) Domain-specific;
Finite State Machine
(1) Each request is processed separately;
(2) Each request is independent from others at any given time;
(3) States are related, but isolated;
(4) return(action); exits one state and instructs Varnish to proceed to the next state;
(5) Built-in VCL code is always present and appended below your own VCL;
语法:
sub subroutine {
…
}
if CONDITION {
…
} else {
…
}
return(), hash_data()
t-in Functions and Keywords
函数:
regsub(str, regex, sub)
regsuball(str, regex, sub)
ban(boolean expression)
hash_data(input)
synthetic(str)
Keywords:
call subroutine, return(action),new,set,unset
操作符:
==, !=, ~, >, >=, <, <=
逻辑操作符:&&, ||, !
变量赋值:=
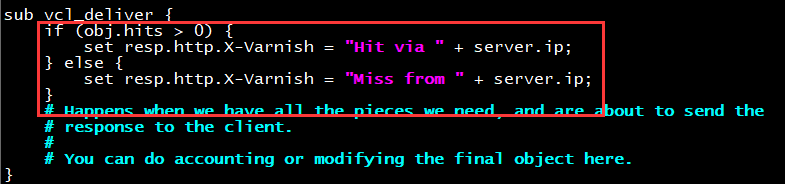
示例1:obj.hits是内建变量,用于保存某缓存项的从缓存中命中的次数;
if (obj.hits>0) {
set resp.http.X-Cache = “HIT via” + ” ” + server.ip;
} else {
set resp.http.X-Cache = “MISS from ” + server.ip;
}
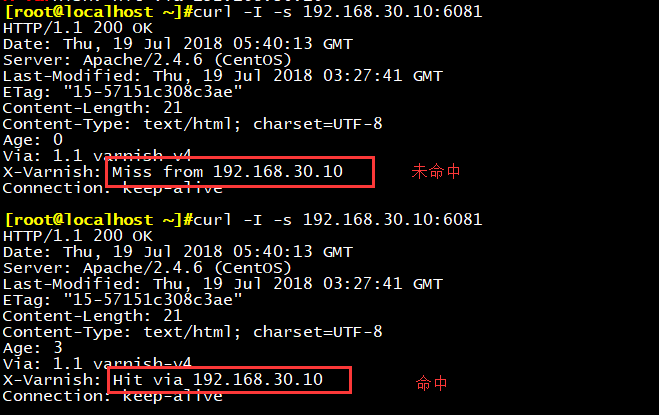
vim /etc/varnish/default.vcl
使用curl -I -s http:url 可以判断是否缓存命中
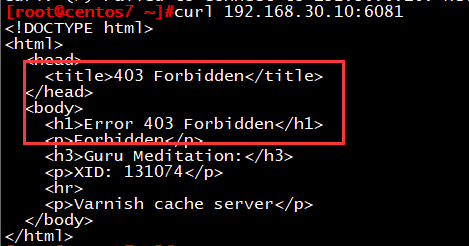
示例2:判定curl类型的请求拒绝访问
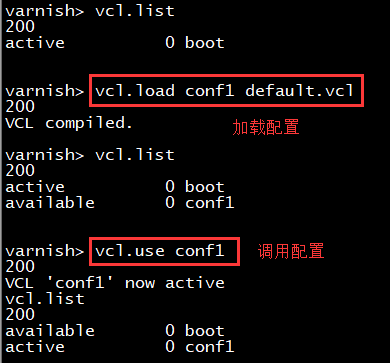
修改配置文件
vim /etc/varnish/default.vcl

调用配置文件
varnishadm -S /etc/varnish/secret -T 127.0.0.1:6082
切换到另外一台主机进行curl测试:
返回403错误状态码
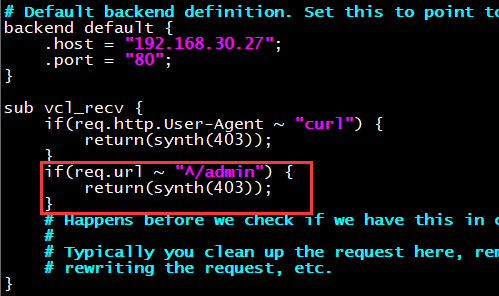
示例3:判定admin相关的请求拒绝访问
node1:
创建一个名称为admin访问目录:
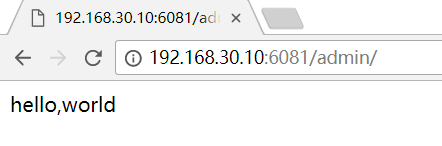
echo hello,world > /var/www/html/admin/index.html
systemctl reload httpd
正常访问返回如下:
修改配置文件:
vim /etc/varnish/default.vcl
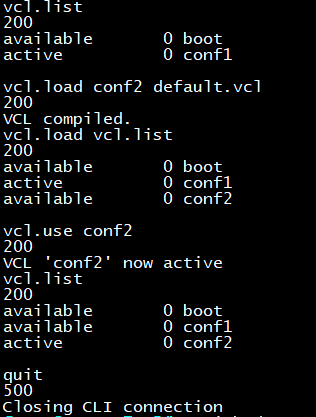
调用配置文件
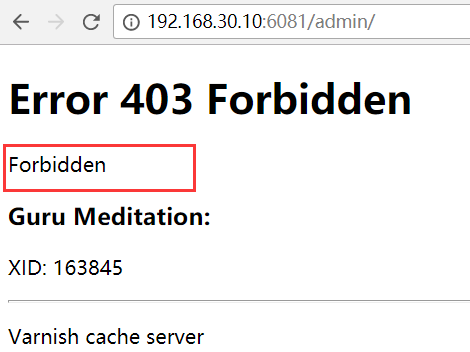
再次访问http://192.168.30.10:6081/admin/
示例4:强制对某类资源请求不检查缓存
示例5:对于特定类型的资源,例如公开的图片等,取消其私有标识,并强行设定其可以由varnish缓存的时长; 定义在vcl_backend_response中;
语法格式:
if (beresp.http.cache-control !~ “s-maxage”) {
if (bereq.url ~ “(?i)\.(jpg|jpeg|png|gif|css|js)$”) {
unset beresp.http.Set-Cookie;
set beresp.ttl = 3600s;
}
}
四、Varnish缓存修剪
缓存对象的修剪有两种:
purge:指定删除某条url的缓存
ban:指定删除某类url的缓存
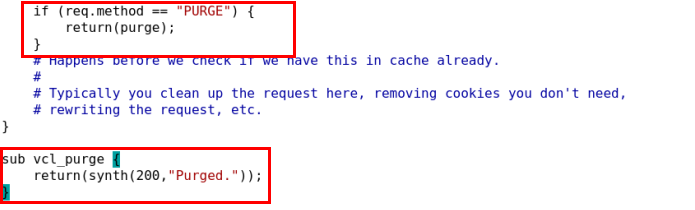
配置purge操作:
(1) 能执行purge操作
sub vcl_purge {
return (synth(200,”Purged”));
}
(2) 何时执行purge操作
sub vcl_recv {
if (req.method == “PURGE”) {
return(purge);
}
…
}
添加此类请求的访问控制法则:
acl purgers {
“127.0.0.0”/8;
“10.1.0.0”/16;
}
sub vcl_recv {
if (req.method == “PURGE”) {
if (!client.ip ~ purgers) {
return(synth(405,”Purging not allowed for ” + client.ip));
}
return(purge);
}
…
}
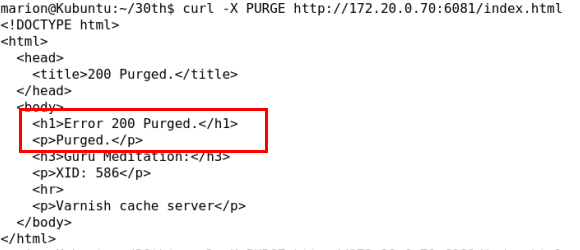
示例:
修改配置:
缓存修剪测试:
如果担心缓存修剪被其他人操作,也可添加ACL的访问控制
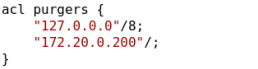
当使用不再ACL范围内的主机进行访问时,返回结果如下:
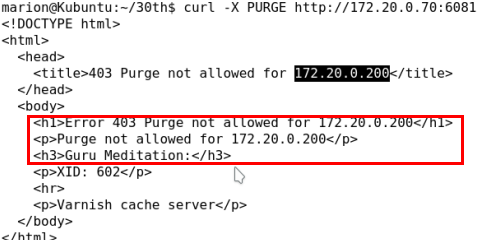
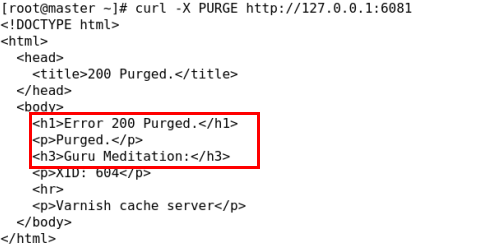
而在ACL定义范围内的主机则可正常使用PURGE修剪缓存
配置Banning操作:
(1) varnishadm:
ban <field> <operator> <arg>
示例:
ban req.url ~ (?i)^/javascripts
(2) 在配置文件中定义,使用ban()函数;
示例:
if (req.method == “BAN”) {
ban(“req.http.host == ” + req.http.host + ” && req.url == ” + req.url);
# Throw a synthetic page so the request won’t go to the backend.
return(synth(200, “Ban added”));
}
curl -X BAN http://www.ilinux.io/test1.html
ban req.http.host==www.ilinux.io && req.url==/test1.html
五、Varnish负载均衡
如何设定使用多个后端主机:
backend default {
.host = “172.16.100.6”;
.port = “80”;
}
backend appsrv {
.host = “172.16.100.7”;
.port = “80”;
}
sub vcl_recv {
if (req.url ~ “(?i)\.php$”) {
set req.backend_hint = appsrv;
} else {
set req.backend_hint = default;
}
…
}
nginx: proxy_pass
haproxy: use_backend
实验:实现varnish的负载均衡
前期准备:
Varnish服务器:192.168.30.10 系统版本:CentOS 7.4
node1:192.168.30.27 系统版本:CentOS 7.4
node2:192.168.30.16 系统版本:CentOS 7.4
客户端:192.168.30.18 系统版本:CentOS 7.4
具体步骤:
修改配置文件:
vim /etc/varnish/default.vcl

node1:
创建javascripts的web目录,并创建文件test1-test6,内容分别也为test1-test6
node2:
创建javascripts的web目录,并创建文件test1-test6,内容分别为node1-node6
客户端进行测试访问:
可看到轮询算法调度已生效,当第二次进行访问时,均缓存命中
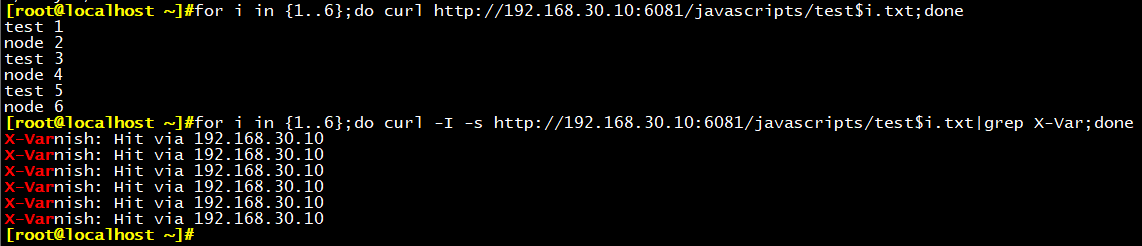
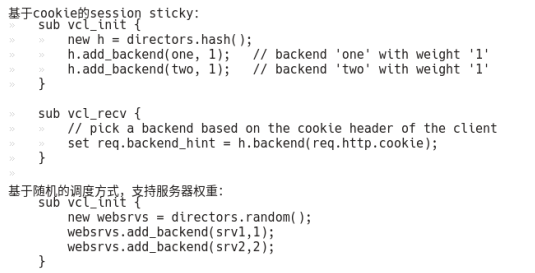
也可实现基于cookie的会话粘性,及随机性算法调度方式
配置格式如下:
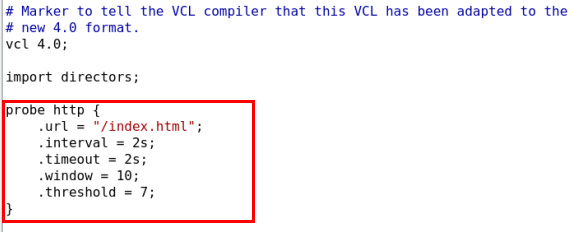
六、后端服务器健康性状态检查
.probe:定义健康状态检测方法;
.url:检测时要请求的URL,默认为”/”;
.request:发出的具体请求;
.request =
“GET /.healthtest.html HTTP/1.1”
“Host: www.magedu.com”
“Connection: close”
.window:基于最近的多少次检查来判断其健康状态;
.threshold:最近.window中定义的这么次检查中至有.threshhold定义的次数是成功的;
.interval:检测频度;
.timeout:超时时长;
.expected_response:期望的响应码,默认为200;
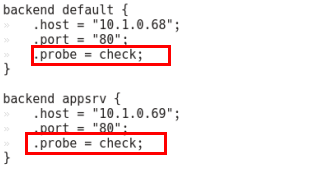
健康状态检测的配置方式:
(1) probe PB_NAME { }
backend NAME = {
.probe = PB_NAME;
…
}
(2) backend NAME {
.probe = {
…
}
}
设置后端的主机属性:
backend BE_NAME {
…
.connect_timeout = 0.5s;
.first_byte_timeout = 20s;
.between_bytes_timeout = 5s;
.max_connections = 50;
}
示例:
查看后端服务器健康性状态:
varnishadm -S /etc/varnish/secret -T 127.0.0.1:6082
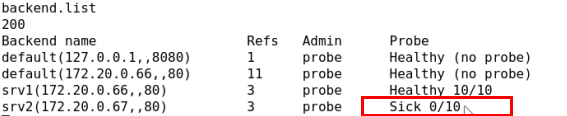
手动设定BE主机的状态:
sick:管理down;
healthy:管理up;
auto:probe auto;
本文来自投稿,不代表Linux运维部落立场,如若转载,请注明出处:http://www.178linux.com/103189
